Intro
The most recent version, 11.5.0.476 includes the new Assets Panel which I presented in this post.
You are able to use Quick Start projects, or slides taken from those projects to avoid having to design and to work out interactions for your project from scratch. Those projects/slides are available in a responsive (Fluid Boxes) and non-responsive version. I tested it out for a tutorial which you can watch using this link (it is a responsive fluid boxes project):
If this topic, also related with 11.5, seems interesting, I will post a more detailed description in the near future. But today you'll get some tips from what I learned creating this tutorial.
QSP tips
- Open the project, and delete or hide the slides you don’t want to use in your course.
- Open a non-responsive or a Fluid boxes project, and insert slides from the Assets panel.
I used the second approach for the tutorial, for a logical reason: I didn’t use even half of the provided slides in the Aspire project. Project has only 17 slides, including a lot of duplicate instances of slides. I used these slides from Aspire:
- Welcome layout
- Timeline Interaction 02
- Main Menu layout 02
- Subtopic Header layout (used 6 instances)
- Tab Interaction 01 (used 3 instances)
- Related Content Interaction (used 3 instances)
- 3 Column layout
- Exit Layout
Tip 1 Duplicate slides
- Insert one instance of the needed slide
- Go into the Filmstrip, slide will be active (surrounded by a blue rectangle)
- Duplicate that slide, either with the right-click menu or with the universal shortcut for duplicate: CTRL-D.
- Move the slide by dragging in the filmstrip to the wanted location.
You can repeat this workflow as many times as needed. Due to Captivate’s smart labeling, the advanced actions will not corrupt in most situations. Why not always? See next tip.
Tip 2: Check Navigation commands
In a slide like the Main Menu Layout, the topic buttons point to another slides in the total project. On insertion of that slide only, without the target slides, all commands will revert to the default navigation command ‘Go to Next Slide’. You have to replace it by ‘Jump to….’ while indicating the correct target slide (in the project the slides of the Subheader Topic layout). This will prove easier if you use the next tip:
Tip 3: Rename slides
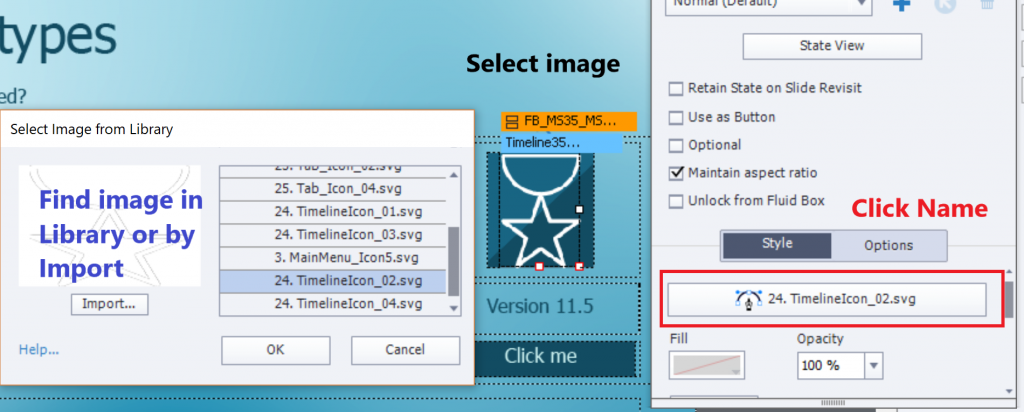
Tip 4: Replace image
- Select the image.
- Click on its name in the Properties panel
- Choose another image from the Library dropdown list, or use the Import button to find it on your system.

However, on many slides an image is used as Fill for a Fluid Box. Look at the Subtopic Header slides (there are 6 in the example): having the image as fill allows to add an image on top of the fluid box. Normally you cannot stack two images, this is a useful solution for that limitations.
If you want to replace the fill for a Fluid box, you need to select that fluid box, you cannot just click the image. After selecting the FB you see that the fill is set to Image, click the second Fill button, use the Browse icon to find an image to replace the image. Be careful to check the Position properties if the new image doesn’t have exactly the same size as the original one.