Multiple Failure messages (Quiz) in Captivate Classic

Intro

This blog post is meant as an answer to a question on the Adobe forum; You can see the full thread under this link.

You'll see that the title is different 'Is it possible to highlight the correct answer option?' The situation:

  • It is about Multiple Choice questions with one correct answer. Problem with a MCQ with multiple correct answers is that Captivate considers the answer to be correct even if it is partially correct. Hence that limitation.
  • Question has 3 attempts.
  • If the learner fails all attempts, the OP wants the correct answer to be highlighted.

Why did I choose a different title here? I proposed the possibility to have 3 different Failure messages (officially labeled as captions, although by default CP uses shapes) as an alternative needing less work.

As usual I create an short project (output see below) to test. In the test I included both possibilities: using a different failure message for each attempt, and highlighting the correct answer after the last attempt if it was a failure again.

Example project

This project has only two MCQ slides, with one correct answer. You'll be able to see the three failure messages, different for e

ach attempt. The arrangement the messages is not the same for both slides. When the second step (click on slide or Y) is done the correct answer will be highlighted. It is a non-responsive project. Review is possible although the learner got already immediate feedback:


Step-by-step

Workflow: use 3 Failure messages

  1. Set up the Quiz Properties like this; this setup doesn't include the appearance of a highlight (see below in the second part). In that case the Last Attempt needs an advanced or a shared action instead of 'Continue'. As usual I dragged the pausing point on each quiz slide from the default 1.5 secs closer to the end of the sldie.
  2. Due to the choice for 3 failure messages (which is the maximum), two extra failure messages will have been added on the slide. It is not a fixed location, depends on the theme. The two extra messages (2 and 3) will often be stacked.  This means you need to move the top one (3) to see message 2. To detect the message number, hover over the message. In this screenshot I hovered over the second message, after dragging the third one down because it was covering the second:
  3. Edit the messages and rearrange them, you can stack them again (as I did on the second question) or mirror the set up of the first quiz slide:

Workflow: highlighting

  1. Create the highlight shape over the correct answer. Remember: all custom shapes are stacked below the embedded quiz objects. To make it visible you have to make sure that the 'answer area' is at least partially transparent:
    In this case the answer area had a fill color, but at 60% alpha. The yellow shape behind it will blend, you'll have to look for a proper color combination.

  2. A consequence of the stacking of the highlight shape under the answer area: it is difficult to select that highlight area on the stage. Make sure to open the Timeline where selection is easier. You need to select the highlight an set it to invisible in output in its Properties panel:


  3. You need to create an advanced or shared action, to be triggered by the Last Attempt event of the question slide (Quiz Properties). This is the advanced action,  the marked items will be parameters if you convert to a shared action (recommended). Of course you can choose another Entrance effect (I used FadedZoomIn):


  4. For the shared action, which I recommend since you may want to reuse this action on multiple slides in this project and later projects, I indicated the parameters in the screenshot of the advanced action, and here is the parameter description. The highlight box will not always be in the same location, hence that parameter. It is not possible to have the highlight appear at the same time as the third failure message. That message appears with the first step of the Submit process, whereas the action to show the highlight is triggered by the Last Attempt action, which is with the second step of that process.

Q&A

You may have more questions, but I expect these to pop up. 

  1. Can this also be done in a Fluid Boxes (responsive project in Captivate Classic)?
    1. Yes, you can also have up to 3 Failure messages. The two extra messages will probably be inserted outside of the static fluid box which has all the other messages. I recommend to rearrange after editing, and have them all stacked in that fluid box.
    2. The highlight is not possible because you cannot stack a shape in the same location as an individual answer, and those answers are embedded objects which means that they have no ID and cannot have states which could be used to change the color of the correct answer.

  2. Can this workflow be done in New Captivate (12.2)?
    Not at this moment for several reasons:
    1. There is no possibility to choose more than 1 failure message. That message is a state in a multistate object, to which you can not add custom states. But even if that possibility existed, you cannot address the multistate object since it has no ID.
    2. You cannot add a highlight shape to the correct answer. You cannot add states to the individual answers, and even if that was possible, same problem arises: that multistate object would not have an ID, so you cannot change its state.


Get rid of Quiz Feedback messages In New Captivate 12.2

Intro

Multiple users asked me how to get rid of the default Success/Failure messages on quiz slides in the New Captivate version. Especially now that it is possible to have the correct answers hidden during Review, I understand this question. Depending on the situation, you do not always want an immediate feedback after each question.

The two-step Submit process which I have described multiple times on my blog remains the same as in previous versions:

  1. Learner clicks the Submit button, a Success/Last Attempt message appears. That message warns to click the slide or press Y to continue
  2. Learner presses Y or clicks the slide and the pause is released, the specified actions on Success, Last attempt will be done.

That situation is for a question slide with one attempt. If there are multiple attempts in case of Failure a Retry message will appear.

All messages in the new version are now in one multistate object. It replaces the individual messages which were in a static fluid box in the previous versions for a responsive project. 

It is impossible to delete that multistate object, there is no option to get rid of all the messages like was possible in previous versions by the setup in this screenshot:

Consequence of such an edit was that the first step of the Submit process automatically was deleted: no pausing after Submit, no need for the warning for the second step. I didn't succeed to achieve this in the New version, which means that you need to warn the learner to click another time. I have tried many workflows without success: changing the label of the Submit button to 'Continue' is only one of my failed attempts. 

Example output

It is a short quiz with 5 questions. I added an audio clip to the first quiz slide to warn about the extra click. All questions have only one attempt, and there is also one attempt on Quiz level. Review (without seeing correct answers) is possible from the Score slide. I did hide the review messages on that slide as well and added an extra slide (with exit button) after it. Like in previous versions it is still a recommendation not to have the score slide as last slide. You can watch the example below (fixed resolution) or the responsive version by clicking this link. Know that the loading time can be long for this version.

Workflow 1 - all quiz slides

This workflow can be used if you do not want any Success/Failure message. In that case it is important to change the settings before inserting the question slides! It cannot be applied to existing question slides.

Step 1: Default labels

  • Open Quiz Preferences, from the Preferences (Edit menu for Windows, Captivate menu for Mac).
  • Go to Default labels
  • Delete the text for the labels you want to hide. In this example I deleted the Success and Last Attempt message:

Step 2: System colors

You are aware of the fact that this version has no longer object styles. Each of the states in the multistate object with the feedback messages has a solid color at 100% Alpha in the default Themes. Color management has not improved, it is guessing which colors have been used. For the Success message it is the Success System color, and for the Failure message it is the Error System color. I didn't spend (waste) time trying to find by trial and error where those colors were used in other situations, but changed the Alpha for those colors to 0% which makes them transparent.

Result of those two steps: you'll not see a Success or a Last Attempt message, but still have to click the slide to proceed. If you have multiple attempts on quiz level, the Retry message will still appear because you didn't edit that message nor the fill of the box. Same for the message when learner clicks the Submit button without choosing an answer.

Workflow 2 - individual quiz slides

This workflow can be used when you don't want to hide the feedback messages for all question slides, or when you want to hide them on existing  slides.

Step 1: Text color

You cannot delete the text in a state, only edit it to create a custom feedback. You can however change the color of the text. So I changed that color to the background color of the question slide. This screenshot is taken on the Score slide, for the state 'Success' of the Review message. You need to do this for all states with messages you want to hide.

Step 2: Fill colors

This is similar to step 2 in the first workflow. For the states to hide set the Alpha of the Fill color to 0%. In the screenshot of Step 1 of this workflow, you see that this has already been done for the Success state of that area. In the last screenshot of Workflow 1 you have seen where you find the Alpha setting in the Color management dialog box.

Help?

I would be very happy if another expert could find a way to:

  • Style the Back/Next Review buttons the same way as all the other quiz buttons. I really miss the object styles. You cannot use Copy/Paste Appearance on buttons of the quiz/score slide. You cannot apply a new style to all the other objects with same type/style as in previous versions.
  • Avoid the second step of the Submit Process.µ
  • Avoid the weird state change of the images on the T//F questions. I know that you cannot disable the Hover state really, but I changed that state to look exactly like the Normal state. Nevertheless that original Hover state appears after submitting the answer.
  • Getting rid of the dimming or text and state change during Review. Light grey on white background is not very comfortable for people with weak eyes.


New Captivate 12 and AI/ChatGPT/Copilot

Intro

Whenever possible I use AI when I expect to save time. Not being a native English speaker, and maintaining a blog where I often publish live examples of Captivate’s output, it helps me designing text-based content for those examples while providing some keywords. In Photoshop and Illustrator I always have been enjoying the AI-based workflows. I love Adobe Express for features like creating a speaking avatar based on written text, and Firefly for graphics.

Warning

More recently everyone has heard about ChatGPT, and is using one or more engines to find more elaborate answers to questions than is possible with old Google.

I often chat with Copilot in Edge. I write this short post to express a warning. I have tried out other engines based on ChatGPT but I like the fact that the answers here offer the URLs of the used resources. Although you may have to offer specifications to get the answer you want, some chatting will provide what you want …. EXCEPT in case of a drastic makeover like what happens with the change from previous Captivate Classic to the present New Captivate, now in version 12.2. In many cases you’ll get a wrong answer because the resource database available world wide for this new version is very small. Copilot will often find only support resources for previous versions and will base answers on them. If you don’t see the URLs to check, this is very confusing and misleading. Here are two examples I checked out for this blog post. I mentioned explicitly the version number as context in the question.  I post the examples in the sequence I used. As expected (look at the second answer) the agent being AI it learned from its first big error.  

Questions

Question 1: Does Adobe Captivate version 12 have text to speech?

This is a screenshot of the first answer. But this is the completely outdated answer you would have gotten:

Of course I knew that this feature was not available at all. There are not even Slide Notes, and NeoSpeech died.

The used resources were all official: Adobe Captivate forum, eLearning community and the official Help documentation. 

After some re-education (my bad…) through chat a more appropriate answer was given.  I asked than for another question and learned that the re-education was not adequate.

Question Two: How to use Bookmarks in Captivate 12.2?

I have been posting blog posts about this topic, so it would clarify how up to date Copilot's database is. FYI: my blog is amongst their resources. Just try to ask anything about the now lost Shared Actions in former versions.

Answer below probably due to my 're-education'?:

Copilot still apologizes for the first wrong answer, but apparently is still confused about the version numbers and now tells me that this is another missing feature. Whereas I already posted three blog posts explicitly about Bookmarks in New Captivate (one is waiting for moderation here as well since weeks).  So, I continued the re-education, sent two URLs for two posts. Result is still bit annoying, because there are still some links to the official documents about older versions where bookmarks as frame navigation are limited to video slides only:

This happened after my detailed explanation about the changes with bookmarks from Captivate Classic to New Captivate. Only then a full search has seemed to happen.

Conclusion

Careful with answers from ChatGPT about software problems, especially with a new version like Captivate. When I was a student, I always preferred professors who did freely tell not to be able to answer immediately, but would be looking it up. ChatGPT too often proclaims to know an answer to every question, which is clearly not the case.

What is your opinion?

Static Bookmarks in New Captivate

Intro

This is a second post about bookmarks in New and Classic Captivate. I hope you have read the introduction, where I explain the terminology and show a Captivate tutorial with examples of static and dynamic bookmarks:

Intro to Bookmarking

New Captivate - version 12 - has only static bookmarks, but they are available on all content slides, with the exception of question and score slides. Captivate Classic has static bookmarks only on slides with slide video. However using micro-navigation (based on available system variables) you can mimick bookmarks on all slides, and also create dynamic bookmarks. Dynamic bookmarks are created on runtime and not available in New Captivate.

In this first part of bookmarking, I treat the topic from its original view: to navigate within a project on the level of frames.

New Captivate also has the possibility to use Bookmarks as events to trigger an (inter)action. That is an improvement over Captivate Classic which has only the Delay command to mimick that behavior. Again, this is limited to static bookmarks. I will publish some examples of bookmark-triggers in a second part.

Example in New Captivate

Scenario

After the title slide you’ll see:

  1. A list of explanations of the Steps. Appearance of each step is controlled by the user with a Continue button This slide uses bookmarks for that reason, but the original idea to use those bookmarks as navigation target from the last slide did not work. I am waiting on an answer from the team, logged a bug. Their use as event trigger has been used, but will be explained in a later blog.
  2. A video slide (slide video). On top you’ll find three buttons which allow to jump to bookmarks within the same slide. One of the buttons is the Replay button.

Example project

Play


Workflow step-by-step

Bug warning

When you open a project which has a slide video slide where the video duration is longer than the default 3 seconds duration of the video placeholder, the time ruler will disappear and be replaced by an emoticon:

Luckily it is easy to solve, just move the zoom slider and the time ruler will reappear:

Step 1: Create bookmarks

If you know the exact time for the bookmark, you can move the play head near that time. For a video I recommend to use the Play button to get the exact timing. Pause/play using the space bar as toggle is still possible, but not always in a consistent way.

Click the bookmark bar to insert a bookmark which looks like a black diamond. I strongly recommend to replace the generative name by a custom one which will make it easier to find the target bookmarks. Just double-click the proposed name and edit it. In this screenshot you see a bookmark near the start of the slide, which will be used to create a Replay button:

Beware: it can happen that while editing the name that the focus switches from the Properties to the Interactions. In that panel it looks like you forgot to define an interaction for the bookmark. This is a bit confusing because it looks like 'missing'. However a bookmark used as target for micro-navigation doesn't need an interaction. The interaction panel shows all the bookmarks on a slide (bookmarks belong to the group of Slide events) with their timing.

It is possible to move a bookmark by dragging. You can delete a bookmark using the right-click menu.


Step 2: navigation buttons

On top of the video slide I added 3 buttons (it is the maximum in New Captivate within one interactive component). The button functions as trigger for the action 'Jump to bookmark xxxx'. Here is an example screenshot for Button 'Second':

The Replay button will get back to a bookmark at the start of the slide:

The Steps slide with the explanations has 5 bookmarks:

As you could read in the scenario, I meant to have 'Jump to Bookmark' as target bookmark from the video slide. But at this moment that is not working. The jump is replaced buy Go to Previous slide.  I hope this will be fixed soon.

You may wonder why there is a fifth bookmark at the end?  Its action is 'Go to Next Slide' to mimick the smooth transition to the next slide which was typical for all previous versions. Using the On Exit slide event is not working. I am not the only user to have found this workaround. Personallty I never have liked the PPT-like presentation playbar.

The other 4 bookmarks are using the frame event to trigger an interaction. In this first part I restrict to the bookmarks in their original meaning: as navigation targets.        

Comparison New/Classic

Advantage of New Captivate: you can use bookmarks on all content slides except quiz slides. 

For Classic Captivate bookmarks are limited to slides with Slide video.  For other slides you need 'micro-navigation'. Next blog post will explain the workaround by replacing the same scenario. I may provide the shared actions to mimick the bookmark navigation on non-video slides.


Bookmarking in Captivate (Classic and New) - Introduction

Intro

One of the new features in Charm (new version 12) release is the possibility to have bookmarks on any content slide. In Captivate Classic you bookmarks are only available on a slide with slide video (to create an interactive video.

What do you expect from a bookmark in its original meaning? Looking this up in multiple dictionaries, two possible meanings appear everywhere:

  1. A strip of leather, cardboard, or other material used to mark one's place in a book. It has a digital version in ebooks as well. In the digital world you'll find this has also become..
  2. A saved shortcut that directs your browser to a specific webpage.

I planned to summarize my experiences with bookmarking fo navigation purposes in one blog post.  However, after weeks of exploring, I realize this would lead to a short booklet instead of a short article, hence the decision to split the content up in multiple articles. Main purpose is to compare and explain the present differences between the new (Charm) version 12 and Classic Captivate.

This introduction will explain the terminology. A Captivate tutorial, demonstrating the terminology is inserted. This tutorial was created in version 11.5.5.553. Explanation of workflows both for New and Classic Captivate will follow in next articles.

Example

You can watch this 8-slide tutorial using this link (to be preferred) for a scalable version, or watch the embedded static version. Please turn on your audio, there is narration. Slide 7 is a long video slide, taken from one of the presentation in an online Adobe conference. Be patient, the Next button if you want to skip appears after 30secs.


Terminology

When you watch the example output below, you'll see that I see two types of bookmarks for navigation: static and dynamic. My choice of adjectives refers to what is used for text fields as well: static text doesn't include variables and when publishing the content is defined and will not be changed on runtime. Dynamic text fields, as you see on the score/results slide in a project with scored objects and/or question slides, need to be rendered on runtime, because they contain variables for which the value will be defined based on actions by the learner.

Static bookmark: is linked to a fixed frame on a fixed slide. Examples: start of an important part in an interactive video. It is a bit similar to what you can have in a Table of Content, but on frame instead of slide level. Have a look at this interactive video, where the menu uses static bookmarks to allow you to access them easily:

Custom Play/Pause button

Static bookmarks can also link to non-video slides, and are not limited to navigation within the same slide. That is valid both for version 12 (New) and Captivate Classic. However, due to the absence of bookmarks in Captivate Classic, you need to use Micro-navigation. If you want an intro to this type of navigation to frames, have a look at:

Intro to Micro-navigation

Dynamic bookmark: the frame for the bookmark can be chosen by the learner, and will allow to return to that frame if wanted. This is the closest digital equivalent to putting a real bookmark in a book after a reading session. The bookmark is created on runtime, reason why I use the adjective "dynamic", referring to the difference between static text and dynamic text. At this moment dynamic bookmarks can only be created in Captivate Classic, not in the New version 12.

Play/Pause Button extended (Classic Captivate)

Intro

This blog post is due to a forum question. For a custom Play/Pause button the developer tried the workflow from this post. However there was a second request: the learner was expected to click an interactive object to proceed to the next slide. The original conditional action for the Play/Pause button results in a conflict: if the learner clicks that button multiple times, the Play action can override the pausing point of the interactive object meant to pause the slide indefinitely until the learner clicks it to proceed to the next slide. If you want to learn more details, please check out this thread.

My promise: a workflow, taking into account that it should be possible to use it on multiple slides. You can test it out in the Example project. Maybe some of you could be in the same situation, hence this blog post. It is based on deep understanding of Captivate's Timeline, micro-navigation, power of shared actions and objects timed for the rest of the project. 

If you are wondering: this workflow is impossible in the new version 12 for multiple reasons.

Example project

Please test this project, either by watching it using this link for a scalable version, or the static resolution version embedded below. After the introductury slides you'll find two slides with the Play/Pause button. Test them by clicking that button multiple times and watch what happens when you reach the end of the slide: the button will change its state but the play head will remain paused until you click the

 Next button.   I used some design elements/slides from the non-

responsive Quick Start Project 'League'.


Background

The basic conditional action for the custom Play/Pause button, which is timed for the rest of the project to start with is:

I used the simple commands Pause and Continue, which have exactly the same result as assigning values to cpCmndPause/cpCmndResume. Toggling those variables alhough they are Booleans, is not possible (sorry). I preferred the 'Go to Next State' for the PlayPause button. This is the object state panel of the button, this command is toggling between the two states.

Due to the timing of the button for the rest of the project, it has always the same ID and the advanced conditional action has nothing which changes when being on another slide. Problem is that when the button is clicked to the Play state on the pausing point of the Next button, the Continue command will override the pausing by this button. To solve this we need to know 'where' that pausing point is, and add a new decision to the conditional action, where Pause occurs in that situation even when the learner clicks to play again.

If you have an instance of the Next button on each slide, to time it near the end of the slide, its pausing point will be at a different frame on each slide. In the example project, to simplify, I timed the Next button for the rest of the project and took out its Pausing behavior. But I added a click box on each slide, pausing at the end of the slide. The click box is invisible (no feedback messages) to the learner. 

I need to define on which frame the slide has to pause indefinitely. In order to keep the Play/Pause button action independently from that frame, I have to store it in a user variable. The value of that user variable will be defined using the On Enter slide event. 

Step-by-step workflow

Variables

System variables

The used system variables are:

  • cpCmndPause: has value 1 when slide is paused, value 0 when it is not paused.
  • cpInfoCurrentFrame: frame number of the present frame, index starts with 0; frame number is over the project not the slide.
  • cpInfoFPS: number of frames per second; default value is 30 but can be changed.

User variables

Two user variables will be used but since they both appear in a Shared action, they'll be defined when you send this shared action to a new project:

  • v_start: will store the frame number of the first frame of the slide
  • v_end: will store the frame number of the frame where you want to pause indefinitely; it will be near the end of the slide, but it doesn't need to be the last frame.

Events and actions

You'll see an overview of the actions on the two slides where the Play/Pause button is important in the Advanced Interaction panel::

PlayPauseAct (advanced action)

This action is triggered by the Success event of the Play/Pause button:
The second decision is simple: The play head will always be paused when the frame number is higher than the on in v_end. Due to the sequence of the decisions, the state change for the button will occur, but Continue will be overridden if the second condition is fulfilled.

EnterAct (shared action)

This Shared action is triggered by the On Enter event of each slide, has 3 parameters:
The first parameter is the one who will be different on each slide. In the screenshot it is set at 18 seconds. It means that once the playhead reaches the frame at 18 seconds it will be paused by the second decision in the PlayPauseAct. Since frame numbers are on project level, the first frame of the slide is used as reference. The Expression commands are needed to perform some math operation to calculate the exact frame number. This literal depends on the Timeline. Have a look at the Timeline of slide 4
For this slide the first parameter was set at 45 seconds:
For slide 5 this was the Timeline:
In this case the first parameter was set at 9 seconds.

On the last slide (6) I used the On Enter event to hide the Play/Pause and the Next button since they were no longer needed. 


Classic Captivate vs 'Charm' test case (responsive project).

Intro

The 'All New Captivate', version 12 has been released just over a month ago.

It lives along Captivate Classic because it has not all the features which are expected in a full-blown authoring tool. Main limitation is that you can only create responsive projects. As a long-time user of Captivate I know that this implicates a lot of prohibited workflows which are possible in a non-responsive project.

To test the differences in workflow and possible bugs/lacking features I want to recreate a responsive project in the new version. The project which you'll be able to see here, was created with Fluid Boxes and based on a Quick Start Project 'Rhapsody' for the design aspect. 

'Crunch Numbers' test project

Play with the project on any device, using this link. You can also view the embedded one below, but on mobile devices you better use the link.


The topic is simple, and suited for playing on small mobile devices. There are some references to previous blog posts, but they used a non-responsive project. I focused on multistate objects because I know already that they are easier to use in the new Captivate release than in Classic Captivate.

Test follow-up

I plan to document each of the steps of the test process in another blog with limited access. Although my primary focus will be on recreation of the interactivities in the project, I will also spend time on the design features. Here is a non-restrictive first list of steps:

  • Preparation: setup of Preferences and Theme.
  • Recreating simple content slides using the slide templates and blocks
  • Eventually use of slides from Quick Start Projects.
  • Setup Multistate objects
  • Use of audio.
  • Animations tool
  • Defining user variables
  • Replacing Shared actions by Interaction tool (and Copy/Paste)
  • Replacing Advanced actions by Interaction tool (and Copy/Paste)
  • Scoring 

Steps in Bold are for me the primary goal.

After the process I will post a link to the result in this blog.

Invitations

As mentioned the new blog will not be public. If you are interested in following my test steps and conclusions, you'll need to contact me either:

  • by sending me a mail with your credentials to info@lilybiri.com
  • by adding a comment here, but I need your name and mail address
  • by filling in the form under the Contact button on my website.

You may get an invitation. It will be a limited group and I expect some engagement/reactions on the private blog.


Custom Navigation (basics)

Warning

At this moment two versions of Captivate are functional with the same license: Captivate Classic (version 11.8) and Captivate (version 12, also named Charm). The workflows described in this post are only functional in Captivate Classic. In version 12 they are not (yet) possible for multiple reasons which I will summarize at the end.

Why use Custom Navigation? 

Captivate has a playbar which includes Next and Back buttons, and a progress bar allowing to scrub to any location.

However in many projects these default buttons are not wanted, some examples:

  • The project is not linear (presentation-like). This can be due to a dashboard pointing to different parts and allowing the learner to control the sequence of the project slides.
  • There are (dummy) slides in the project which you don't want to have visited by the learner. 
  • Your client requires Forced viewing (bad idea especially for adult learners).

In those cases you don't want to have the default buttons which will be available all the time and always cause the action 'Go to Next  Slide' or 'Go to Previous Slide'. In all those cases a scrub bar is also a bad idea, but this article has its focus on custom Next and Back buttons. I have seen so many cases where the developer just puts an instance of the custom buttons on each slide - each with their individual action -  but I will propose altnernatives.

Workflows

Purpose of both workflows is the same: avoiding to have an instance of the buttons on each slide:

  1. Workflow 1: Put the buttons on the first slide where you need them, and time them for the rest of the project, always on top. For the Next button this will be on the first slide, for the Back button on the second slide. The buttons will have a unique ID. That means that they can be addressed with an action like Show/Hide when necessary. You can hide the Next button if it is no longer needed on the last slide using the On Enter event of the slide. This workflow is to be preferred if you need a lot of Forced viewing. In that case you can hide the Next button (On Enter) and use the Delay Next Actions command to show them after a certain delay. 
  2. Workflow 2: Put the buttons on master slides. They will not get an ID, but if you keep the Pausing (is activated by default) the pausing point will occur for each slide based on the master slide at the last frame, whatever the slide duration. These buttons cannot be controlled by actions like Show/Hide.

Since the buttons in both workflows will not always be used with 'Go to Next  Slide' or 'Go to Previous Slide', you'll need a 'dynamic' action to make them flexible. 

Dynamic actions

I prefer Shared actions because it is easier to transfer them to any project, using my Shared actions Library. That is a Captivate project where I store much used Shared actions. I open the library in any new project using File, Import, External Library.

Next button

The simple action ‘Go to Next Slide’ can also be achieved by this action:

Assign cpCmndGotoSlide with cpInfoCurrentSlide

This may seem weird, but the reason is the different start number of the index: for cpCmndGotoSlide it is 0, for cpInfoCurrentSlide it is 1. Example: if you are on slide 3, Next button should go to slide 4, but for cpCmndGotoSlide slide 4 is identified by number 3.

Howeveer you cannot use this action to the Next button, whether it is on the first slide (timed Rest of Project) or on the master slide(s). It is static, you cannot edit it to go to another slide than the Next one. To solve this issue I replaced the system variable by a user variable, which I label v_Next.

   Assign cpCmndGotoSlide with v_Next

Another event and action is needed on each slide to define the value of v_Next. The used event is the Slide On Enter, and it is better to use an Advanced action, because it can be applied to all On Enter events of the slides in one workflow. For its default action it will be:

   Assign v_Next with cpInfoCurrentSlide

For slides where the Next button needs to jump to a different slide, you’ll need to edit this action, replace ‘cpInfoCurrentSlide’ by the slide number you want to navigate to.. 

Back button

The simple action 'Go to Previous Slide' can be replaced by this Expression:

Expression cpCmndGotoSlide = cpInfoCurrentSlide - 2

Why 2? For the same reason as explained for the Next button, due to the difference in index for both system variables. To make this action dynamic, we'll need another user variable which I'll label v_Back. Similar to the workflow for the Next button, the value of this variable will be set with an action On Enter for each slide. For a normal Back button this would be:

   Expression v_Back  = cpInfoCurrentSlide - 1

The action for the dynamic Back button will be:

   Expression cpCmndGotoSlide = v_Back  - 1

On the slides where you want to navigate to a slide which is not the previous slide, edit the On Enter action, replacing cpInfoCurrentSlide by the wanted slide to navigate to.

I prefer also shared actions for both the Back button action and the On Enter action.

Summary

In my Shared actions Library I have three Shared actions for the Next/Back buttons:

NextAct   Assign cpCmndGotoSlide with v_Next

BackAct   Expression cpCmndGotoSlide = v_Back  - 1

EnterAct   Assign v_Next with cpInfoCurrentSlide

                 Expression v_Back  = cpInfoCurrentSlide - 1

  • In a new project, drag the shared actions to the Project Library of the new project. It is important to drag them simultaneously to avoid the variables v_Next and v_Back to be created twice.
  • Add Next/Back buttons with one of the two workflows. Apply the Shared action ‘NextAct’ directly to  the Next button and 'BackAct' to the Back button. No parameters are needed.
  • Convert the action ‘EnterAct’ to an Advanced action, by using it as template. There are no parameters to be defined. Apply the Advanced action to all Slide Enter events, which is possible by selecting all slides in the Filmstrip (Ctrl-A) and adding to the slide Enter event.
  • Identify those slides where the buttons needs to navigate to other slides and edit the Advanced action 'EnterAct' for those slides. 

What about Captivate (version 12)

This workflow is impossible due to lack of:

  • Master slides
  • Timing of objects for rest of project
  • Missing system variables from the Movie Control category
  • Missing slide Enter event

In that version you need to keep the workflow to insert or copy/paste a button on each slide and add the appropriate action using the Interaction tool.


Software simulations: Preparation phase (back to basics)

Intro

Captivate has always been famous for its interactive software simulations. Originally when it was released under the name ‘RoboDemo’ it was its primary goal. Although – in recent versions  – not much has been changed  for this feature,  it could be worthwhile to explain some tips I acquired while recording interactive tutorials for many applications (in several languages). In Flanders we often quote ‘Goed begonnen is half gewonnen’, freely translated ‘a good preparation will spare you lot of work later on’. This blog is about this preparation phase. some recommendations are also valid for Video Demo. I plan another blog will focus on the capturing workflow, and a third one on editing/polishing the sims into engaging eLearning course(s).
Preferences

Preferences can be edited before opening a project, while you are in the Welcome screen, the so-called Global Preferences. You do not have to start the Software simulation type of project to do so. Preferences are too be found under the Edit menu (Win users like me) or under the Captivate menu (Mac users).  Those global Preferences have less options because project-specific ones are missing, but the Recording category is complete.These options need to be checked, and eventually changed:

Settings:

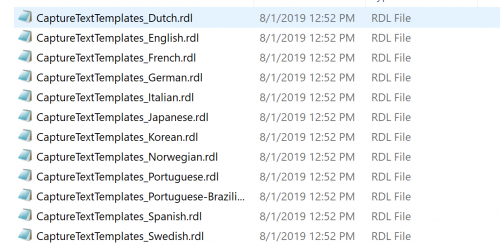
Check the language! If you need to use another language, this is the place to be before starting the simulation. The feedback messages during capture (both shapes and captions) can be found in a file with extension rdl, like you can see in this screenshot. You can edit the messages in an editor like Notepad (don’t use Word).

I tend to keep the other settings at their default value. Lot of them can be set up later on for the project (narration, system audio..). The Camera sound and the Keystrokes audio are useful during recording, will not be included when published. The Smoothening is meant for the movie slides which have to be created for drag and other mouse actions. Later on you’ll get tips in the second part which will treat the capture itself.
Video Demo

To have a better quality for the movie slides (setting is also used for the simulation movie slides, also indicated as Full Motion Recording slides), change to 32-bit instead of 16-bit. For Video demo the temporary files are in a dedicated folder, you may want to switch to another folder on another drive if your startup drive (C) is too small. That tip is only for Video Demo, which can become rather big in file size.

Keys

Some of those shortcut keys are only for software simulations, not for Video Demo. That is the case for the Pause button, you cannot pause a Video Demo (answered that question multiple times in social media). You have to end the recording and eventually record another video at the end of the previous one..

Modes

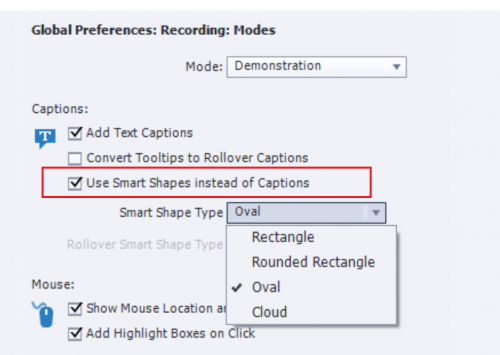
Allows to check the setup for the three default modes (Demonstration, Training, Assessment) and eventually set up a Custom mode. Beware: you cannot choose a ‘default’ mode for future recording, which is what some users seem to believe. Choosing the mode(s) always happens at the start of a new recording. Personally I will edit some settings in this category. The feedback messages in a software sim, contrary to all other feedback messages (shapes) are by default set to be Text Captions. I prefer to switch to shapes and you can have a choice for the shape; it is easier to control the style of shapes in Captivate (see Step 2: Themes). You need to make the choice for the Demonstration mode, but it will be taken over for the Hint messages in Training/Assessment:

Take note of the objects to  be added during recording: besides the Success/Failure/Hint messages, highlight boxes, click boxes, Text Entry Boxes and eventually Rollover Captions (for Tooltips).

Defaults

This category is meant to edit the styles to be used. It is bit weird that this is included in the Preferences. Do not worry, Recording defaults will be added to the used Theme as well.
Beware: that will be the Theme set as Default theme. Of course if you opted for shapes instead of captions under 4., you only have to check the styles for shapes, not for captions. It is a bit confusing, because some captions have no counterpart as shapes: Capture Caption, Rollover caption. The styles for Smart Shape (used for both) is by default empty, but you can choose a styles there as well.
I will always create a different style for the Highlight box, instead of the thin lined Blue one which is the default. For the TEB, which often doesn’t have the wanted style that is a lot more difficult, because the wanted font and font size depends a lot on the application you’ll want to capture.

Theme

All software simulations (and the Video Demo) use the Blank master slide. It is important to keep that master slide blank. A background color or background image is not a problem. But you shouldn’t add other objects.

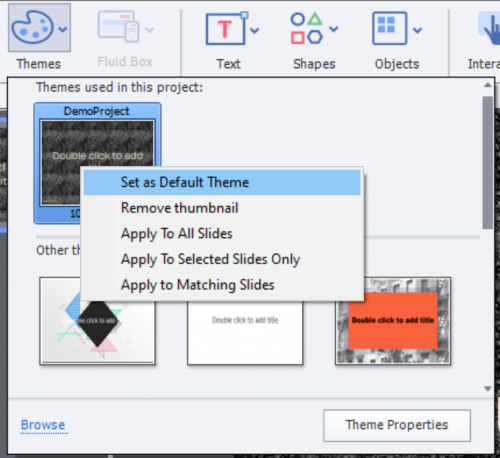
The Theme of your choice will need the wanted theme colors palette, theme fonts and object styles (maybe set in the Preferences, Defaults), Content and Quiz master slides are important if you want to add them later on to the course.  Once the wanted theme has been double-checked mark it as the Default theme. Especially if you do create many software simulations it is recommended to keep a Theme dedicated to them.

Storyboard

You have to know precisely what you want to capture. For long workflows, do not hesitate to split them up in small logical parts. It is a lot easier to record a limited number of slides, certainly if you want to do narration at the same time (which I do not recommend). For a software simulation you don’t have to worry that much about the synchronization with audio, since that can easily be done while editing (phase 3). While preparing, keep in mind to limit Full Motion Recording slides when possible. In many case drag and other mouse actions can be replaced by alternatives. Example: instead of dragging in scrollbars click somewhere on those bars. There are a couple of reasons. Several users have reported issues with the FMR (Full Motion Recording) slides when publishing to HTML5 in some browsers. Originally those slides are SWF-based, they are converted to MP4 when publishing but apparently the result is not always optimal. A better solution is to replace FMR by Video Demo slides, but that slows down the recording workflow (see second post).

Using State Numbers in Formula question

Intro

Review the output tutorial published in this post. The two first use cases were about a knowledge check question where the learner needs to create physics formulas, by clicking the terms in the formula. Those terms are multistate objects, used as buttons. In a previous post we created one shared action to get the 'State number' which is stored in an associated variable for each multistate object. That same post also explained how to choose the sequence of the states.

The first use case has 3 terms in the formula, the second one has 4 terms. The terms are identical multistate objects, at the start of the exercise they show the same Normal state.

In this article youi'll see how to create the action for the Submit button, and the On Enter action which is needed to reset the slide and thus allow multiple visits to the slides.

Submit actions

Those are advanced action triggered by the Success event of the Submit buttons.

Formula with 3 terms

To the left of the equal sign the term should be 'Force', which is state 3 in the multistate object.

To the right of the equal sign we need 'Pressure' and 'Area', sequence is not important. Those are states 1 and 2. The easiest way is to calculate the sum of the two state numbers, which should be 3. To avoid confusion, create another user variable v_right to calculate the sum. The condition will be very simple: v_1 (state number to the left of the equal sign) needs to be equal to v_right.  To show the result, another multistate object SS_Feedback was created with these three states:

This feedback shape is on the slide (not hidden) but the Normal state is invisible to the learner. I used the same feedback for the next slide (4 term formula) by timing it for the rest of the project. It will be hidden after the two formula slides.

The Submit action doesn't need much explanation; I used the Delay command to mimick the default time a feedback is shown, allowing a new attempt:

Formula with 4 terms

Due to the sequence of the states, a correct formula will also have the same sum to the left and to the right of the equal sign. Of course we need another user variable v_left  to store the sum to the left. However, checking the sums will not be sufficient in this case. If the learner chooses exactly the same states on both sides, the sums will also be the same. Example: if only the states for the 'oval 'are chose on both sides. To exclude that situation, I use another expression with a multiplication of the state numbers. For the result of the multiplication two extra user variables a; re defined: v_leftM and v_rightM

Example: if only 'oval' states are used sum will be: 5 = 2 + 3. However the multiplication will result in 6 = 2 * 3. Whereas for the drum the sum is 5 = 1 + 4  but the multiplcation will result in 4 = 1 * 4.  Look at the Submit action in this case:

Enter actions (reset)

Those are advanced actions triggered by the On Enter event of the slides, to reset the situation. 

Formula with 3 terms

The 3 variables storing the state numbers need to be reset to their default value (1: corresponding with the Normal state). That is not necessary for the v_right, because it is always calculated. The option 'Retain state on revisit slide' is not activated, which means that on revisiting the slide the Normal state is reset automatically. The variable v_states needs to be redefined.

Since the multistate object SS_Feedback is timed for more than one slide, and can be hidden by actions on later slides, it is important to show this object and put it back in the Normal state. The automatic reset to the Normal state is not happening due to the timing. The Next button needs to be hidden.

Formula with 4 terms

The 4 variables storing the state numbers need to be reset to their default value (1: corresponding with the Normal state). That is not necessary for v_right, v_left, v_leftM and v_rightM because they will be calculated. The option 'Retain state on revisit slide' is not activated, which means that on revisiting the slide the Normal state is reset automatically. The variable v_states needs to be redefined.

The resetting for the feedback object is for the same reason as in the other Formula slide.

More?

I used a similar workflow in this small project, which is meant as exercise for the math's class about Multiplication tables.

It is a responsie project, uses the same shared action I have used in the use case I described here. The Submit actions are a little bit more complicated. Your challenge: try to replicate this project. This is the link:

CrunchNumbers