Bookmarking in Captivate (Classic and New) - Introduction

Intro

One of the new features in Charm (new version 12) release is the possibility to have bookmarks on any content slide. In Captivate Classic you bookmarks are only available on a slide with slide video (to create an interactive video.

What do you expect from a bookmark in its original meaning? Looking this up in multiple dictionaries, two possible meanings appear everywhere:

  1. A strip of leather, cardboard, or other material used to mark one's place in a book. It has a digital version in ebooks as well. In the digital world you'll find this has also become..
  2. A saved shortcut that directs your browser to a specific webpage.

I planned to summarize my experiences with bookmarking fo navigation purposes in one blog post.  However, after weeks of exploring, I realize this would lead to a short booklet instead of a short article, hence the decision to split the content up in multiple articles. Main purpose is to compare and explain the present differences between the new (Charm) version 12 and Classic Captivate.

This introduction will explain the terminology. A Captivate tutorial, demonstrating the terminology is inserted. This tutorial was created in version 11.5.5.553. Explanation of workflows both for New and Classic Captivate will follow in next articles.

Example

You can watch this 8-slide tutorial using this link (to be preferred) for a scalable version, or watch the embedded static version. Please turn on your audio, there is narration. Slide 7 is a long video slide, taken from one of the presentation in an online Adobe conference. Be patient, the Next button if you want to skip appears after 30secs.


Terminology

When you watch the example output below, you'll see that I see two types of bookmarks for navigation: static and dynamic. My choice of adjectives refers to what is used for text fields as well: static text doesn't include variables and when publishing the content is defined and will not be changed on runtime. Dynamic text fields, as you see on the score/results slide in a project with scored objects and/or question slides, need to be rendered on runtime, because they contain variables for which the value will be defined based on actions by the learner.

Static bookmark: is linked to a fixed frame on a fixed slide. Examples: start of an important part in an interactive video. It is a bit similar to what you can have in a Table of Content, but on frame instead of slide level. Have a look at this interactive video, where the menu uses static bookmarks to allow you to access them easily:

Custom Play/Pause button

Static bookmarks can also link to non-video slides, and are not limited to navigation within the same slide. That is valid both for version 12 (New) and Captivate Classic. However, due to the absence of bookmarks in Captivate Classic, you need to use Micro-navigation. If you want an intro to this type of navigation to frames, have a look at:

Intro to Micro-navigation

Dynamic bookmark: the frame for the bookmark can be chosen by the learner, and will allow to return to that frame if wanted. This is the closest digital equivalent to putting a real bookmark in a book after a reading session. The bookmark is created on runtime, reason why I use the adjective "dynamic", referring to the difference between static text and dynamic text. At this moment dynamic bookmarks can only be created in Captivate Classic, not in the New version 12.

Score in Software Simulation

Intro

This is a short blog post, answering a software simulation (assessment mode) question on the forum. If you are interested, here is the link.

You probably know that in such an assessment scores are attached to one interactive object on each slide: either a click box or a Text Entry Box.It offten happens that the same action can be done by clicking more than one 'target' on the slide, which will need customizing that slide to add at least one extra click box, which will also be scored. However that will lead to a results slide where the acquired percentage is not correct. Reason is that all scored objects are included in the total score. You can verify that easily in the Advanced Interaction panel, to be opened from the Project menu or with the shortcut key F9. Here is an example. Slide 59 has two target click boxes, both are scored.

The OP wants to show the correct percentage to the learner in the project, but for the reporting to the LMS Pass/Fail reporting is sufficient which can be done by basing it on the required pass points.

Variables

    • A while ago this blog post described using the system variables used in the Results slide: Quizzing System Variables. For this blog post the relevant system variables are:

cpQuizInfoTotalQuizPoints: will have the value you see at the top of the Advanced Interaction panel, and is not correct in this case because it includes the scores of the extra target click boxes.

cpQuizInfoPointsscored: will be correct because on each quiz slide only one of the targets can be clicked.

cpInfoPercentage: is calculated from both previous variables and will be lower than expected for the learner.

cpQuizInfoPointsPerQuestionSlide: this system variable is not behaving as expected for slides with multiple scored objects. It will NOT show the total score of the slide, but the score of ONE scored object. I will presume that in case of a slide with two target click boxes, both of them will have the same score. This is also valid if you prefer shape buttons instead of click boxes.

Since there  is no need to transfer the percentage to the LMS, it is possible to use user variables. Create these variables:

v_TotalScore: will replace the system variable cpQuizInfoTotalQuizPoints

v_TooMuch: will store the total score of the extra click boxes. I assume that click boxes on the same slide have the same score.

v_Percentage: will store the result of the calculation from v_TotalScore and cpQuizInfoPointsscored

Workflow

Simple

The easiest way would be to count the number of extra targets. If all the click boxes have the same score of 1 point you could calculate the correct percentage with this advanced action:

You can trigger this advanced action with the On Enter event of the custom Score slide. It will allow you to display the correct Percentage. 

Advanced

Situation becomes bit more complicated if not dual targets (click box/shape button) have the same score (of 1 point). In that case you can take advantage of the weird behavior of the quizzing system variable cpQuizInfoPointsPerQuestionSlide  (see above). I used this shared action, triggered by the Success action of the targets, and the 'Last Attempt' action which is used here (Success action on a background Shape covering the complete slide). I assumed that the Last Attempt action of the targets is set to No Action. That typical workflow was used by the OP, and explained in this blog post

You see that this shared action has no parameters, you could also create an identical advanced action, if you still fear shared actions. My main reasons for this choice:

  • Shared action can have a small description
  • Shared action appears in the Library, which make it easier to check the Usage
  • This shared action has no parameters, so it takes the same time as the advanced action to be applied to all the necessary events.
  • It is much easier to transfer this shared action to another Project.

There is a small change to the action to be triggered On Enter for the Results slide:

Conclusion

On the Results slide you can insert most of the default fields, an overview:

  • You scored:  the system variable cpQuizInfoPointsscored is correct
  • Maximum score: you need to replace the system variable by the user variable v_TotalScore
  • Correct questions: will be OK, it is the system variable cpQuizInfoTotalCorrectAnswers
  • Total Questions: will not be OK, you could add a supplementary command to the shared action similar to replace the system variable cpQuizInfoTotalQuestionsPerProject by a decremented user variable.
  • Accuracy: you need to replace the system variable cpInfoPercentage by the user variable v_Percentage
  • Attempts: will be OK, it is the system variable cpQuizInfoAttempts


Custom review text for Random questions.

Intro

Another Quiz tweak blog, answering a question in the Adobe forums found under this ‘link‘.

None of my previous blogs about tweaking quiz slides (like Custom feedback) or using Random question slides (Do’s and Don’ts) could answer this question directly. But the workflow below did use some of the ideas of older blog posts, and addressing the limitations of random questions.

Goal: show a custom review message for random question slides. Follow this step-by-step workflow. Of course I used a shared action since it is a repetitive process. You’ll see a short example project.

Example project

Watch this quiz, either the embedded version (fixed resolution) or a rescalable version using this link. This short project has 3 random slides which will be selected from a question pool with 8 question slides. There is a score slide at the end, where you can click the Review button. There is no slide after the score slide, which means the Continue button has only the functionality to pause the score slide.


Problems to be solved

Three limitations/problems need to be addressed by the workaround:
  1. In the default Review design of Captivate the Review area is only used for questions which have not been answered.  The default messages which you can still define under  Quiz Preferences, Settings, button ‘Question Review messages’ do not appear anymore since the design with checkmarks has been introduced. You will need to create custom text messages.

  2. Although you can add custom objects to question pool slides, you cannot address those objects using an action.  It is possible to use an Advanced or Shared action for the On Enter event, but you cannot hide/show custom objects.

  3. A random question cannot have any triggered action in a Captivate project.

My first conclusion:  the custom text container cannot be in the question pool slides nor in the random question slide. It needs to be outside of them. But the message itself needs to be different for each quiz slide, somehow it needs to be attached to each question in the pool.

Workaround summary:

  • Text container will be a shape, timed for the rest of the project. It needs to be on a normal content slide immediately before the first random question slide. That ‘dummy’ slide can be very short (I used 0.1 secs) and even set to fade so that it will barely be visible to the learner. The shape will be the custom text container and it is outside of the question slides. This workflow has an extra advantage: it will be on top of the embedded objects of the quiz slides if you activate 'Place object on top' in its Timing Properties.

  • The shape is not filled with a text feedback message but with a user variable set up to show sufficient characters (I used 250). Text style and size of the shape are edited so that those characters can be displayed.

  • The value of the variable (feedback) is assigned with a Shared action On Enter for each quiz slide in the question pool(s). 

Step-by-step workflow

Step 1 (question pool): in scratch area

Use the scratch area for each quiz slide to add the feedback message.  By using copy/paste the text to fill in a parameter in the shared action. That is a lot more comfortable than having to type the (long) text in the small parameter field. Here is a screenshot of one pool question slide:

Step 2: import the Shared action

You can download the Shared action here:

https://shared-assets.adobe.com/link/f63df322-5037-479a-42b8-86506a7f1b7e

Import this shared action to your project library. If you have already created a library to be used as external library in any project, add it to that library as well. I will explain the action functionality later. Importing this action in this early step,  results automatically in the creation of the user variable v_review which you’ll need in the next step.

Step 3: create dummy slide

Create a short slide immediately before the first random slide. On that slide you insert a shape (labeled Tx_Review). Time it for the rest of the project. in Timing Properties.

Go into Text Edit mode (F2 or double-click) and use the X button in the Character part to insert the user variable v_review. Be sure to increase the default duration. I used 250 characters which was sufficient for the feedback messages created under step 1. Here is a screenshot of that slide and its Timeline. You see the double arrow at the end of Tx_Review timeline, indicating it is timed for the rest of the project, and the very short duration.

Because you don’t want to show the text container Tx_Review from the start, use the On Enter event of this dummy slide to ‘Hide Tx_Review’.

Step 4: Shared action On Enter in Question pool

On each slide In the question pool add the Shared action (downloaded in step 2) to the On Enter slide event.  This is the preview of this action, with indication of the two parameters:

The functionality is self-explanatory. In the first decision 'Always' the variable v_review gets the feedback text (first parameter). Use copy/paste from the message in the scratch area (step 1) to define this parameter. The second parameter is always Tx_Review.  

Step 5: Hide Tx_Review

you don't need the text container, timed for the rest of the project, on the following score slide and/or content slides.You’ll need to hide Tx_Review similar to the dummy slide (step 3). In the example project that was done on the Score slide.

Step 6: testing!

Use only F11, Preview HTML in Browser, and preferably test in multiple browsers.

(SWF to HTML) Replacing Rollover Caption/Image

Intro

From what I learned on the forums in  2021, many developers are still busy with conversion of legacy courses (SWF output) to HTML5 output. That can be very boring and time consuming.  This blog gives a quick overview of three solutions for a common issue: the HTML Tracker (under Project) will detect all Rollovers and flag them as incompatible. That means for Rollover Slidelet, Rollover Caption, Rollover Image.

In reality non-compativility is only true for Rollover slidelets: those are SWF-based and are useless. However Rollover caption/image can still be used in courses provided they are accessed only from devices with rollover events: desktop, laptop (either with mouse or trackpad).  They will not be functional on mobile devices (tablet, phone) because those do not have rollover events. You don't have a click event, but a tap event. 

This article will give you 3 possible workflows to replace Rollover images or Rollover captions. They will not be an exact replacement. Rollovers typically have two 'events':

  • Roll over event: triggers the appearance of the image/text.
  • Roll out event: triggers the disappearance of the image/text.

Consequence: the learner has full control over the duration of the image/text screen using movements of mouse or trackpad.  The mouse movement needs to be replaced by a tap event (click). Tap events exist for interactive objects (and hyperlinks). 

To explore the three possible workflows (Success image, Two-state object, Shared action) you can choose between an interactive Captivate course (audio included) or reading a textual summary.

Captivate tutorial

In the tutorial I used some design elements from the Quick Start Project 'Earth'. All interactions are custom. You can watch the embedded version, but I recommend to use this link because it will give you a scalable version. To see the original rollovers, you need to use a laptop or desktop (with mouse or trackpad). Here is the link:

Converting Rollovers for HTML5 output

Embedded version:


Step-by-step workflows

1. Using Success feedback shape

An interactive object (button, click box, shape button) has the possibility for a Success and a Failure message. The Success message appears automatically when the object is clicked or tapped for a fixed duration. Default duration is 3 seconds. In recent versions those messages by default use Shapes, not captions  (see Preferences, Defaults).

Rollover Caption replacement (step-by-step)

  1. If possible, convert the object used to be 'rolled over' to a button. In version 11.5 that is possible for all images. Since version 6 that is possible for shapes and a shape can be used as text container and can be filled with an image. 
    If this is not possible, put a click box (or a shape with Alpha and Stroke set to 0) over the object. This may also be necessary if you want multiple rollover objects in one text container.
  2. In the Properties panel activate the 'Success' message on the Actions tab.
  3. Edit the text in the Success message on the stage to the text you want to appear.
  4. (optional) Go to the Timing Properties, and edit the duration if you estimate 3 seconds not to be sufficient.

Rollover Image replacement (step-by-step)

  1. Identical as for the Caption replacement
  2. Ditto
  3. Import the image to the Library. It needs to be a bitmap image, SVG is not possible.
  4. Check the size of the image
  5. Select the Success message on the stage. Delete the default text and use the Options tab (Properties panel to resize the shape to the exact size of the image.
  6. In the Properties panel for the message, Style tab, switch Fill to 'Image' and select the image to fill the shape.
  7. (optional) Edit timing if necessary in the Timing Properties.

Advantage: very simple solution since you use existing design with feedback messages.  The workflow to have a shape size fitting for the image can take some time but for text, no problem. This solution works for all versions supporting HTML5 output.

Drawback: problem with this very simple solution is that the learner has no control over the duration of the text/image which appears when they tap the rollover object.  You can add audio to the Success shape if wanted (options), it will play when the shape appears.

2. Using Two-state object (toggle)

This solution has been described in detail in this post.  Same workflow can be used to replace Rollover text and image. It is even possible to have both text and (multiple) image(s), and audio. In short:
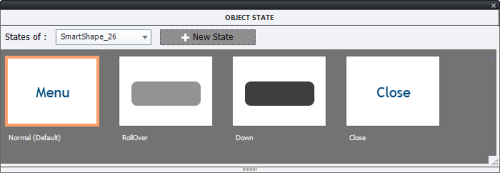
  • Convert the text container or image to a button. For images that is only possible if you are on version 11.5.
  • Take out the InBuilt rollover and down states
  • Create a custom state where you add the items you want to show when tapping the button
  • Add the command 'Go to Next State' to the button. That will convert it into a toggle button: first click will show the items (as rollover event does), next click will hide them again because you return to the Normal state (as a Rollout event would do) since you have only two states.

Advantage: learner has control over the duration of the appearance, same as for the old Rollover items. You can add as many items as wanted in the second state: image, text, audio, even video.

Drawback: you need to instruct the learner about the toggle functionality. It may take bit more time than the first solution.

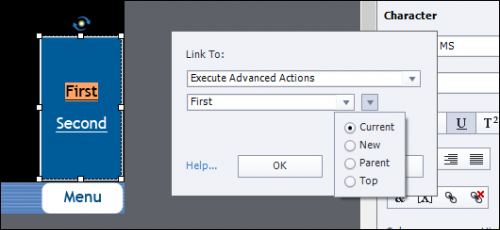
3. Shared action with flexible duration

Both previous workflows have some drawbacks, although they seem rather simple. Do not be afraid of this third workflow, because it may even be the quickest solution to replace rollover captions/images.  Once you have a functional shared action, adding it to replace rollovers in any project is a breeze.  Especially when you work in a team, you don't need to be an expert in actions to apply a shared action.

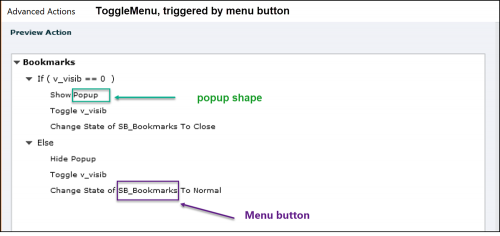
If you didn't watch the Captivate tutorial, watch this one-slide project. It  has been taken out of the complete tutorial. You will see three buttons to reveal popups. The popup will disappear automatically after a certain duration (like in Workflow 1). That duration is stored in  a user variable v_duration. In the example you'll see the default duration, but you can increase or decrease that duration with two small buttons.


You may have seen that an Entrance effect was applied, something what is impossible with the two other workflows.

The duration in the variable for the popup can be set:

  • by the developer (default duration or by using an On Enter action for the slide); 
  • default duration by developer, but ability for the learner to change (as in the example)
  • ask the learner the preferred duration using a Text Entry Box or a Scrolling Text Interaction.

Using Shared Action (step-by-step)

  1. Convert the rollover area to a button to be tapped/clicked. If that is not possible use a click box.
  2. Insert the content you want to pop up when the button is clicked. If you need more than one item, group them (CTRL-G).
  3. Make the group invisible in output (eye icon in Properties panel).
  4. Assign the shared action 'ShowItems' to the Success event of the button. You can download the one I used from this link:
    ShowItems
  5. The parameter is the name of the group you want to show.
  6. Set the value of the variable: either you use the definition of the variable (Project, Variables) or you can use the On Enter event of the slide with an Assign command.
  7. (Optional): If you want to replicate the setup of the example file, add two extra buttons with respectively the commands:
       Decrement v_duration by 1
       Increment v_duration by 1

Advantage: learner has some control over the duration of the appearance depending on the setup. You can group as many items of all nature: images, texts, video, audio.... You can add effects, and even sequencing the appearance with the Delay command.

Drawback: complete control of the duration is not possible. 

Conclusion

The tutorial was created with the most recent version (11.5.5.553) of Captivate, but the workflows can be used in Captivate 11, 10 and 9. That is also valid for the shared action. If you never used a shared action, you can find a short course in this blog. Look for 'Who is afraid of Shared Actions?'. 

All Click/Reveal workflows are a possible replacement for rollover text/image. My choice for these particular ones was made based on their timesaving features. With exception for the second workflow, the learner will not have total control over the duration of the reveal information which they have with a rollover. On the positive side, the second and third workflow allow to have multiple texts and images pop up which was not possible with rollover Caption/Image. It was possible with Rollover slidelets, but they died with the demise of the Flash Player.

The workflows suppose that you are able to open the legacy projects in your present version of Captivate, and that you still have access to the raw files (cptx). If that is not the case, have a look at this blog:

Conversion from SWF to HTML5


Lightbox setup

Why?

Lightbox is a popular technique to make extra information (text, images, video…) stand out. Traditionally that information will appear on a background of an object which hides or dims the original objects on the slide. A way to close the lightbox is necessary, and will also make those objects visible again. In a way, the overlay slides in an interactive video are sort of lightbox as well. It is evident that such a lightbox is rather easy to create in a non-responsive project, but several limitations (like stacking) in Fluid Boxes project make it almost impossible. The example shown here, and the setup, was for a non-responsive project.

Recently a Captivate posted a question in the Adobe forums.: ‘How to create a lightbox within a state of an object‘. She was upgrading an older project, where the developer used a slide for each lightbox, by using multistate objects to replace the multiple slides.  After having asked for some extra information, it turned out to be more complicated than just the creation of lightboxes.  It was about a two-step process for extra information:

  1. Clicking a ‘question button’ would show the answer to the question as a popup (Click-Reveal workflow). That popup didn’t really need a way to close it, but clicking another question button should replace the content by new content. OP was correct that using a multistate object was the perfect workflow for this first step, with a Normal state which was invisible by setting Alpha (for the Fill) and Stroke both to 0. I have demonstrated this use multiple times in blogs.

  2. The content needed to have a way to open a ‘lightbox’ (in the traditional sense explained before) with more information related to the question/answer already shown. 

Problem

States in a multistate object, with the exception of the Normal state cannot have interactive objects! In both steps such an object is necessary. In the first step it is needed to open the proper lightbox, in the second step to close the lightbox.

Such an interactive object can be a button, a click box or… a hyperlink. Quite a while ago I wrote a couple of articles to demonstrate the power of hyperlinks which is ignored by many. However, for HTML5 output in the recent version (11.5.1) its use to run advance actions seems not always to be functtional, needs lot of testing. Originally when creating the sample output, I planned to use hyperlinks in most cases, but had to give up for the reason just explained. BTW all actions triggered by hyperlinks worked perfectly for SWF output. So I had to revert to buttons in most cases. I will explain the complete setup in a blog.

Example project

Watch this project. There is no real content for questions, answers nor lightboxes. Focus is only on the structure and workflow. There is one slide after the title slide, which has 5 question buttons:
  • Clicking a question button will show a popup which should contain the answer, and there is a (image used as) button to open the lightbox. The question buttons shows a ‘Current state’ when clicked.

  • Clicking the button opens a lightbox: cover, shape with content, and a hyperlink used to close the lightbox. When the lightbox is closed, the question button will revert to a ‘Done state’. It is not a Visited state, but a custom state.

You can watch the project below (fixed resolution) or using this link (rescalable output)


Setup

Objects – timeline

See the setup, using this screenshot of the timeline panel:

From bottom to top:

  • Five question buttons, which are shape buttons labeled SB_Quest1….SB_Quest5. They have a pausing point at the default 1.5secs. For those buttons I deleted the InBuilt Rollover and Down states, but added two custom states: ‘Current’ and ‘Done’. 
    .
  • A group of shapes used as text container for the answers SS_Answer1…. SS_Answer5. I could have used a multistate object as well. I started using individual texts because I hoped to use a hyperlink for the lightbox switch.

  • A shape used as Cover. Its position in the stack order is important: it needs to be above the answer and question objects, but under the multistate object SS_ExtraInfo. That cover is a shape, filled with dark gray, partially transparent. Beware: it is also used as text container: look for the text ‘Close Lightbox‘ which has been converted to a hyperlink triggering an advanced action.

  • Multistate object SS_ExtraInfo which has a state to appear in the lightbox for each of the answers. The Normal state is empty (Alpha and Stroke shape = 0).
  • Button Bt_Info (used a button from thitOt not necessary to be on top of the stack, Its position in the stack order is not important, because will be hidden when the lightbox appears.

Variable

One user variable v_quest was created. Default value can be empty. It will store the number of the question chosen by clicking the question button. That number is necessary for two advanced actions. as you’ll see below.

Events and Actions

On Enter slide event: "EnterAct"

This simple non-conditional action is meant to set the slide to its original situation:

If I had used a multistate object for the Answer popups, with a Normal state that was invisible (like for the SS_ExtraInfo), I would not have needed the second command (Hide Gr_Answer). By hiding the Cover, I also hide the hyperlink since it is a text in the cover. No need to hide SS_ExtraInfo since the Normal state is invisible. Why didn’t I use a hyperlink instead of the button Bt_Info? Because the advanced action was not triggered as it does when using SWF output. Too bad.

Question buttons:  Shared Action "QuestAct"

Another non-conditional action, based on this Advanced action:

I converted it to a Shared action, with these 6 parameters:

If you prefer a multistate objects over a group for the answers, you will still have 6 parameters, but the Group will be replaces by the name of the multistate object, and the Answer object by the wanted state.  I already explained my choice for a group.

Button Bt-Info: Advanced action "ShowLightBox"

This is an action with 6 decisions. The first decision is non-conditional, the five remaining decisions are conditional because a different state has to be shown based on the question number in the variable v_quest.  Those decisions have only one command and can easily be created with the duplicate decision button.

Hyperlink: Advanced action "CloseAct"

The hyperlink in the Cover shape triggers a 6 decision action very similar to the previous one:

More…

You can extend the described workflow to more than 5 questions. The shared action can be used, and you may have to add decisions to the two longer advanced actions.

I didn’t provide a close button on the answer popups, for learners who don’t want to see the lightbox, for whom the answer popup is sufficient. It could be done with a hyperlink or an extra button.

It would be possible to have something happen when all question buttons have been clicked, but that will require the creation of one extra variable for each button, a Boolean to be toggled from 0 to 1 if a button has been clicked.  The check for the extra happening has to be added to the CloseAct.

Prevent Skipping on Drag&Drop quiz slide

Intro

In a recent thread user asked how to prevent that a learner would click the Submit button on a Drag&Drop slide before having performed at least one drag action. Sort of alternative for preventing ‘Skip’ on a normal quiz slide. Such functionality is not available out of the box.  The D&D slide needed to be scored, which made the situation more complicated (easy reset by developer is only possible for Knowledge Check slides).

Like all quiz buttons, the Submit button on a D&D slide is an embedded objects. Consequence: it doesn’t have an individual timeline nor an ID. There is no way to disable that button. You can drag it out to the scratch area, and use Auto Submit, but that was of course no solution for this situation.

Example file

Have a look at this published file.  As usual I used some ready-to-go-slides, in this case from the project ‘Rhapsody’.  All slides were taken from this Quick Start Project, but I deleted the existing Drag&Drop interactions,  just used the design components. After the title slide, you’ll see two Drag&Drop slides. The Submit button is not on the slide when you start, it will only appear after the first drag action.

The Submit button is not on the slide when you start, it will only appear after the first drag action.  To make the slides more similar to quiz slides, I added a second step to the Submit Process.

Check your Captivate knowledge for version 11.5. Either use this link (rescalable) or watch the embedded published file (fixed size):


The trick is to use the Timeline and a motion path effect triggered by any Object action. Not really very complicated, follow the steps below. This workflow, due to stacking of objects, is not that easy in a Fluid Boxes project, the example was a non-responsive project with Scalable HTML output.

Step-by-step Delaying Submit button

1. Pause the timeline before the default pausing point

By default each Drag&Drop slide has a pausing point at 1.5secs, similar to question slides and linked to the Submit process. Too bad, that pausing point is not visible in the Timeline panel, you can only see and edit it in the D&D panel.

You need to pause the timeline at a frame before this pausing point  at 1.5secs by inserting an interactive object which remains invisible to the learner. In this case I inserted a click box, small size (1px for width and height) and located in a place where it is very improbable that learner will try to click. Set it to infinite attempts with the command ‘No action’ to be triggered by its Success event; do not show the Hand cursor. Have a look at this screenshot for the setup of this click box:

The topmost click box which appears later, will be explained the workflow for creating second step Submit process.

Step 2: Drag Submit button off the slide

To make the Submit button invisible you drag it in the scratch area, either to the left (first D&D slide) or to the right (second D&D slide).

Step 3: Timebased motion effect to Submit

Although the Submit button is an embedded object, you can apply an effect to it using the Right-click menu or the Timing properties. The timing of the effect will not be visible in the Timeline panel, because the button has no timeline. The only way to set up the timing is with the numbers in the Timing panel. This motion effect (I used Left-to -right or the opposite one depending on the location) can be very short (used 0.2secs). It is important that it starts at or after the pausing point of the click box (step 1), and ends before the default D&D pausing point (which was kept at 1.5secs.). See this screenshot for one of the Submit buttons:

Step 4: Create User variable 'v_drag'

Create a Boolean variable, labeled it v_drag. Its default value should be 1. It will be toggled to  after the first drag action.

Step 5: Advanced (conditional) action 'ObjectAct'

The purpose of this action is to release the playhead with the first dragging of any drag source to a target. The result will be that the Timebased effect on the Submit button will occur, and the Submit button enters the slide. The playhead will be paused by the default D&D pausing point at 1.5secs. Hence the importance of the timing of the effect described in step 3.  To avoid a same playhead release to happen on subsequent dragging, the tracking variable v_drag is toggled to 0, and the action is conditional:

Step 6: Attach 'ObjectAct' to all Object actions

Since you don't know which will be the first drag action, you need to attach to every drag action. That  is the boring part since there is no easy way to attach the same action to all at once, not even for one drop target. Here are the steps for each drop target:

  • Select the drop target
  • Click the button ‘Object Actions’ in the tab ‘Format’
  • For each of the drag sources open the No action list, choose Execute Advanced Action
  • Choose ‘ObjectAct’ as advanced action.

In the example file you’ll have 3*6=18 object actions in the first D&D slide, and 4*4=16 in the second slide. I really hope one day there will be a way to apply the same action to multiple object actions at once…

Do not forget to test! The actions Success and Last Attempt (wrongly labeled as Failure) were left both to the default command ‘Continue’. That way the learner will have time to watch the feedback. Timing of the feedback shapes (or captions) can be edited as you probably know.

Workflow: adding second step to Submit Process

If you veiwed the example file, there was a second step (click the slide to proceed) added. If you don’t do that, the feedback message will appear and the playhead will be released, out of control for the learner. It is a simple trick, as you may already have seen in the first screenshot of the Timeline for the first click box.

I added a second click box, covering the whole slide, but appearing after the release of the playhead by the Drag&Drop actions on Success of Last Attempt (1.5seconds). This click box triggers the default ‘Go to Next Slide’:

Don’t forget to warn the learner about this second step, The example file had the warning in the feedback messages.

This last extra workflow is NOT possible in a Fluid Boxes project because stacking is not allowed. You can use the first workflow with the motion path in a Fluid Boxes project, but may have to replace the click box by an invisible shape or transparent button (no fill nor stroke) if you want to add them to a normal fluid box.

Quiz: Replace Score by 100% or 0%

Intro

Recent question on the Adobe forums is the reason for this blog. User didn't want the score (points or percentage) to be transferred to a LMS. Since the questions were random questions, using pools, it was impossible to use Knowledge Check slides, nor Pretest slides. The requirement to succeed the assessment was to have a minimum amount of correctly answered questions (7 out of 8). If that was the case, the transferred result to be transferred to the LMS should be 100%, and on failure 0%. I designed a workflow based on previous blogs about Random quiz slides and Reporting custom quiz slides. You will be able to check out a published example project, and follow the setup, Step-by-Step. To save some time I used a couple of ready-to-go slides from the project 'Alliance', but had to do edit of course.

Example

You can watch this file either from this link, (scalable)  or in its embedded version (fixed resolution):

Project has 11 slides, one of them (default results slide) is hidden. A pool was used to insert 5 random quiz slides. You need to have at least 4 correctly answered questions to obtain a score of 100%.


Setup

Here is the filmstrip of the example file:

Slides 1-3 are based on ready-to-go slides from the project Alliance.

Slides 4-8 are random quiz slides taken from a pool with 10 questions.

Slide 9 is again taken from Alliance (but with lot of multistate objects, see later).

Slide 10 is the hidden default score slide. It will automatically be moved after slide 9 because of the scored button on this slide (see step 3).

Slide 11,  final slide allowing to be sure that the final result (100% or 0% ) is correctly transferred to the LMS. I inserted the system variable cpInfoPercentage in a shape on this slide (top left).

Step 1: Score random question slides

Supposed you have the question pools ready, insert the required amount of random quiz slides in the project. All slides in a pool have by default the same score (10 points), it is not possible to have partial scores for MCQs with multiple correct answers.  There seems to be a bug for a FIB slide, where the correct answer appears as tooltip in case you have that question. Will log the bug, seems new.

Once the random quiz slides are inserted, it IS possible to edit the score. I took all score out, set them to 0. Just a tip, check the Advanced Interaction panel (F9, or under the Project menu) to see that the total quiz score is now indeed set to zero.  Penalty has no sense in this situation because success doesn't depend on the acquired score of the quiz.

To avoid long waiting time after the submit process for a question, I moved the pausing point near the end of the slides in all the pool questions.

Step 2: Tracking correct questions

To track the number of correctly answered question, you need to create a user variable v_counter, with a start value = 0. 

That variable needs to be incremented with each correct answer.  Number of attempts on question level is set to 1. It is then sufficient to create a simple advanced action to be triggered by the Success event of all random quiz slides:

Step 3: Results slide

I used a ready-to-go slide to show the result, but have converted several objects to multistate objects. The Normal state is the one shown on Success, the Failure (new) custom state will be shown on failure. This is the timeline of that slide:

Moreover I added two interactive objects to the slide, both invisible in output to start with (eye button in Properties):

  • Bt_Failure: is a transparent button similar to the Next button in the Alliance project. It has its default command 'Go to Next Slide'. 
  • SB_Success: is a start shape marked as button. Special is the fact that this button is set to Report (Actions tab ), and to include in Quiz. When you check in the Advanced Interaction panel (F9), this shows:

 Step 4: Conditional action EnterResult 

Use the On Enter action of the Results slide (slide 9) to show the correct state of the 4 multistate objects shown in the Timeline screenshot, and to show either the button SB_Success or Bt_Failure, based on the requirement of having at least 4 answers correct. Of course, the number 4 can be changed (OP wanted 7 correct answers). The action is self-explanatory:

This trick with the two buttons was published in my blog, over 8 years ago. The example file in that article is of course SWF output.  I didn't want to use two identical buttons - same location - in the example of today because that is impossible in Fluid Boxes projects.  This was not such a project, but it is perfectly possible to use the same workflow in a responsive project. It was also the main reason for the multistate objects used on this Results slide.

Extra: Editing Alliances

This is bit off topic, just for those interested

I did edit the ready-to-go slides a lot. Having a pause triggered by the On Exit event is not something  like because it can create problems. All slides have at least one interactive object, which can pause the slide near its end. That project has some quiz slides, but they are NOT based on the quizzing master slides. This means that the theme was not fully realized. When I inserted random quiz slides, which necessarily do use quizzing master slides they looked very different from the nice quiz slides. I have updated the master slides to make them looking approximately like the ready-to-go slides.

There are more problems with this project, which I detected but didn't encounter in this particular project. As I have written in previous posts, never do use the Switch to Destination theme!

Interactive Video, Navigation Bookmarks

Intro

Interactive Video is without any doubt my favourite new feature in Captivate 2019. It makes adding some interactivity to a passive video very easy compared with the old workflows which I used to simulate such an interactive video in previous versions. I had in mind to blog about some possible workflows that could add even more functionality. A user posted a question today about Bookmarking for Navigation. I had already some workflows in mind, and want to share one of them with you. I tried it out on the sample project provided with Captivate. That project has only two bookmarks, which are labeled 'ExerciseBenefits' and 'O3Jump'. the workflow can easily be extended to more bookmarkst. We'll create a shape button to pop up a menu. 

Popup menu

To create the menu, which is hidden when the video starts, I used a shape,  but you can use a text caption as well. I filled that shape with one word for each of the bookmarks. In this case I used the words 'First ' and 'Second'. Those words will be indicated as hyperlinks. Hyperlinks have a lot more functionality than just pointing to an URL, as I explained in some blog posts.

Close button

Dropdown menu

The menu for hyperlinks is missing some options (which I regret): you will not see the option 'Jump to Bookmark' nor 'Execute Shared Action'. My only choice was to use the command 'Execute Advanced Actions'.  That means that you have to create as many advanced actions as you have bookmarks. They are very simple oneliners, but with a simple action or a shared action it would be a better workflow.  It is also impossible to prevent release of the playhead, but that is not really an issue in this case since we are creating navigation actions, and the video may continue to play when it gets to the chosen bookmark.

The shape with the hyperlinked texts needs to be invisible in output, and timed for the rest of the slide. If you have multiple video slides, and you want one menu for all videos,  time it for the rest of the project. Because the overlays are possible, you'll not have any problem to have the shape being visible on top of the video.

Menu Button

The menu button (which you could see in the screenshot with the popup shape) is a shape button. I added a custom state 'Close' to the 3 InBuilt states, where the label is changed from Menu to Close. To avoid confusion I took out the label from the Rollover and Down state which are used both for the open and closed version of the button:

The button is a toggle button, to track the visibility of the popup shape I needed a user variable (Boolean) which I labeled v_visib as usual. Default value = 0, which means the popup shape is closed and the Normal state of the button is active. When the button is clicked to open the popup, the state will change to Close, and the variable will be toggled. This leads to a conditional action which I have described/used already many times:


Conclusion

I hope you liked this workflow which is not included by default. You can add this toggle button to other buttons like an Audio/Mute and a CC button. If you missed it, you can find a workflow for that type of buttons in this blog post:.