Get rid of Quiz Feedback messages In New Captivate 12.2

Intro

Multiple users asked me how to get rid of the default Success/Failure messages on quiz slides in the New Captivate version. Especially now that it is possible to have the correct answers hidden during Review, I understand this question. Depending on the situation, you do not always want an immediate feedback after each question.

The two-step Submit process which I have described multiple times on my blog remains the same as in previous versions:

  1. Learner clicks the Submit button, a Success/Last Attempt message appears. That message warns to click the slide or press Y to continue
  2. Learner presses Y or clicks the slide and the pause is released, the specified actions on Success, Last attempt will be done.

That situation is for a question slide with one attempt. If there are multiple attempts in case of Failure a Retry message will appear.

All messages in the new version are now in one multistate object. It replaces the individual messages which were in a static fluid box in the previous versions for a responsive project. 

It is impossible to delete that multistate object, there is no option to get rid of all the messages like was possible in previous versions by the setup in this screenshot:

Consequence of such an edit was that the first step of the Submit process automatically was deleted: no pausing after Submit, no need for the warning for the second step. I didn't succeed to achieve this in the New version, which means that you need to warn the learner to click another time. I have tried many workflows without success: changing the label of the Submit button to 'Continue' is only one of my failed attempts. 

Example output

It is a short quiz with 5 questions. I added an audio clip to the first quiz slide to warn about the extra click. All questions have only one attempt, and there is also one attempt on Quiz level. Review (without seeing correct answers) is possible from the Score slide. I did hide the review messages on that slide as well and added an extra slide (with exit button) after it. Like in previous versions it is still a recommendation not to have the score slide as last slide. You can watch the example below (fixed resolution) or the responsive version by clicking this link. Know that the loading time can be long for this version.

Workflow 1 - all quiz slides

This workflow can be used if you do not want any Success/Failure message. In that case it is important to change the settings before inserting the question slides! It cannot be applied to existing question slides.

Step 1: Default labels

  • Open Quiz Preferences, from the Preferences (Edit menu for Windows, Captivate menu for Mac).
  • Go to Default labels
  • Delete the text for the labels you want to hide. In this example I deleted the Success and Last Attempt message:

Step 2: System colors

You are aware of the fact that this version has no longer object styles. Each of the states in the multistate object with the feedback messages has a solid color at 100% Alpha in the default Themes. Color management has not improved, it is guessing which colors have been used. For the Success message it is the Success System color, and for the Failure message it is the Error System color. I didn't spend (waste) time trying to find by trial and error where those colors were used in other situations, but changed the Alpha for those colors to 0% which makes them transparent.

Result of those two steps: you'll not see a Success or a Last Attempt message, but still have to click the slide to proceed. If you have multiple attempts on quiz level, the Retry message will still appear because you didn't edit that message nor the fill of the box. Same for the message when learner clicks the Submit button without choosing an answer.

Workflow 2 - individual quiz slides

This workflow can be used when you don't want to hide the feedback messages for all question slides, or when you want to hide them on existing  slides.

Step 1: Text color

You cannot delete the text in a state, only edit it to create a custom feedback. You can however change the color of the text. So I changed that color to the background color of the question slide. This screenshot is taken on the Score slide, for the state 'Success' of the Review message. You need to do this for all states with messages you want to hide.

Step 2: Fill colors

This is similar to step 2 in the first workflow. For the states to hide set the Alpha of the Fill color to 0%. In the screenshot of Step 1 of this workflow, you see that this has already been done for the Success state of that area. In the last screenshot of Workflow 1 you have seen where you find the Alpha setting in the Color management dialog box.

Help?

I would be very happy if another expert could find a way to:

  • Style the Back/Next Review buttons the same way as all the other quiz buttons. I really miss the object styles. You cannot use Copy/Paste Appearance on buttons of the quiz/score slide. You cannot apply a new style to all the other objects with same type/style as in previous versions.
  • Avoid the second step of the Submit Process.µ
  • Avoid the weird state change of the images on the T//F questions. I know that you cannot disable the Hover state really, but I changed that state to look exactly like the Normal state. Nevertheless that original Hover state appears after submitting the answer.
  • Getting rid of the dimming or text and state change during Review. Light grey on white background is not very comfortable for people with weak eyes.


Quiz Basics 3: Attempts and Scores

Intro

In the first two articles of this basic course about Quizzing, I explained the Terminology, and the Submit Process.

Those posts applied to all types of questions: scored, random, Knowledge Check, pretest slides. This post will be talking exclusively about scored (graded) quiz slides and random quiz slides which are graded. For those slides the results are stored in the quizzing system variables, and you can have the score slide in your course. You will get some tips about the default score slide at the end. Scoring doesn’t exist for Knowledge check slides, you can only choose attempts on question level, not on quiz level.  Pretest questions have scoring as well, but the values are stored in different system variables, and are only meant to navigate the learner to another slide,  based on the pretest result.

This article will explore the scoring and attempts on two available levels:

  • on question level
  • on quiz level

Attempts/Scores on Question level

Setup for both is done in the Quiz Properties panel. That panel appears automatically in the newbie UI when you insert a quiz slide (or a random slide) in the right docking station. For quizzes however I strongly recommend to switch to the Expert UI (check the option ‘Enable custom Workspaces….’ under Preferences, General Settings). Set up a workspace where both the Quiz Properties and the Properties panel are visible. Reason is that you need the Properties panel for partial scored MCQ slides with multiple correct answers.

Attempts

In the default setup the number of attempts for graded questions is set to 1. The feedback messages for Correct and Incomplete are checked and 1 Failure message. The actions for Success and Last Attempt are both set to Continue. You could check the option Infinite Attempts, but I strongly doubt you’ll want to have the learner in such an infinite loop.  A limited number of attempts however can be a good choice. If you allow more than one attempt, do not forget to check the ‘Retry message’ because that is not done automatically. Have a look at this screenshot for True/False Question, to the arts marked with a blue rectangle. I set the number of attempts to , and checked Retry. The Failure message was left at its default 1 message.

I kept the default Continue actions as well, but moved the pausing point closer to the end of the question slide (see previous article) to minimize the waiting time after the second step of the Submit process.

Score/penalty for 1 correct answer

Default score for all questions is set to 10 points. Since some LMS’s don’t like to see total scores greater than 100 points, and all questions don’t merit the same score you will certainly want to change those scores. BTW: later on I will offer an exploring post about the wonderful Advanced Interaction panel (F9), unknown to many because it never appears automatically in the newbie UI. It is not only about ‘advanced’ actions at all.

Changing the score happens in the Quiz Properties panel for all question types with a black/white score. B/W score means that you only get the score if everything is correct, score will be zero in all other cases. All question types, except the MCQ with multiple answers are validated with this rule, even Matching, Hotspot and Sequence. In the screenshot above (T/F), you see the score reduced to 4 points.

I also added a penalty: this score will be subtracted from the total score if the answer was wrong after the last attempt. You don’t have to enter a negative number here. Beware: in SCORM 1.2 reporting a negative result at the end will be reset to zero.

MCQ with multiple correct answers and partial scoring

Have a look at this screenshot, set up for such a question slide, with 5 answers. Two out of them are correct, each has a positive score of 5 points. The 3 wrong answers get a penalty of 2 points each. Neither the score nor the penalty can be set up in the Quiz Properties panel, they are dimmed. You have to select each individual answer, and setup score in the Properties panel of that answer (visible in the screenshot as floating panel next to the Quiz Properties):

The 4th answer, wrong answer, is selected in this screenshot. There is no Penalty field in the Properties panel, tab ‘Options’, only ‘points’. Since this needs to be a penalty I entered -2points. Same for the other wrong answers. The correct answers got positive points (5 for each). The dimmed numbers for Score and Penalty on the Quiz Properties panel are calculated by Captivate to 10 points and 6 points. I had to check the ‘Partial correct’ message, was not done automatically although Multiple answers was chosen.

In this example I changed the actions (Success/Last Attempt) to ‘Go to Next Slide’, didn’t move the pausing point of the quiz slide. This is the second possibility to narrow the waiting time after Submitting the result.

You see that 3 attempts are possible for this question (green markings).  But the Retry message is unavailable, dimmed. Reason is that I have chosen to show 3 Failure messages, different one after each attempt. You need to include the warning about clicking the slide (or pressing Y) for the last Failure message which appears after the last attempt.

Quizzing System Variables

These quizzing system variables (see also: Using Quizzing System Variables) are linked to individual question slides:

  • cpQuizInfoAnswerChoice: after submitting the answer (see this post for a typical use case)
  • cpQuizInfoLastSlidePointScored: after submitting the answer
  • cpQuizInfoMaxAttemptsOnCurrentQuestion: while on that slide. Beware: there is no exposed system variable telling which attempt the learner is taking at this moment on question level, only the maximum allowed attempts can be retrieved.
  • cpQuizInfoNegativePointsOnCurrentQuestionSlide: maximum penalty for this question slide
  • cpQuizInfoPointsPerQuestionSlide: maximum score for this question slide.
  • cpQuizInfoQuestionPartialScoringOn: Boolean
  • cpQuizInfoQuestionSlideTiming: if you use a time limit on the quiz slide
  • cpQuizInfoQuestionSlideType

Attempts/Score on Quiz Level

The number of allowed attempts on (total) quiz level is set up in the Quiz Preferences, Pass or Fail.  Default setup is one attempt. If you allow multiple attempts, don’t forget to check the option to ‘Show Retake Button’. When clicking that button, all questions will be reset and the quiz system variables will be cleared.

If you also allow Review (Quiz Preferences, Settings), you have to be aware of the fact that all attempts on Quiz level will be considered to be exhausted if the learner clicks the Review button (also on the score slide). To prevent confusion use this easy trick: drag the Retake button on top of the Review button on the results master slide (or the score slide). Once the attempts are exhausted the Retake button will disappear and Review button becomes visible. Problem is that this is perfectly possible for a non-responsive (blank) project or a responsive project with Breakpoints. But a normal fluid box doesn’t allow stacking of buttons, unless you define the fluid box as being static. I will post a workaround in my “tweaking posts”, later in the Quiz sequence of posts.

The Total Score on quiz level will be calculated from all the scored objects in the course (see Advanced Interaction panel) and stored in a quizzing system variable cpQuizInfoTotalQuizPoints. Except for the feature ‘Branch aware’ that will be a fixed number when starting the course.  Other quizzing variables  (see post) linked to the quiz level are:

  • cpInQuizScope
  • cpInReviewMode
  • cpInfoPercentage:  appears on the results (score) slide as ‘Accuracy’ ‘percent’
  • cpInfoAttempts: appears on the results slide as ‘Attempts’ ‘total-attempts’
  • cpQuizInfoPassFail: Boolean
  • cpQuizInfoPointsscored: appears on the results slide as ‘You scored’  ‘score’
  • cpQuizInfoQuizPassPercent
  • cpQuizInfoQuizPassPoints
  • cpQuizInfoTotalCorrectAnswers:  appears on the results slide as ‘Correct Questions’ ‘correct-questions’; beware: partially correct questions are seen as correct
  • cpQuizInfoTotalProjectPoints: appears on the results slide as ‘Maximum Score’ ‘max-score’
  • cpQuizInfoTotalQuestionsPerProject: appears on the results slide as ‘Total questions’ ‘total-questions’
  • cpQuizInfoTotalUnansweredQuestions

The Continue button on the Score slide has about the same functionality and importance as the Submit button on quiz slides. That actions specified under Quiz Preferences,  Pass or Fail (after Last attempt on Quiz level) will be done after clicking that button. The pausing point on the score slide is linked with that button. You can move that pausing point the same way as for the quiz slides, closer to the end of the score slide. It is recommended not to have the score slide as last slide in a course, but have at least one more slide. That way you’ll be sure that the results will be transferred to the LMS.

Quiz Basics 2: Submit Process

Embedded objects

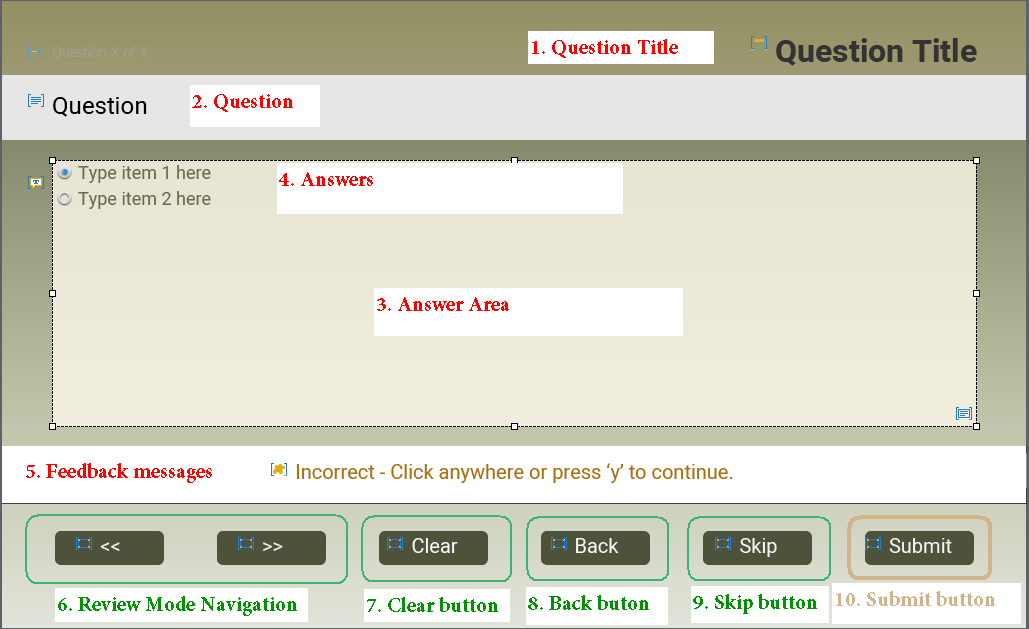
In a first article about Quizzes I introduced some terminology and one of those terms is ‘Embedded Objects’: those objects on the quizzing slides and master slides which have no individual timeline, but have functionality built in. Some of those objects can be turned off, using either Quiz Preferences (for global settings) or Quiz Properties for individual slides. Here is an overview of those objects (for quiz master slide MCQ,T/F….), from top to bottom, using the numbering in this screenshot:

  1. Question title: cannot be deactivated. You can edit that title on the quiz slides, do not delete it.
  2. Question: same, change the style if wanted but never delete.
  3. Answer area: compulsory as well. If you expect long and/or many answers, I recommend to make this area as big as possible on the master slide. If you want custom objects on the quiz slide (like an image), free some space by editing the size of this area. For a Fluid boxes quiz slide, you’ll need to add a fluid box for that purpose. More information in Fluidize your quizzes.
    This area is the container for:
  4. Answers: it is not possible to resize the individual answer size on the master slide, only on the quiz slides. Of course you need this object.
  5. Feedback messages: are stacked in the same location (also in fluid boxes, by using a static fluid box). In the screenshot the Review area is also stacked in the same location. It has almost no meaning anymore since it is only used for skipped questions.
    Quiz Preferences offers no way to activate/deactivate the messages, that has to be done with Quiz Properties for the quiz slides.

    1. Correct message: is checked by default for a normal quiz slide
    2. Incomplete message: is checked by default for a normal quiz slide
    3. Failure message: normally set to 1, with the dropdown list you can choose ‘None’. If you have more than 1 attempt on quiz level, you can add up to  failure messages with that same list.
    4. Retry message: becomes available when the number of attempts is greater than  However if you have more than 1 Failure message it will be dimmed.
    5. Partially correct message will appear instead of the Correct message when Partial scores is turned on and the question is not answered fully correct.
  6. Review Mode Navigation Buttons: if you allow Review (Quiz Preferences), it is wise to activate these buttons in the Quiz Preferences. They will only appear during Review, and make navigation possible since quiz slides normally do not have a Next button (and I also recommend no Back button) except when “Submit All” is turned on (will post a future article about Quiz Preferences). Here is a partial view of Settings in Quiz Preferences:

7. Clear button:  can be turned on/off both globally (see the screenshot above from Quiz Preferences, Settings). In the default setting it is turned off. It is possible also to turn on/off on individual quiz slides using th Quiz Properties (see screenshot top right).

8. Back button:  is a bit confusing. You can turn off ‘Allow Backward movement’ in the Quiz Preferences, which will automatically result in having the Back button disappear on quiz slides. However, when using remediation, where you want to send the learner back to a content slide, you have to turn this option on. Having a Back button on a questions slide is not a good idea, since answers are frozen once the question slide is left. Learners cannot re-enter an answer. One exception: when Submit All is turned on (see future article). Even when ‘Allow Backward movement’ is turned on, you can still check off theBack button on all quiz slides with Quiz Preferences, Settings. You can also do it individually using the Quiz Properties for the question slide.

9. Skip button; is turned off by default, can be turned on both globally and for individual quiz slides.

10. SUBMIT button: is the most important object on this slide. There is no way to turn it off, not globally nor individually. It is that button which is responsible fir the two-step Submit process. Remember: quiz slides have a pausing point by default which cannot be turned off (you can move it only with the mouse).

Two-step Submit Process

When the learner clicks the Submit button:

Step 1

Feedback message appears, playhead is not released but remains paused at the pausing point. If you have added slide audio to the question slide and it is not finished, it will continue playing. The pausing point will not stop the audio. Four possible situation in this first step:

  1. There is no answer or answer is not complete: Incomplete message appears.
  2. The answers were totally or partially correct. The feedback message Correct (or Partially correct) appears.
  3. The answers were not correct (partially correct is considered as correct).
    1. If there is only one Failure message and one attempt Failure message appears
    2. If there are multiple attempts which are not exhausted,  and one failure message: Retry message appears
    3. If there are multiple attempts, not exhausted, and multiple failure message: the appropriate failure message appears. Make sure to indicate that they can retry except for the last failure message.

All messages, except the Retry message and the intermediate failure messages (not the last one) should indicate how to trigger the second step. For all types of quiz slides, except the overlay quiz slides in a VR project, that will be ‘click the slide or press Y’.

The goal of this first step is to offer the learner as much time as necessary to read the feedback messages. Some developers don’t like the present workflow, will post some possible tweaks in a future post. Personally I hope that the new workflow for the overlay quiz slides in VR projects, which is more user friendly, will be extended to the other types of quiz slides.

When the user clicks the slide or presses Y:

Step 2

With this step the playhead will be released, same way as what happens with an action when the option ‘Continue Playing the Project’ is activated. It can only happen in two cases: for a correct answer, or for a Last attempt answer.

  • Correct answer: the action ‘On Success’ specified in the Quiz Properties panel will be done. Beware: default action is set to ‘Continue’.  It means that the released playhead has to travel through the inactive part of the slide (the part after the pausing point).  It it is only the default 1.5secs, that may be OK. However if you added slide audio, and forgot to move the pausing point closer to the end of the slide, that may be a long waiting time for the learner. Alternative could be to replace the action ‘Continue’ by ‘Go to Next slide’. In most cases that works fine, some users could have issues in case of low bandwidth and slow reactions of the LMS due to hardware problems. I had that problem in college when too many students were taking the same assessment, due to outdated switches.
  • Wrong, last attempt: the action ‘Last Attempt’ will be done. Same comments as for the Correct answer concerning the pausing point and audio. Look at the screenshot below: due to the audio clip, if you leave the action to the default command ‘Continue’, the learner will have to wait 4 seconds before getting to the next slide. Better drag the pausing point to almost the end, at 4 seconds. You cannot use the Timing properties panel to do so.

Quiz basics 1: Terminology

Why?

Since 2008 I have been blogging regularly about Captivate. The most visited post is a rather old one date October 2011. It is labeled  ‘Question Question Slides‘ and believe me, still has daily views.  It is the reason why  I consider Quizzes as one of the three main topics for any Newbie in ‘Three Skills to Acquire‘.  Since 2011 quite a lot has changed in Captivate, although the basic design of quizzes is still the same.  Many peers have asked me in the past to publish a book about Quizzes  (could easily fill a book if it included custom questions). From what I feel in the community, a book is not at all the appropriate medium anymore. However I want to publish a sequence of articles about Quizzes, as I did for the Timeline (another stumbling block), with up-to-date information. It is important to understand the terminology, which is a problem when trying to answer questions everywhere: there is no ‘official’ glossary for Captivate and lot of terms are used in a haphazard way. To avoid any misunderstanding in future posts about Quizzes, I want to start with explanation of the different terms concerning quizzes. Some are ‘official’ also to be found in the Help documentation, some are terms I am using as well.

Drag&Drop will not be included in this sequence of articles, it is not following all the rules of the normal question types

Quiz Menu

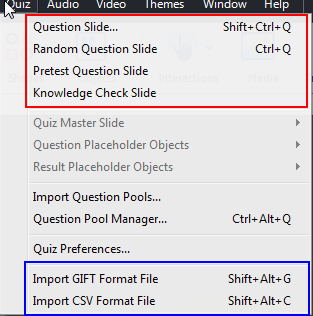
Although you can insert Question slides and Knowledge Check Slides from the big button Slides, the place to be is the Quiz menu:

The red box shows the 4 possible choices:

Question slide

Is based on a dedicated Quizzing Master slide, depending on the type: True/False, Multiple Choice, Fill-in-the-Blank, Short Answer and Sequence have the same master slide, Matching, Hotspot and Likert have each an individual master slide. Beware: Likert type cannot be used in a responsive project, whether Fluid Boxes or Breakpoint workflow is used.

An inserted Question slide will have these settings by default (except Likert which is set to Survey):

  • Graded
  • 10p score, no penalty
  • 1 attempt
  • actions Success/Last Attempt are set to Continue
  • pausing point at 1.5 secs
  • 1 Failure message
  • Reporting turned on
  • Included in Quiz Total

Most settings can be changed. Only one type has the possibility for partial scoring: MCQ with multiple correct answers. MCQ with one correct answer has the functionality of Advanced Answers (message/action). If number of attempts is higher than 1, you can have up to 3 Failure messages.

Question slides have a dedicated  category of system variables, read-only. More information in this post

You can use the On Enter event of a question slide to trigger a custom action, but not the On Exit event. Question slides, like interactive objects have a Success and a Last Attempt event which can be used for actions.

Random Question Slide

Is a placeholder slide, which will be replaced by a random question from a question pool. Pool questions are based on the same quizzing master slides as normal question slides. On Enter event can be used on slides in the pool, not on the placeholder slide. The same quizzing system variables are used for random question slides as for the normal question slides.

You find the option for Random slides also in the dialog box ‘Insert Question’ which you open with Quiz, Question slide.

More details about this type in Random Questions, Do’s and Don’ts

Pretest Question Slide

Slides are based on the same master slides as the normal question slides. They have a special bunch of system variables, will not be included in the variables used for question and random slides. The Pretest slides have only one goal: to have navigation after the pretest based on the results. For that reason you set up a Pretest action. These special slides have limitations:

  • They need to appear in sequence at the start of the course.
  • All free navigation will be disabled: both by playbar and by Table of Contents (reason is that learner cannot go back to the Pretest slides).

Knowledge Check Slide

This new type was introduced with Captivate 9.  Likert questions nor random questions can be used. They are not scored, will not be present in the quizzing system variables nor in Review/Retake. They can be recognized by a special icon in the Filmstrip. This is the default setup:

  • Not graded
  • No score, no penalty, partial scoring in MCQ impossible
  • Infinite attempts
  • action Success is set to Continue
  • pausing point at 1.5 secs
  • No Failure message
  • No Reporting

Some featured can be changed: you can limit the attempts and will then get a Last Attempt action. You can turn on Failure message(s).

A complete comparison with normal quiz slides can be found in Tips for Knowledge Slides

TIPS:

  1. It is possible to copy/paste normal question slides in a question pool  to reuse them as random slides.
  2. It is possible to copy/paste a question slide from a pool as a normal question slide in a project.
  3. It is impossible to convert a normal quiz slide to a Knowledge Check slide nor to a Pretest slide.
  4. It is impossible to convert a Knowledge Check slide to a normal quiz slide nor to a Pretest slide.
  5. It is not possible to convert a Pretest slide to a normal question slide, nor to a KC or random slide.

PS: KC slides can also be used as Overlay slides in an Interactive video. You’ll find more details in Tips for Interactive Video.

Question slides can be used in 360 slides and VR projects. Styling of those slides is limited at this moment, cannot be based on a custom theme.

Import GIFT file

Instead of adding the question/answers in the individual slides, Captivate allows two alternatives, one of them being GIFT import. Moodle developed this ‘language’, you can find the full documentation here. Use a text editor which allows to publish to non-formatted txt files. This file can be used to insert all types of questions in Captivate with the exception of Likert, Hotspot and Sequence types. There are also workflows which start from an Excel file.

Lot of features are supported: for MCQ with multiple correct answers you can set up partial scoring, you can add feedback messages etc.

GIFT import is possible for normal question slides, for slides in a question pool. It is NOT possible for Pretest slides, nor for Knowledge Check Slides.

Especially when dealing with big amounts of question slides, and/or many pools I like to keep the questions ready in a GIFT file as backup and for eventual editing

Import CSV file

New import workflow appeared with CP2019: use of an Excel template which will create a CSV file that can be imported. You’ll need two files which are stored in the GalleryQuiz under the installation folder of Captivate. I published a small article about this workflow. Using the macros in CSVQuestionsCreationMacro file is pretty straightforward and documented in this tutorial by Dr. Pooja Jaisingh.  Same question slides are supported as for GIFT import (T/F, MCQ, Matching, FIB and Short Answer). There are some limitations, reason why I still stick to the GIFT alternative:

  • You cannot indicate partial scoring for MCQ with multiple correct answers
  • CSV file not really suited as backup, since you cannot edit a question once it has been added to the CSV sheet
  • Got some errors when trying CSV editing with importing to an Excel file, and exporting to CSV. File was not accepted by Captivate.

Quizzing Master Slides

All types of question slides described above are using the Quizzing Master slides. Each theme in Captivate needs at least 6 master slides, whether it is a blank (non-responsive) project, a Fluid Boxes (responsive) or a Breakpoint Views (responsive) project. Blank master slide is always required (for PPT import an software simulations), 4 question master slides and one score master slide. The Blank theme used to show this minimum set, but for some reason in CP2019 a Title master slide was added (?) which I deleted in this screenshot.

I will focus on editing those quizzing master slides in a later article. In this introduction I just want to point out some very special aspects of those slides.

Timelines

The timeline of the quizzing master slides, and the result master slide is very simple: you see only the slide timeline. There are no placeholders, no object timelines like you normally find  on content master slides. However when you look at the content of those master slides, you see a lot of objects!

You don’t see any pausing point on the master slides, not for the questions, nor for the score master. However when you insert a question slide (any type) it gets automatically a pausing point at 1.5secs. Same for the Score slide.

When you select an object on the master slide (button, a feedback, Question, Answer area) they still don’t show a timeline. Their properties will appear. I will point to the objects in a question (master) slide or a score (master) slide as:

Embedded Objects

My definition: objects that do not have an individual timeline, not on the master slide nor on the slide itself. Those objects have functionality built in, which control the workflow for the slide. I talk about the Submit process (see future article), the appearance of messages, the inclusion in quizzing system variables etc. Just one tip: be careful when dealing with Embedded objects.

Those objects have absolute priority in the z-order, also known as stacking order. They will always appear on top of extra inserted custom objects.

Puzzling: normally the only interactive object allowed on a master slide is a shape converted to a shape button. However on the quizzing and score master slides the used buttons are all Transparent buttons.

When creating a question slide or a score slide, not all objects will appear. It depends on the setup in Quiz Preferences (see later article), the Quiz Properties of the slide and… on the situation. The Review Navigation buttons (with the double arrows) on quiz slides will only appear during Review. The Retake button on the score slide can only appear if more than one Attempt on Quiz level is allowed.

Next?

So much has to be told about Quizzing, always more than I expected. In future posts I will try to write about:

  • Two-step Submit process
  • Tweaking/customizing that process
  • How to handle Embedded Objects
  • Quiz Preferences
  • Editing the Master slides for quizzing
  • (Setting up the Pretest condition)
  • Audio on Quiz slides
  • Custom objects on quiz/score slide
  • Custom score slide
  • Scoring for KC slides
  • ….

I am sure this list is not complete. If you want to add more ideas, feel free to comment.

Quiz/Score slides in Quick Start Projects - part 2: Responsive projects

Intro

Recently I posted about using Quiz slides as ready-to-go slides from the available Quick Start projects, in their non-responsive version. The conclusion was not very positive, because most themes didn’t include the necessary master slides to allow you to create all types of quiz slides with the theme look/design. For the Score slides the situation is even worse, because they cannot be inserted as ready-to-go slide, they will appear automatically after insertion of a quiz slide, or after setting up the Quiz Preferences to show a score slide (for scored objects). If the Results master slide has not been created in a theme (as was the case for multiple QSPs) you’ll not be able to get them in your project, unless by using the long workaround I explained in that post.

This second part refers to the responsive versions of the Quick Start Projects. It is a relief to see that the situation is better for the used themes. You will be able to download a table, with the same indications as in the first post.

Table

The number of Quick Start Project with a responsive (fluid boxes) set up is more limited than for the non-responsive projects. You can find a similar overview like the one provided for the non-responsive projects in this downloadable table:

QuizQSPResp

Items marked in red need some explanation, have a look at the Tips below

TIPS

Similar to the non-responsive projects, there are QSPs (Quick Start Project) with a fully developed theme, including dedicated master slides for the score slide and the quiz slides. That group includes the projects Safety, Wellbeing and Alliance. A second group (Earth, Rhapsody and Wired) has master slides but only partially similar to the example slides. Mostly images are lacking, but since you are dealing now with Fluid Boxes, it will need some knowledge of that workflow to reproduce the look of the quiz and score slides.

The project Aspire  has several example MCQ slides, only one of them is using a dedicated master slide. It has also an incomplete Results master slide. The project League has incomplete quiz master slides.

The situation for the score slide is different. As told before, you cannot insert a score slide as a standalone slide. It will be inserted automatically after you have inserted a question slide of the same theme, or when you select the option ‘Show score at the end of the Quiz’ in Quiz Preferences, Settings.

The tips for the question slides, mentioned in the previous post, are valid here as well. For that reason, focus in the TIPS is only on the Results (score) slide. If you want to learn more about the Fluid Boxes layout for question slides, and about editing the feedback messages, have a look at:

Tips for Fluid Boxes quiz slides

Feedback Messages in Fluid Boxes question slides

Score slide

Three groups of Quick Start Projects, each with a different approach.

Group 1: Safety, Wellbeing, Alliance

These projects have a Results master slide consistent with the global Theme design. The content (inserted fields) is similar to Results slides in all themes packaged with Captivate. That means that you can use choose the to be inserted fields, using Quiz Preferences,  Settings, button ‘Quiz result messages. The screenshot below shows an example, where two fields (Max. Score and Attempts) have been unchecked. The Fluid boxes layout will adapt to those changes.

No problems with this group at all. When you insert any question slide from one of these QSPs the results slide will automatically be inserted and have the design of the master slide of that same QSP.

If you insert a question slide directly (using Quiz menu) the theme of the project will have priority and the project Results master slide will be used. This is due to the fact that version 11.5 supports the use of multiple themes.

Group 2: Aspire and Rhapsody

Those projects have two Results slides. This screenshot shows them for Aspire:

The first master slide (Result) is the default master slide used when the Results slide is inserted (due to insertion of a question slide). It has only partially adapted the Theme design.

The second master slide (Custom Result) is used in the Alliance project for the example results slide.  You can switch the existing Results slide to this master slide if you want. BUT! the big problem is that you’ll miss the Advanced action used for this results slide, and the text content for some text captions.  This is a big problem if you are not familiar with those features.

Group 3: Wired, Earth and League

These projects have no Normal Result master slide. By Normal I mean that you can add/delete fields as shown in the screenshot ‘Quiz Result Messages’ under Group 1. These projects have only a customized Result slide, which is using an advanced action.

This is a problem: when you insert a question slide from one of these projects, the companion Results slide will be that custom slide. That means that you will have to find the advanced action and attach it, after having filled in the missing information.

Two possible solutions: either you will replace the custom Results slide by the default Results slide from the project theme. These two screenshots may illustrate the workflow. It is a project using the ‘Cement and Steel’ theme packaged with Captivate.  A T/F question slide was inserted from the QSP ‘Earth’, which resulted also in the Results slide of ‘Earth’, and you can see the result here (missing Text, advanced action). You see the results slide at the back (with part of the missing fields in the scratch area), the Filmstrip and the Properties panel of the results slide. You see that the Results slide belongs to the ‘Earth’ theme:

To replace the Results slide by the one belonging to the theme ‘Cement and Steel’, use the dropdown list (showing Earth) to switch, and you’ll get only one possible master slide: the Results Master slide of ‘Cement and Steel.’ Select that master slide, and you’ll get all the fields back, no advanced action needed, although the design may need some editing.

Post a comment, if you want to learn how to recover the advanced actions for the custom results slides in groups 2 and 3.

Tweak Remediation: get out of the eternal loop

Intro

The Remediation feature was introduced with Captivate 6. There are many YouTube videos explaining the setup. I still prefer the original one by Shameer Ayyappan. 

The idea is that a learner when failing a Question will be navigated back to a content slide. When clicking the Next button on that content slide learner will return to the Question, and be able to change the answer. That is not a normal behavior for quiz slides, by design answers are blocked and attempts considered to be exhausted when leaving such a slide. 

There are some issues with the feature:

  • The learner will need to give a correct answer before being able to continue to the next slide. Result is an ‘eternal’ loop until the correct answer is given.
  • Each learner will have a 100% score at the end. Not always what you want as developer.

Quite a while ago I designed a workaround to break the ‘loop’. Yesterday a user in the Adobe forums asked for such a workflow. This is the thread.

As usual I checked if the workflow still is functional on the most recent release (I am on 11.5.5.553) and if it could be improved.  You can guess that I replaced the former advanced actions by the much more useful and flexible shared actions.

Example 

Watch this example: it has two content slides, and two quiz slides. For the first question (T/F) remediation feature is used, but after a second failed attempt the learner will proceed to the next question. Remediation for the first slide is using the first content slide. Similar for the second quiz slide (MCQ): remediation is using the second content slide, and learner will go to the next slide (score) after the third attempt. Watch it using this link (rescalable) or the embedded fixed resolution version below:


Step-by-step workflow

The limitation for the workaround is the same as for the default Remediation feature: you cannot use partial scoring for the MCQ slides, because a partially correct answer is considered to be correct by Captivate.

Sort summary of the default Remediation setup:

  1. The next button on the content slide has the command ‘Return to Quiz’ for its Success event. That command will only be done when the slide is visited from a quiz slide. If that is not the case, the Next button uses the action ‘Go to Next Slide’.
  2. Attempts for the question slide is set to 1.
  3. The Last Attempt action for the Quiz slide has the action ‘Jump to Slide, pointing to the appropriate Content slide

To break the eternal loop:

1. User variables

Create two user variables:

  • v_attempt: starts with a default value of 0 and is reusable for each quiz slide (will be reset to 0). It tracks the number of attempts on question level. There is no system variable possible. Only on quiz level you can use cpQuizInfoAttempts.
  • v_max: will get assigned the number of attempts allowed for each question. In the example file, for the first question it has the value 2, for the second one the value 3. That makes it flexible.

Once you have the shared actions in an external library, no need for this first step. Just drag the shared actions (together) from the external library to the project library and they will be created automatically. Since they are in both shared actions, even if you replace the EnterQuest action by an advanced action, it will still be done by importing the second shared action FailureAct.

2. EnterQuest (Shared action)

This (standard) action is triggered by the On Enter event of the quiz slide.

For each quiz slide you’ll need this action to set the value for v_max and to increment the value of v_attempt by 1 to track attempts. This shared action has only 1 parameter: the literal which is the value of v_max for this particular quiz slide. If you want the same number of attempts for all the quiz slides, you can replace this shared action by an advanced action of course.

3. FailureAct (Shared action)

This (conditional) action is triggered by the Last Attempt event of each quiz slide. 

It has one parameter as well: the content slide which needs to be used for remediation.

4. Next buttons

Similar to the default Remediation, you need a Next button on each content slide with the action ‘Return to Quiz’.


Penalty and Partial scoring in Quizzes - Q&A

Why?

This is an basic article because often questions about this specific feature appear on the social media. This week I had another one in this thread. The question was specific for Multiple Choice questions with multiple correct answers. It is a very basic post, not meant for advanced Quizzing users.

Terminology

Penalty

A penalty is a negative score linked to a question (or an individual answer for a MCQ, see below). It is essentially meant to avoid ‘guessing’.  Think about a T/F question where a learner always has 50% chance to choose the correct answer, without proving real understanding. In Captivate you can add a Penalty for each type of question in the Quiz Properties panel. You add it as a ‘positive’ number.  See this screenshot:

The Penalty will appear in the Advanced Interaction panel, column Negative points:

You can have a hands on experience with penalty, when playing with this short quiz (more explanation later on), has only MCQ type of question. The previous screenshot of the Advanced Interaction panel was for this example file. Either you watch this embedded version (fixed resolution) or you use this link to open a scalable version:


For this example I have used design elements from the most recent Quick Start Project ‘Business’.

Partial Scoring

Feature is only available for Multiple Choice Questions with one or multiple answers.  

For all other types of questions a learner gets the score  for a question only when everything is correct.  That can be very frustrating for learners if they just missed something.  That is certainly the case for a MCQ with multiple correct answers, but also for a Fill-in-the-Blank with multiple blanks, or a hotspots question with multiple hotspots. However those other types have no inbuilt  partial scoring.

MCQ with Multiple Correct Answers

To set up partial scores, you need to activate the option ‘Partial score’ and in this case the option ‘Multiple answers’ is of course also needed. If you do not specify the exact score for each answer, both score and eventually penalty will be equally distributed. But it is much better to identify the score and penalty, because each answer can have a different weight: some are more easy to detect than others. 

For that reason you need to:

  • select each answer
  • open its Properties panel
  • go to the Options tab
  • enter the ‘points’
  • for wrong answers you enter ‘negative’ points,

After entering individual score/penalty the score and the penalty on the Quiz Properties will look ‘dimmed’, but they are calculated as sums from the individual positive and negative scores of the answers. I prefer the expert UI because I can have both Properties and Quiz Properties next to each other, or at least both visible at the same time. Here an example for one correct answer, 6 points out of the total score of 15 points, because the two other correct answers have a score of 5 and 4points:

In this screenshot you see the ‘penalty’ or negative score for one of the wrong answers:

This wrong answer has a score of -4p, whereas the second wrong answer is estimated at -3p, which leads to a total penalty of 7points.

MCQ with One Correct Answer

It may be less logical for a MCQ with ONE correct answer, isn’t it?  However the term ‘partial score’ is also valid for ‘partial penalty’ as you could see above.  You may have several wrong answers, and some may considered to need a bigger penalty than other wrong answers. This means really differentiating the penalty which is available for MCQ with one correct answer. The first question slide in the example file was set up that way. The correct answer was rewarded with 10 points, the wrong answers had 3 different penalty scores. Here is an example:

Something is wrong with the ‘total’ penalty in the Quizzing Properties however.  It has been calculated as explained above: sum of all the negative scores. But in this case, the learner can only  mark one of the wrong answers, that penalty of 10 points can never exist.

Possible Issues

LMS reporting

When using SCORM 1.2 the LMS may not accept a score below 0. Just a warning

Attempts on Question level

The reason for the example file was the thread I mentioned in the introduction. In the example file, the Quiz attempts are set to Infinite, but the attempts on question level are limited to:

  • Two attempts for the Single Choice question
  • Three attempts for the Multiple Choice questions

The second and third question are identical, but the second has no partial scoring, the third has partial scoring turned on.  Captivate will see a question with a partially correct answer as a ‘correct’ question, and include it in the system variable cpQuizInfoTotalCorrectAnswers. That has also its consequence for the attempts. If you give only one correct answer, the attempts will be considered to be exhausted, you’ll not have the possibility to add correct answers. Try it out: you will see that you can use the 3 attempts always on the second question (as long as you don’t have all the correct answers), but not on the third question. That is a problem!

MCQ slides with images (back to basics)

Intro

Recently another request on the Adobe forums appeared about quiz slides:

"....insert images as the Options/Answers in the Multiple Choice Questions"

I answered within a short time showing a screenshot of such a question slide, quickly designed:
It is not really that difficult, but reminded me of the fact that many newbies have not really an idea about the way quiz slides are created. Although I have already published many articles about quizzes (see overview),  want to explain how I realized that quiz slides in minutes.

I would have posted this in the community as another Tweak post, but since 3 posts I entered since 2nd of July are still not approved, and i wanted to provide a clear answer to the OP on the Adobe forums, will only post in my personal blog.

Quizzing Master slides editing

All question slides are based on a dedicated master slide. One unique master slide is used in any theme for MCQ (one answer and multiple answers), True/false, Fill-in-the-Blank and Sequence questions. Typical for those master slides is that all the items are embedded, they have no individual timeline. You'll find more information in my other blogs. The most important part for this use case is the so-called Answer area:

That particular item is the container for the Question answers. It is however NOT possible to edit the individual question answer captions. 

Even with the default setting in Preferences which prefers Smart Shapes over Text Captions, all items on quiz slides are always captions! Question slides need a long due refurbishing, shape buttons as quiz buttons are also not allowed. 

To make place for images, you need to make the Answer area as big as possible. Move the buttons to the bottom, make the feedback messages as small as possible and move them downwards as well. Move the captions at the top as high as possible (Type of question, Progress indicator in this case as well, Question). Now you'll be able to increase the size of the Answer area:

Question slide editing

Only on quiz slides it is possible to edit the individual answers. I increased the number of answers to 4, and rearranged the answer captions to make them as big as possible. I took out the numbering and the text caption placeholder. You see the four answer captions inside of the (red) answer are:.

As most embedded items on the quiz slides, those answer captions have functionality built in. I would like to compare those captions with 'hotspots'. When you click a caption, the radiobutton will be selected. For a MCQ with multiple correct answers, it will be a checkbox that is selected. 

All embedded objects are always on top of the stack (z-order). If you insert an image in the area defined by the answer caption, it will be below the 'hotspot' and the functionality will be preserved. That is the only trick I used to have the resulting question slide with the maps of some European countries (SVGs). Since it is an original quiz slide, all functionality (Retake, Review) can be used. 

The workflow is also valid for quiz slides in question pools.


Quiz: Replace Score by 100% or 0%

Intro

Recent question on the Adobe forums is the reason for this blog. User didn't want the score (points or percentage) to be transferred to a LMS. Since the questions were random questions, using pools, it was impossible to use Knowledge Check slides, nor Pretest slides. The requirement to succeed the assessment was to have a minimum amount of correctly answered questions (7 out of 8). If that was the case, the transferred result to be transferred to the LMS should be 100%, and on failure 0%. I designed a workflow based on previous blogs about Random quiz slides and Reporting custom quiz slides. You will be able to check out a published example project, and follow the setup, Step-by-Step. To save some time I used a couple of ready-to-go slides from the project 'Alliance', but had to do edit of course.

Example

You can watch this file either from this link, (scalable)  or in its embedded version (fixed resolution):

Project has 11 slides, one of them (default results slide) is hidden. A pool was used to insert 5 random quiz slides. You need to have at least 4 correctly answered questions to obtain a score of 100%.


Setup

Here is the filmstrip of the example file:

Slides 1-3 are based on ready-to-go slides from the project Alliance.

Slides 4-8 are random quiz slides taken from a pool with 10 questions.

Slide 9 is again taken from Alliance (but with lot of multistate objects, see later).

Slide 10 is the hidden default score slide. It will automatically be moved after slide 9 because of the scored button on this slide (see step 3).

Slide 11,  final slide allowing to be sure that the final result (100% or 0% ) is correctly transferred to the LMS. I inserted the system variable cpInfoPercentage in a shape on this slide (top left).

Step 1: Score random question slides

Supposed you have the question pools ready, insert the required amount of random quiz slides in the project. All slides in a pool have by default the same score (10 points), it is not possible to have partial scores for MCQs with multiple correct answers.  There seems to be a bug for a FIB slide, where the correct answer appears as tooltip in case you have that question. Will log the bug, seems new.

Once the random quiz slides are inserted, it IS possible to edit the score. I took all score out, set them to 0. Just a tip, check the Advanced Interaction panel (F9, or under the Project menu) to see that the total quiz score is now indeed set to zero.  Penalty has no sense in this situation because success doesn't depend on the acquired score of the quiz.

To avoid long waiting time after the submit process for a question, I moved the pausing point near the end of the slides in all the pool questions.

Step 2: Tracking correct questions

To track the number of correctly answered question, you need to create a user variable v_counter, with a start value = 0. 

That variable needs to be incremented with each correct answer.  Number of attempts on question level is set to 1. It is then sufficient to create a simple advanced action to be triggered by the Success event of all random quiz slides:

Step 3: Results slide

I used a ready-to-go slide to show the result, but have converted several objects to multistate objects. The Normal state is the one shown on Success, the Failure (new) custom state will be shown on failure. This is the timeline of that slide:

Moreover I added two interactive objects to the slide, both invisible in output to start with (eye button in Properties):

  • Bt_Failure: is a transparent button similar to the Next button in the Alliance project. It has its default command 'Go to Next Slide'. 
  • SB_Success: is a start shape marked as button. Special is the fact that this button is set to Report (Actions tab ), and to include in Quiz. When you check in the Advanced Interaction panel (F9), this shows:

 Step 4: Conditional action EnterResult 

Use the On Enter action of the Results slide (slide 9) to show the correct state of the 4 multistate objects shown in the Timeline screenshot, and to show either the button SB_Success or Bt_Failure, based on the requirement of having at least 4 answers correct. Of course, the number 4 can be changed (OP wanted 7 correct answers). The action is self-explanatory:

This trick with the two buttons was published in my blog, over 8 years ago. The example file in that article is of course SWF output.  I didn't want to use two identical buttons - same location - in the example of today because that is impossible in Fluid Boxes projects.  This was not such a project, but it is perfectly possible to use the same workflow in a responsive project. It was also the main reason for the multistate objects used on this Results slide.

Extra: Editing Alliances

This is bit off topic, just for those interested

I did edit the ready-to-go slides a lot. Having a pause triggered by the On Exit event is not something  like because it can create problems. All slides have at least one interactive object, which can pause the slide near its end. That project has some quiz slides, but they are NOT based on the quizzing master slides. This means that the theme was not fully realized. When I inserted random quiz slides, which necessarily do use quizzing master slides they looked very different from the nice quiz slides. I have updated the master slides to make them looking approximately like the ready-to-go slides.

There are more problems with this project, which I detected but didn't encounter in this particular project. As I have written in previous posts, never do use the Switch to Destination theme!

Sequence check slides (updated version)

Intro

More than 7 years ago I wrote a similar blog post: how can you check the sequence of clicks. Of course the embedded tutorial was a SWF, since only that type of output was supported at that moment. This post is an update with HTML5 output, and taking advantage of new features (multistate objects, SVGs as buttons). 

Example

Play with this example project. I inserted two examples of sequence checks:
  • Geo slide: alphabetically clicks on countries (used English names, not the original names of the coutnries)
  • Keypad slide typing the pincode on a numeric keypad.

First and last slide are taken from the Quick Start Project 'Aspire'. The images used as button also are from the Assets panel.

You probably will have more ideas where this workflow can be used for Knowledge Check slides. There is a sequence type of quiz slide, you can test a sequence with Drag&Drop slides, but these alternatives are less limited in design. ould love to hear your proposals for sequence checks as well


Setup

Variables

Similar to the old post I used only two user variables (to be created):
  • v_counter: will track the number of clicks on interactive objects. It starts with a default value of 0. It is reused on the second sequence slide, by resetting to the default value using the On Enter action of that slide.
  • v_correct: will track the number of correct clicks, set up with default value of 0 and re-used in the same way as the previous variable.

Multistate Objects

Instead of the hide/show workflow used in the original post, multi-state objects to display the feedback are used. That object is labeled Tx_Display (for the Geo-slide) and Tx_DisplayBis (for the Keypad slide). Look at the screenshot of the Object state panel for Tx_Display:

The Normal state is empty (easy to reset, will automatically reset when returning to the slide if ‘Retain State’ is unchecked). The 6 following states correspond with the correct sequence, hence their labeling. The last state is the Wrong state. The sequence of states is important, because I will be using the ‘Go to Next State’ command in the actions.

SVGs

If you did read some recent posts, you know that I am a big fan of the use of SVGs both for image and interactive objects. In this case I used them mostly because they remain crisp at any resolution and lead to very small file size. The file size of the published project is less than 4MB. ¨Probably half of that size is due to the bitmap images on the ready-to-go slides, and the unique PNG which I used for the Background of the Keypad. Look at the timelines of the sequence slides. SVGs are grouped. Too bad that you cannot recognize the interactive object from the color (should be green), but they all have a pausing point set at 1.5secs (Europe SVG is not a button).


The group Gr_Wrong on the Keypad groups all button SVGS which are not used in the pincode. Those buttons are on top of the image, and can be hidden, since the remaining keypad image shows them as well but in a non-interactive version. For the Geo slide, the colored country  SVG buttons are also on top of a big SVG (Europe), but I don’t want the colored ones to disappear, for that reason the buttons will be disabled, not hidden (see advanced actions below).

Actions and events – Geo slide

The colored country SVG buttons trigger an advanced action On Success. There are 6 countries, which means 6 advanced actions (created with the duplicate function). The five first actions are similar to this SV1_Act:

Only the items marked by a red oval have to be switched for the actions SV2….SV5Act: the name of the SVG button in the first decision, and the literal (number) in the second decision. If the clicked country is not fitting in the correct sequence, the learner sees the Wrong state in the multistate shape and the Retry button will appear.

The last country SVG button (SV6) has a slightly different action, derived from the previous one.  Reason: the Next button has to appear if the sequence is correct. That extra command is highlighted by a blue rectangle.

The Next button has the default command ‘Go to Next Slide’ on its Success event.

The Retry button needs to  everything, as you can see in this screenshot. Action is triggered by the Success event:

Actions and events – Keypad slide

Because of the re-use of the variables v_counter, v_correct and the button Bt_Next which is timed for the rest of the project, the On Enter event of this slide is used to reset everything to default values. If you want to allow going back to slides, a similar action would be needed for the Geo slide, but that was not the case in the example file. The On Enter action is pretty simple:

Some explanation may be needed for the Hide command which I highlighted. Since the required pincode (29791) needs the number ‘9’ twice (second and fourth position in the sequence) I have put two SVGs on top of each other: SVG_Two and SVG_Four. By default SVG_Two is visible, but SVG_Four  is hidden and becomes visible With the same action where SVG_Two is hidden. You cannot have two interactive objects on top of each other when both are active at the same location.

The Number buttons trigger an advanced action On Success.  It is similar to the one in the Geo slide, except for using Hiding instead of disabling. Example of the first number button (which is 2):

As explained above, for SVG_Second (number 9) is bit different

Similar to the Geo slide, the last correct button (number 1) will show the Next button if all was correct:

Any wrong number button will trigger this action using its Success event:

The new Retry button, labeled RetryBis is similar to the one on the Geo slide, triggers:

Remember that the SVG button Four  is in the same location as Two, because both have the number 9. That is why SVG_Four has to be hidden and SVG_Two shown.

Why no Shared Actions?

Although we have very similar actions for the SVG buttons, both on the Geo slide and on the Keypad slide, this is a typical use case where it is impossible to use shared actions. Problem are the ‘literals’, which should have been converted to parameters. Look at the screenshot of the action SV1_Act posted earlier. Logically these items should be parameters:
  • The SVG button SV_1 – compulsory parameter in the first decision
  • The literal ‘1’ in the condition of the second edition, not compulsory
  • The multistate object Tx_Display, compulsory parameter in the second decision
  • The state Wrong in the ELSE part of the second decision
  • The button Bt_Next in the ELSE part of the second decision

Why is the literal a problem? Because it is also used in the Increment command. If you replace it by 2 for the second button, this will also be the case in the Increment command. I may have a workaround, but it is not always functional.

Second reason: with the workaround the parameters would increase to 6, which is my limit for a usable Shared action. Whereas using duplicate functionality for the advanced action is lot quicker, since only two items need to be edited.

This blog is already way too long. If you like to hear about my ‘thumb rules’ for choosing between duplicate advanced and shared actions, post a comment. Maybe I’ll dedicate another blog to it.