Quiz Basics 3: Attempts and Scores

Intro

In the first two articles of this basic course about Quizzing, I explained the Terminology, and the Submit Process.

Those posts applied to all types of questions: scored, random, Knowledge Check, pretest slides. This post will be talking exclusively about scored (graded) quiz slides and random quiz slides which are graded. For those slides the results are stored in the quizzing system variables, and you can have the score slide in your course. You will get some tips about the default score slide at the end. Scoring doesn’t exist for Knowledge check slides, you can only choose attempts on question level, not on quiz level.  Pretest questions have scoring as well, but the values are stored in different system variables, and are only meant to navigate the learner to another slide,  based on the pretest result.

This article will explore the scoring and attempts on two available levels:

  • on question level
  • on quiz level

Attempts/Scores on Question level

Setup for both is done in the Quiz Properties panel. That panel appears automatically in the newbie UI when you insert a quiz slide (or a random slide) in the right docking station. For quizzes however I strongly recommend to switch to the Expert UI (check the option ‘Enable custom Workspaces….’ under Preferences, General Settings). Set up a workspace where both the Quiz Properties and the Properties panel are visible. Reason is that you need the Properties panel for partial scored MCQ slides with multiple correct answers.

Attempts

In the default setup the number of attempts for graded questions is set to 1. The feedback messages for Correct and Incomplete are checked and 1 Failure message. The actions for Success and Last Attempt are both set to Continue. You could check the option Infinite Attempts, but I strongly doubt you’ll want to have the learner in such an infinite loop.  A limited number of attempts however can be a good choice. If you allow more than one attempt, do not forget to check the ‘Retry message’ because that is not done automatically. Have a look at this screenshot for True/False Question, to the arts marked with a blue rectangle. I set the number of attempts to , and checked Retry. The Failure message was left at its default 1 message.

I kept the default Continue actions as well, but moved the pausing point closer to the end of the question slide (see previous article) to minimize the waiting time after the second step of the Submit process.

Score/penalty for 1 correct answer

Default score for all questions is set to 10 points. Since some LMS’s don’t like to see total scores greater than 100 points, and all questions don’t merit the same score you will certainly want to change those scores. BTW: later on I will offer an exploring post about the wonderful Advanced Interaction panel (F9), unknown to many because it never appears automatically in the newbie UI. It is not only about ‘advanced’ actions at all.

Changing the score happens in the Quiz Properties panel for all question types with a black/white score. B/W score means that you only get the score if everything is correct, score will be zero in all other cases. All question types, except the MCQ with multiple answers are validated with this rule, even Matching, Hotspot and Sequence. In the screenshot above (T/F), you see the score reduced to 4 points.

I also added a penalty: this score will be subtracted from the total score if the answer was wrong after the last attempt. You don’t have to enter a negative number here. Beware: in SCORM 1.2 reporting a negative result at the end will be reset to zero.

MCQ with multiple correct answers and partial scoring

Have a look at this screenshot, set up for such a question slide, with 5 answers. Two out of them are correct, each has a positive score of 5 points. The 3 wrong answers get a penalty of 2 points each. Neither the score nor the penalty can be set up in the Quiz Properties panel, they are dimmed. You have to select each individual answer, and setup score in the Properties panel of that answer (visible in the screenshot as floating panel next to the Quiz Properties):

The 4th answer, wrong answer, is selected in this screenshot. There is no Penalty field in the Properties panel, tab ‘Options’, only ‘points’. Since this needs to be a penalty I entered -2points. Same for the other wrong answers. The correct answers got positive points (5 for each). The dimmed numbers for Score and Penalty on the Quiz Properties panel are calculated by Captivate to 10 points and 6 points. I had to check the ‘Partial correct’ message, was not done automatically although Multiple answers was chosen.

In this example I changed the actions (Success/Last Attempt) to ‘Go to Next Slide’, didn’t move the pausing point of the quiz slide. This is the second possibility to narrow the waiting time after Submitting the result.

You see that 3 attempts are possible for this question (green markings).  But the Retry message is unavailable, dimmed. Reason is that I have chosen to show 3 Failure messages, different one after each attempt. You need to include the warning about clicking the slide (or pressing Y) for the last Failure message which appears after the last attempt.

Quizzing System Variables

These quizzing system variables (see also: Using Quizzing System Variables) are linked to individual question slides:

  • cpQuizInfoAnswerChoice: after submitting the answer (see this post for a typical use case)
  • cpQuizInfoLastSlidePointScored: after submitting the answer
  • cpQuizInfoMaxAttemptsOnCurrentQuestion: while on that slide. Beware: there is no exposed system variable telling which attempt the learner is taking at this moment on question level, only the maximum allowed attempts can be retrieved.
  • cpQuizInfoNegativePointsOnCurrentQuestionSlide: maximum penalty for this question slide
  • cpQuizInfoPointsPerQuestionSlide: maximum score for this question slide.
  • cpQuizInfoQuestionPartialScoringOn: Boolean
  • cpQuizInfoQuestionSlideTiming: if you use a time limit on the quiz slide
  • cpQuizInfoQuestionSlideType

Attempts/Score on Quiz Level

The number of allowed attempts on (total) quiz level is set up in the Quiz Preferences, Pass or Fail.  Default setup is one attempt. If you allow multiple attempts, don’t forget to check the option to ‘Show Retake Button’. When clicking that button, all questions will be reset and the quiz system variables will be cleared.

If you also allow Review (Quiz Preferences, Settings), you have to be aware of the fact that all attempts on Quiz level will be considered to be exhausted if the learner clicks the Review button (also on the score slide). To prevent confusion use this easy trick: drag the Retake button on top of the Review button on the results master slide (or the score slide). Once the attempts are exhausted the Retake button will disappear and Review button becomes visible. Problem is that this is perfectly possible for a non-responsive (blank) project or a responsive project with Breakpoints. But a normal fluid box doesn’t allow stacking of buttons, unless you define the fluid box as being static. I will post a workaround in my “tweaking posts”, later in the Quiz sequence of posts.

The Total Score on quiz level will be calculated from all the scored objects in the course (see Advanced Interaction panel) and stored in a quizzing system variable cpQuizInfoTotalQuizPoints. Except for the feature ‘Branch aware’ that will be a fixed number when starting the course.  Other quizzing variables  (see post) linked to the quiz level are:

  • cpInQuizScope
  • cpInReviewMode
  • cpInfoPercentage:  appears on the results (score) slide as ‘Accuracy’ ‘percent’
  • cpInfoAttempts: appears on the results slide as ‘Attempts’ ‘total-attempts’
  • cpQuizInfoPassFail: Boolean
  • cpQuizInfoPointsscored: appears on the results slide as ‘You scored’  ‘score’
  • cpQuizInfoQuizPassPercent
  • cpQuizInfoQuizPassPoints
  • cpQuizInfoTotalCorrectAnswers:  appears on the results slide as ‘Correct Questions’ ‘correct-questions’; beware: partially correct questions are seen as correct
  • cpQuizInfoTotalProjectPoints: appears on the results slide as ‘Maximum Score’ ‘max-score’
  • cpQuizInfoTotalQuestionsPerProject: appears on the results slide as ‘Total questions’ ‘total-questions’
  • cpQuizInfoTotalUnansweredQuestions

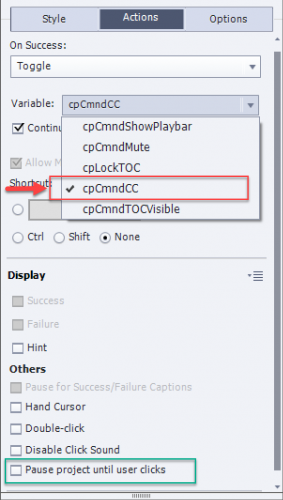
The Continue button on the Score slide has about the same functionality and importance as the Submit button on quiz slides. That actions specified under Quiz Preferences,  Pass or Fail (after Last attempt on Quiz level) will be done after clicking that button. The pausing point on the score slide is linked with that button. You can move that pausing point the same way as for the quiz slides, closer to the end of the score slide. It is recommended not to have the score slide as last slide in a course, but have at least one more slide. That way you’ll be sure that the results will be transferred to the LMS.

Review wrong answers in Quiz, skip correct answers

Intro

Similar to most Captivate developers I am busy converting legacy projects with SWF output to HTML output (in my blog). Quite a long time ago, based on questions from users, I wrote this blog post: Limit Review.  At that moment the version was Captivate 6 output was of course to SWF. If you want to view the embedded file, you'll need  Flash Player enabled browser to watch it.

I updated this blog post and created a new Example project. It is interesting to see how much easier the workflow has become, due to two new features:
  • Shared Actions: available since version 7 and improved with version 8. One of my favorite features, much underestimated by most developers for totally unknown reasons. Whereas in the old post I had to create 2 advanced actions for each quiz slide, this new version has only two shared actions, with one parameter.
  • New system variable cpInReviewMode (Quizzing category). It is a Boolean variable with a default value=0. That value will automatically be toggled to 1 when in Review mode.

Example file

I used the edited Theme, based on the Quick Start project ‘Alliance’ which I also used in my previous post with the Survey about upgrading legacy projects. HTML5 output is not as smooth as SWF output. You can compare the old post  (see link mentioned before) .

The example has 7 question slides, different types, using partial scoring and penalty. You can play the rescalable version from this link or watch the embedded one here:


Setup

Variables

This is the only remainder of the original blog.  We will be using another quizzing system variable cpQuizInfoLastSlidePointScored. The value of this variable is changing with each quiz slide. That change happens with the second step of the Submit Process.  More info about the Submit Process of a question slide can be found in this blog post.

We need to track the score for each quiz slide. To achieve that, a user variable is needed for each question slide. In this case, we need 7 user variables. No default value needed:

Labels are not so important, you just need to be able to link them to the quiz slides. If you have a shared action ready as in the first item of ‘Rare tips for Shared Actions‘ that is fine as well.

Events

All events are on the quiz slides:
  • On Enter event: will be used for a shared action EnterReviewAct. Tip: in the Advanced Interaction panel, this action will not appear (which is a pity). The reason is that the columns Success (which normally has the action for On Enter) and Failure (normally On Exit action) are used for the question actions. You can see the Usage of this action in the Library of course. Logically it has been used 7 times, because of the 7 quiz slides:


  • Success event of question (Quiz panel): will trigger a Shared action ‘ScoreQuestionAct’.

  • Last Attempt of question (Quiz panel): will trigger the same Shared action.  This action will be used 14 times. ave a look at this screenshot of the Advanced Interaction panel, where both the Success and Last Attempt events are registered:


Shared Actions

ScoreQuestionAct

This is a very simple standard action, copies the value of the system variable cpQuizInfoLastSlidePointScore to the tracking user variable. That variable is the unique parameter:

This action is triggered by both Success and Last Attempt events. It happens sometimes that you get an error, because the same parameter is used for both events. That is a bug in Captivate, which I have reported since a while, but the actions will work perfectly.

EnterReviewAct

This conditional action triggered by the On Enter event, checks two conditions:

  • Is the learner in Review mode?
  • Did the learner have a positive score on this slide? As you can see in the Advanced Interaction panel (screenshot in previous part),  I used penalty and partial scores.   Partial scored questions are counted as ‘correct’ answers in Captivate.

If both conditions are true, the slide will be skipped.

More?

Maybe you have some comments?  I don’t have a crystal ball, but feel like these two questions may pop up:

  1. Can this workflow also be used for random questions? 
    Answer is Yes: you need to trigger the shared actions for all quiz slides in the pool(s). Of course, you cannot have partial scoring, not penalty in a question pool.

  2. Can you avoid skipping partial scored questions?
    I see a way to do this, but wait for your suggestions.


Using cpQuizInfoAnswerChoice for Survey (Conversion from SWF to HTML)

Intro

Eight years ago I wrote a blog post about ‘Secrets of cpQuizInfoAnswerChoice’. Of course the embedded published project was SWF at that moment. This specific quizzing variable is very useful when you need to evaluate the results of survey slides in order to make decisions. I created a new example file, partially based on slides from the Quick Start Project Alliance. It is part of a ‘decision tree’ which could be used for those who want/need to convert legacy projects to make them ready for publishing to HTML5.

Example file instructions

There is no audio in this example. All quiz slides are Survey slides, and navigation is based on the results of the Survey slides.  Type of slides used are True/False, MCQ with one correct answer, MCQ with multiple correct answers. At the end of each branch (there are quite a lot of possibilities) you will end up on a slide with possible workflows. In this example you’ll find only three ‘results’ slides:
  1. If you have only the SWF output of the legacy project.
  2. If you have the cptx-file but cannot use it directly in the present Captivate version
  3. If you have the cptx file which can be opened in the present version.

To explore a new branch, please refresh the browser. There are more than 3 recommended workflows because of sub-branches.

You can watch the embedded movie below (fixed size) or use the link for a rescalable version.


Values of cpQuizInfoAnswerChoice

This system variable belongs to the category Quizzing. Typical for that category is that the variables are read only, you cannot edit them in Captivate directly.

It is a reused variable, gets a different value after the Submit process on each quiz slide. The value you are getting depends on:

  • Type of question (see below)
  • Numbering (if available) in the question. For several types you can choose between capital characters (A, B, ..), small characters (a, b, …), numbers or None.  None will result in the same value as numbers (my preferred numbering)

In the example file I used three types of questions, which are very common in surveys:

  1. True/False. For that type the value of cpQuizInfoAnswerChoice will be either a character or a number, depending on the chosen numbering type.
    Example: if learner choses “True” value will be A, or a, or 1 (also for None as numbering)
  2. MCQ with radiobuttons (one answer): value will be the character or number of the chosen answer. No problem when shuffling the answers. Although the numbering on runtime will be changed in that case, the original number, as seen in the editing environment, will be stored in the variable.
    Example: Second slide in the example had three answers. You may shuffle the answers on runtime, but if the learner selected this answer, the value of cpQuizInfoAnswerChoice will be ‘1’.
  3. MCQ with checkboxes (multiple answers possible): all chosen answers will be stored, using a separator (in my case a semicolon). If you use shuffling, the reported value will take the numbers originally assigned in the developing environment:
    Example: first slide in the example file looked like this. With the shown selection, the value of the variable will be ‘2;3;4’ even if due to shuffling the numbering was different on runtime.

Short description of the other Question types:

  • Matching: the chosen corresponding  numbers in the first column, with separator(s) will be reported similar to MCQ with multiple answers.
    Example ‘A;C,B’ indicate that in the first column those were chosen to connect with A, B, C in the second column.
  • Sequence: I couldn’t figure out what the meaning was of the reported value, very strange. Look like IDs (like Interaction IDs) separated by semicolumns. Maybe someone can explain?
  • Fill-in-the-Blank: the text chosen for the blanks will appear, with separators.
  • Short Answer: text entered by the learner.

Due to the fact that Captivate’s variables can store strings as well as numbers, if you choose for numbers you can perform calculations (Expression command). I used that feature in an old post about Graded Surveys. Tha particular technique  has not been used in this example.

Used Techniques

I will not explain every detail in this example file, just some tips about the used techniques.

Decision Tree – Branches

Before starting the development, I did sit down to see how many branches I would provide in this survey. The present example results in three main branches, ending up in three different end slides. Those are the slides surrounded by a red box in the screenshot of the Advanced Interaction panel (will blog about its use ASAP). The Survey slides are included in a blue box:

Choice of the branch to follow is tracked by a user variable. Three variables, starting with an empty value:  v_swf, v_cptx, v_scratch. Those variables can have different values, because each main branch has sub-branches.

Example: The branch which will end on slide 12 (SWF_workflows), starts with a value=1 when the learner indicates that the output SWF is the only asset remaining from the legacy file. Based on answers to the other questions, this value can be incremented to 2 or 3. Each of them will lead to different content on slide 12.

Multistate objects

The information on the end slides (12-14) is stored in multi-state containers. The On Enter action of each slide uses the tracking variable for that branch to show the appropriate state. Look at the screenshot of the action triggered On Enter for slide 12:

There are only two decisions  (not 3) because the Normal state is valid for the situation where v_swf==1.

Embedded variables

The result of the poll can navigate to slide 14, with the recommendation to start from scratch. However it is possible that legacy assets can be used: documented/branded theme, assets like graphics files (PS/AI), audio clips, video clips, GIFT or CSV files for questions. To show this information, user variables are inserted in the states on the slide. Their value is either empty, or has a value due to the choices on the very first survey slide. Look at this screenshot, which shows the Normal state (no external library available) for the Scratch slide:

More?

Do you have questions? Please post them in a comment. Maybe we’ll meet at Washington DC, will try to help users struggling with conversion of their legacy projects due to the demise of the SWF player.

Question for you: any idea why a slide seems to be missing in the Advanced Interaction panel (slide 11)?

Discover/Use Captivate's System Variables - Part 2

Intro

In a first blog about System variables I offered a free table with description an references for all system variables. If you didn't get that table yet, please get it from that article. That older post described shortly all caregories. It had focus on the variable categories s which are read only, and how they can be used to show information in a course and/or for editing/debugging reasons (like cpInfoCurrentFrame).  Not treated in that first part was the Quizzing category because I already had a detailed explanation in this blog post.

Here the focus is on that very special category 'Movie Control'. It is special because those variables cannot be inserted for viewing in a course.  More important is that they can be controlled, changed by the developer on runtime which is not possible for any variable for the other categories. Learning how to control these variables can be a good step up to getting started with advanced or shared actions: more complicated actions than the simple actions which you find in the dropdown list on the Actions tab of an interactive object.

Terminology

Since this post is meant for users starting with variables, I want to explain some terms that are important expecially when working with system variables of the Movie Control category. You can skip this part is it sounds familiar to you.

Slides versus Frames

In questions on the forum I often see confusion between those two terms. A normal cptx project is slide-based. That leads many users to suppose that Captivate is functioning like Powerpoint, but that is not true. Essentially Captivate will lead to a movie, not to a sequence of slides which is typical for a presentation. That movie is more than a simple video, because interactivity is based on offering control to the user and to do so you need to  pause the movie. This is not the case with a video: the learner can pause the video, but the developer has no influence of therm with the exception of the interactive videos. I use the term interactive movie for a fully interactive published Captivate file. An interactive video is not better at all, more of a hype at this moment, because is interactivity is more limited. Although a PPT can have animations with some duration and seqeuence, it is not a real movie unless you capture it as a movie. 

Any video/movie is played at a certain 'speed'. The speed is defined in frames per second or FPS. The default speed of a published cptx file is set to 30FPS (but a video demo at 15FPS). If you keep the default length of a slide in CP, which is 3 seconds, that means that you have 90 frames in that slide. 

I explained these terms already many times. As you can see in the table, several system variables in the Movie Control category are linked to navigation between slides or frames. Understanding the difference is required.

Boolean variable

A variable can have any value in Captivate: a text (often called string) or a number. When you look in the table you will see the typical values of the system variables. Many of them also aren:  from the 'Boolean' type. That is a variable that will have only two possible values: 0 or 1, true or false. You can interchange them easily, I prefer using the numbers 0/1 because it is less typing.  In the Movie control category many variables are indicated as Boolean: cpCmndCC, cpCmndMute, cpCmndNextSlide, cpCmndPause, cpCmndPlaybarMoved (pretty useless, internal), cpCmndPrevious, cpCmndResume, cpCmndShowPlaybar, cpCmndTOCVisible and cpCmndLockTOC.

Like other variables Booleans have a default (or start) value which you find also in the table. Often it is 0, which means the situation described by the variable is turned OFF. But there are exceptions. Some examples:

  • cpCmndMute: default value = 0, which means that audio is playing
  • cpCmndPause: default value = 0, which means the course is not paused
  • cpCmndShowPlaybar: default value = 1, which means that the playbar is visible
  • cpCmndTOCVisible: default value = 0, which means that the TOC in overlay is not visible

Toggle

When used as a verb, this means 'switch between two situations'.  I didn't use the word 'state' to avoid confusion with states in a multistate object. You can toggle a playbar between the visible and hidden situation, audio between muted and not muted, a TOC in overlay between expanded and collapsed, any object or group between visible and invisible. There is a close relation between Boolean variables and toggling. For that reason a couple of versions ago the new command/action Toggle' appeared in the dropdown list of the Actions tab, and in the advanced actions dialog box. 

Some people also use Toggle to indicate a Toggle button. That is a button which allows to switch between two situations£. Several buttons on the Captivate playbar are toggle buttons: turning CC on/off, play or mute audio, pause or continue the movie. 

Use Cases

Toggle buttons

CC on/off

If you use custom buttons instead of a playbar, which is recommended for any non-linear project, you can create a toggle button to turn Closed Captioning on/of. Beware: in versions before CP2017, Closed Captioning was always turned off when the course started. That is the reason why the default value of cpCmndCC  is still indicated as O. With the new more elaborated features for CC, you also have the possibility to turn CC on for a project. In that case the variable will have the value 1.  To create a toggle button for this feature you can use a shape button on the main master slide (no need for pausing) if you are in a non-responsive project. For a responsive project with fluid boxes, using the main master slide is a bad idea (no fluid boxes possible), you'll have to use the other master slides. Use guides for the creation of the footer fluid box, so that it is consistent for all the master slides.

Create this simple action to be triggered by the Success event of the button:

Since you don't need this button to pause the slide, you have to uncheck the option 'Pause Project until user clicks'.

Audio on/off, Playbar on/off, Overlay TOC expand/collapse, TOC lock/unlock

The workflow is exactly the same as for the CC toggle button. In the screenshot you see that the appropriate system variables show up and can be selected.

It is of course possible to replace a toggle button by two  buttons. Example: a button to show the overlay TOC  and another one to hide it. In that case you could use the commands 'Show TOC' (same result as Assign cpCmndTOCVisible with 1) and 'Hide TOC' (same result as Assign cpCmndTOCVisible with 0). This is  an alternative for the tiny expand/collapse buttons attached top left of the slide. A toggle button saves space on the slide, easier to manage. 

Two buttons are also possible for Playbar on/off  (Show Playbar/Hide Playbar) and for locking/unlocking the TOC for navigation (Lock TOC/Unlokc TOC). 

For Audio on/off you do NOT find such simple actions in the Actions tab.  'Play Audio' is meant only to play an audio clip, but has no effect on slide audio, object audio, nor background audio. Similar with 'Stop Triggered Audio' which can only stop clips started with the command 'Play Audio'. If you want two buttons, you will need to use the system variable cpCmndMute, with the Assign command:

  1. Assign cpCmndMute with 1    will mute audio
  2. Assign cpCmndMute with 0     will have it play again

To create a toggle button with a different look when the situation is toggled, you'll need an advanced or shared action. Have a look at: 

1 action = 5 toggle buttons

Shape category ‘Buttons’ – Challenge

Being a tutorial for newbie (no advanced/shared actions, I will not explain using the navigation system variables for two reasons:

  1. You probably never will use the slide navigation variables  for navigation between slides. It is intuitive to use ‘Go to Next Slide’, muc more than ‘Assign cpCmndNextSlide with 1’
  2. The navigation variable cpCmndGotoFrame is  very important in micro-navigation but that is a more advanced topic that needs the use of advanced/shared actions. If you are interested, have a look at: Intro to Micro-navigation

However I have a challenge for you! The shape dialog box has a special category labeled ‘Buttons’.

Typical for these shapes: the option ‘Use as button’ is checked off (no pausing point by default). They will trigger an action, which for most buttons is a simple action. You will see that the Mute button  is assigning “1” to the system variable cpCmndMute. The three buttons marked in the screenshot trigger an advanced action: the Home button and the Start button (both marked in red) use the advanced action ‘startSlide‘, the End button (marked in green) uses ‘endSlide‘.  You can open th action in the Advanced Actions dialog box,  by clicking the Browse icon:

Look at the use of the system variables in startSlide :

  • Assign cpCmndGotoSlide with 0          this means: go to the first slide (index starts with 0)
  • Assign cpCmndResume with 1              is the same as Continue

Can you explain the script ‘endSlide’?

More?

A lot more is possible when using the movie control variables in advanced or shared actions. I already posted some links before. Here is a link to a blog post about ‘Replay Slide‘ where you’ll find different scenarios. It will help to understand the importance of frames: if you only get back to the first frame of the slide, reset will not happen if this is done by an On Enter action, or if you have Text Entry Boxes/Drag&Drop slide.

For newbies I plan a third article about user variables and simple use of them (still without advanced/shared actions). Would love to get some comments.

Discover/Use Captivate's System variables - Part 1

Intro

Many years ago I did write out some tutorials explaining how to use variables. They are still available in Adobe's Knowledge base, but of course the screenshots are outdated since they were created in Captivate 4 and 5. Inspired by a recent thread in the forums, where it took a while to explain the use of variables, I want to write out some posts about Variables. This first article will focus on System variables and include a downloadable table which you can use as reference for them.

What is a Variable?

If you 'google' to find a definition of a variable you will get thousands of results. I would say that it is a container identified by a name and the content can change or be changed (is variable). It is a term used in programming languages and applications. It makes them more flexible, powerful. If you are a maths lover, compare this equation: 5 + 6 = 11 with  a + b = c. The a, b, c are variables, and the second equation allows you to create tons of small sums. The first equation uses 'literals', and you have only one sum.

Captivate has by default 6 categories of System variables and 2 automatically defined user variables. This article is only about system variables, they are available for your use in any project. All the system variables start with the characters 'cp'. Lables are, as usual in Captivate, unique for each variable and they are case sensitive. It may be confusing that the two  user variables,  created for each new project (cpQuizInfoStudentName and cpQuizInfoStudentID) also start with the same characters..  When you open the dialog box  Project, Variables the type 'user' is automatically selected, and you see only those 2 variables. Be sure: those are NO system variables, they are necessary for the workflow of Internal Server reporting, but can also be used with many LMS's. The certificate interaction uses  cpQuizInfoStudentName as well.


Categories of System Variables - table

You can download the table from this link.

Captivate has 6 categories of system variables. To see them switch to System type in the dialog box:

  1. Movie control: is a very special category, which I will explain in a second post.  They offer a way to control your course by changing a system variable. This is not a normal behavior of variables, and can be considered as a, add-on to more complicated advanced/shared actions. These system variables are also different from those of category 2-5 because their value cannot be displayed in Captivate output.

  2. Movie Information: typical for this movie are the number of slides/frames, the speed (FPS), which frame/slide you are at this moment, etc… All variables of this category are read only. Their value can be used by the developer, they can be displayed in a Captivate file, during Preview and after publishing. I will point out some examples later on that could save you time while developing. In the table you’ll find some references as well.

  3. Movie Metadata: you can add metadata to a course, lot of it can be done using File, Project Info.  The behavior and usefulness are similar to the previous category. More tips below the examples below.

  4. System Information: data about present Date, Time, or which OS you are using if watching on a mobile device are in this category. Like 2-3 these variables are read only but can be used in the same way as those from Movie Information and Movie MetaData. Look in the table for examples.

  5. Quizzing: will not expand on this category because I already posted a blog about using Quizzing System variables

  6. Mobile: has only one system variable which is exceptional because it stores 3 numbers. It cannot be displayed in a course, only be used in actions.

This blog has focus on categories 2-3: they are very useful when you insert them in a course, either during debugging or to be able to show their value in output.  The workflow is the same for all variables that can be displayed (not category 1n nor 6).

Display a Variable

The best way to insert a variable to be displayed is this workflow:

  • Create a text container: either a caption or a shape on the slide
  • Go into edit mode, by double clicking or using the function key F2.
  • You’ll get the Character part in the Properties panel. Find tesee three buttons

    First button inserts a symbol, last button a hyperlink, but you need to click the second button to insert a Variable
  • Switch from the default User type, to System.
  • Choose a category under the dropdown list which has by default ‘All’ as choice
  • Select the wanted variable.
  • The ‘length’ is set by default to 50 characters, but you can edit this number. It is essential to do so if you expect the value to be greater than 50 characters (spaces included).
  • Confirm the insertion with the OK button.
  • While editing the variable will appear as in this first screenshot, between double $$. When previewing or after publishing that placeholder is replaced by the value (second screenshot)

Edit and Runtime view 

Some Examples

1. Slide counter: Slide X/Y

You use two system variables from the category Movie Information: cpInfoCurrentSlide and cpInfoSlideCount. Insert this text on the first slide of your course, and display it for the rest of the project.  Do not forget to check off ‘Always on top’ for the text container.

2. Author name in Theme

You will use the variable cpInfoAuthor from the category Movie Metadata. While creating a custom theme to be used in multiple courses, insert this variable in a text container on the main master slide. Master slides are part of the theme. Do not forget to warn your colleagues to fill in the fields under File, Project Info.

3. Course name in Theme

If you use a Title master slides, you can insert the variable cpInfoCourseName on that master slide as title. That variable also blelongs to the category Movie Metadata. Same comment: Project Info has to be defined by the developer. You can also use this variable in a footer of course.

4. Debugging Timeline

As I mentioned many times, understanding how to pause the timeline, and its consequences on objects is very important. I always recommend to insert a text container with the variable cpInfoCurrentFrame to watch pauses while Previewing the project. It is a variable from the category Movie information. You can see that I apply this recommendation myself in this movie:
Captivate’s Timeline

You’ll certainly find more examples. When used in combination with advanced or shared actions, lot more is possible but that is beyond the scope of this introduction.  One example: to show the elapsed time on the course (the real time spent, not the developer’s time based on slide durations), you cannot just insert the variable cpInfoElapsedTimeMS (from Movie Information) because it is defined in milliseconds. You need to do some simple maths to make it readable to the learner, and that means …. advanced action.

What Now?

Have a look at my next blog post, where you'll start to take control of your courses with the system variables of the Movie Control category. It is a good 'step up' to challenge your next goal: using advanced/shared actions.


Micro-navigation (introduction)

Intro

Recently I presented two sessions about the Timeline at the Adobe eLearning Conference in DC (25th of April 2018). Maybe you did read a previous post, where I offered some easy Timeline Tweaks, taken from the first presentation 'Demystifying Captivate's Timeline' which was aimed at clarifying basic features of the timeline, including the different ways of pausing the timeline. The second presentation 'Mastering Captivate's Timeline' plunged deeper into exploring advanced workflows, including use of variables, advanced/shared actions and.... micro-navigation. I created that term in this (old) article. The word has been adopted by many Captivate users. Time to upgrade this article to integrate the changes within newer versions (system variable names) and the switch from SWF to HTML output. If you have a look at that article, please use a Flash Player enabled browser to watch the embedded interactive movie (SWF).  The present post can be considered as an introduction to 'micro-navigation'. We will start with a comparison between navigation between Slides (macro-navigation) and navigation between Frames.

Navigation

Between Slides

You, Captivate user,  are aware of slides and master slides. Slides appear in the Filmstrip and each slide is based on a master slide Master slides have a dedicated panel, which looks very similar to the Filmstrip. In the Newbie UI when activating the Master Slide panel it will replace the Filmstrip in the left docking station. The Timeline panel can be used both for slides and master slides. Timing (horizontal scale) itself has no real meaning for master slides,  panel is used to change the stack order (or z-order) of objects. If you insert a shape button having a pausing point on a master slide,  pause will be visible at the end of the timeline. 
For sure you have used navigation commands for slides. In the dropdown list of the Actions tab for any event (slide event, interactive object event) or hyperlink navigation commands are available. They allow you to override the default navigation. 'Default navigation' means when the playhead reaches the end of a slide it will automatically move to the next slide.
The slide navigation commands are:
  • Go to the next slide

  • Go to the previous slide

  • Jump to slide ...

  • Go to last slide visited

Maybe you are not aware of the availability of dedicated Shape buttons in the Shape thumbnail dialog box, that have an advanced action to go to the Last slide or the First slide of a project?
Also less known are the system variables from the category 'Movie Control'  related to slide navigation. They be used in actions:
  • cpCmndGotoSlide  can be used to replace the simple command 'Jump to Slide'; beware: index starts with 0, whereas the index of cpInfoCurrentSlide starts with 1 (exceptional to make it possible to use in a progress indicator). If you want to restart a slide without re-entering the slide, you can use "Expression cpCmndGotoSlide = cpInfoCurrentSlide - 1"  

  • cpCmndNextSlide  is a Boolean variable with a default value of 0. With 'Assign cpCmndNextSlide with 1" has the same result as Go to the next slide     
  • cpCmndPrevious is a Boolean variable with a default value of 0. With 'Assign cpCmndPrevious with 1" has the same result as Go to the previous slide

Between Frames

A published cptx-file (to HTML or SWF) is an interactive movie. Each movie '(and animation' plays at a certain speed, the 'professional' name for that speed is 'Frames per Second' rate, or FPS. The quality of a movie depends on the resolution but also on that FPS number. The default FPS for a published cptx-file is 30FPS. You can see this rate in the Project Info panel.
 

It is possible to change FPS rate in Preferences, Project Publish settings.

 
With the default rate (30), each second on the timeline has 30 frames, the smallest unit on the timeline  (0,1sec) 3 frames.  I use the word micro-navigation for navigation between frames. Contrary to the navigation to slides, there are no commands available for micro-navigation. It is only possible using advanced or shared actions which allow you to manipulate the system variables available for frames. The relevant frame system variables are:
    
From the category 'Movie Information'
  • cpInfoCurrentFrame: your best friend when exploring Captivate's timeline, debugging projects with advanced actions, micro-navigation etc. You'll find that variable inserted in a text container quite often in my tutorials. You can watch an example in this interactive movie   
              
  • cpInfoFPS: returns the FPS rate, by default set to 30 as explained above. This variable can be used in calculations (with Expression) to convert from seconds to frames.

  • cpInfoFrameCount: similar to cpInfoSlideCount (total number of slides in project) it returns the total number of frames in the project. It can be used in combination with the previous variales to calculate to the total duration of the project (as shown in the TOC).
    From the category 'Movie Control'
  • cpCmndGotoFrame can be used to jump to a frame using its frame number (similar to cpCmndGotoSlide); playhead will not be released, project remains paused.
  • cpCmndGotoFrameAndResume can be used to jump to a frame using its frame number and to release the playhead at the same time, project will continue.

Testing? 

It is just a proposal: test out what you learned by creating a one-slide project, similar to the one visible at the start of this post and as thumbnail.  Design is up to you, but this is required for the 'exercise':

  1. Replace 'No action' for the On Enter event of the slide by 'Pause'; the slide shouldn't start playing automatically.
  2. Insert the system variable cpInfoCurrentFrame in a text container (example has it bottom right); that will allow you to track the location of the playhead. When starting the slide it will pause immediately, it will show 1 (although the system variable starts with 0, there is a small delay).
  3. You need two buttons: one for navigation forward, and one for navigation backwards. I used two shape buttons from the category Buttons, but replaced the action (see below). In the example they are at bottom center.
  4. A number of objects staggered on the timeline. In the example I have 7 shapes aligned in a row. They appear 1 second later than the previous one. All objects are timed for the Rest of the Slide. Result will be that the slide itself will have a duration that is longer (8secs in my case). To move an object on the timeline one second to the right: select the timeline of that object and use shortcut key CTRL-right (see Colors and Keys for Timeline). Here is a screenshot of the Timeline in my example:

    You see a small gap (0,1 sec) before the first object. Reason is the delay I mentioned before: playhead is stopped at frame 1, I don' want that shape to appear immediately. Because this is a one slide project, I didn't need to pause the slide at all, not even at the end. Both buttons have no pausing point as you can see in the Timeline.

Three events are used on this slide for actions:

  1. I already mentioned the On Enter event of the slide, which is set to 'Pause'.
  2. The button SB_Next triggers a one-line advanced action that should look like this:
  3. The button SB_Back triggers a one-line advanced action similar to the previous one, but with the math operator for subtracting instead of adding.

Test now, either after publishing and uploading to a webserver, or with Preview HTML in Browser! 
Everything is working as exptected? Great, you are ready for more advanced workflows with micronavigation. Watch out for the next article about micro-navigation: a shared action that can be used in different situations: forcing full view of a slide on first visit, but not on later visits is one of the use cases.


Using Quizzing System Variables

Intro

In my last post I mentioned that, based on the visits to my blog posts, Quizzes in Captivate seem to be one of the stumbling blocks for newbies. Most of the quizzing blog posts with focus on default quiz slides are already pretty old. More recently I have been talking about new features like Branch aware and Knowledge Check Slides. The most visited post will be updated to accommodate the changes in a near future. This article will offer you some ideas about using the specific quizzing category of system variables. If you ever downloaded the full list of system variables, you will have seen that these variables are read-only, at least if you are not a JS expert. As a bonus, you'll find a downloadable list with Quizzing System variables which include my personal comments and links to blog posts where I have used those variables.

This article is an introduction to the use of variables, the use cases are not complicated at all.

Using read-only Variables

Quizzing System variables are read only, but you can use them in two ways, which I will illustrate by a couple of use cases later on:

  1. To show information to the learner, by inserting them in a text container, which can be a shape or a text caption.
    All variables are case sensitive, for that reason I recommend strongly only to insert variables using the X button in the Character part of the Properties panel for the text container. In the dialog box you choose System variables (default is User variables), eventually the category (Quizzing) and pick the correct variable from the dropdown list. It is also possible to limit the number of characters (set to 5 in this screenshot):

    Since text containers including variables have to be generated on runtime, contrary to the static text containers, it is wise to use only websafe fonts which was not the case in the screenshot above.

  2. To use them in an advanced or shared action for multiple goals, like changing navigation, calculation, skipping slides etc.

You will see some use cases for both situations in this article.

Use case 1: add information on question slides

This use case has been explained in an older article (Buttons on question/score slide), but here you'll see a refurbished version using new features which have appeared since that old version: hyperlink, multistate object, shared action, toggle command.

The idea is to insert system variables in a text container that appears on the first question slide, is timed for the rest of the project, always on top. Since all embedded quiz objects have priority in the stacking order (z-order, order of the layers in the timeline), you have to make sure that the custom text container is not covered up by embedded objects. For that reason I edited the size of feedback messages on the quizzing master slide, to make room for the (green) text container:

This text container can remain permanently on the question slides, always available, or you can use a shape button to trigger its appearance. That button is visible in the screenshot as a green button with the label 'i'. It is also inserted on the first question slide, timed for the rest of the project. This shape button has an extra custom state 'Close', visible on the next screenshot, to turn it into a real toggle button. The action used for this shape button is the shared action described in '1 action = 5 toggle buttons', and a user variable v_visib is used in that action.

You see the inserted system variables cpQuizInfoPointsscored, cpQuizInfoPointsPerQuestionSlide and cpQuizInfoNegativePointsOnCurrentQuestionSlide. The result on runtime, when the toggle button has opened the info text can be seen in this screenshot:

To be sure that the information is closed by default On Enter for each question slide, I used an On Enter action for each question slide, which will be shown in use cas 3


Use case 2: Custom Score slide

You can turn on/off fields in the default Score slide, but you can also replace the inserted fields by your text and system/user variables. Look at this example in editing mode:

You see again a lot of embedded system quizzing variables: cpQuizInfoPointsscored, cpInfoPercentage, cpQuizInfoTotalQuizPoints,  cpQuizInfoTotalCorrectAnswers  and cpQuizInfoTotalQuestionsPerProject. Moreover there is one added user variable v_penalty, which I'll explain in use case 3.

On runtime it will look like this screenshot:

This score slide is taken from the same example file. Since both the text information container and its toggle button were timed for the rest of the project, you have to take care of hiding both On Enter for this score slide. I used this standard advanced action:


Use case 3: Calculation total Penalty

Although there is a system variable (with a very long name) cpQuizInfoNegativePointsOnCurrentQuestionSlide, no exposed system variable is available containing the total penalty of the quiz, which is the opposite of the maximum number of points , cpQuizInfoTotalQuizPoints. If the user misses all answers, he'll get a negative score equal to that total penalty. Since it is not available as an exposed quizzing variable, I will have to calculate it.

For that purpose I created a user variable v_penalty with a start value of 0. The On Enter event of each question slides was used to trigger this standard advanced action (shared action had no sense because same action is valid for each question slide):

The first 3 commands take care of resetting the toggle button (SB_Info with the variable v_visib) and hiding the text information container (Tx_Info).

The Expression command is using cpQuizInfoNegativePointsOnCurrentQuestionSlide to calculate the present amount of v_penalty. It may seem confusing that I'm using '+' as mathematical operator: reason is that the system variable always shows a negative number. You don't have to believe me: have a look at the second screenshot in use case 1. 

More use cases - download

I wanted to keep it simple in the described use cases, introduction to the use of variables. Download the pdf with description of all quizzing system variables from this link

The table has 6 columns:

  • Variable name
  • Variable type: a variable can be empty, a Boolean (only values are 0/1 or T/F), a number, text or undefined.
  • Explanation which is sometimes bit different from the explanation found in the Variables dialog box
  • Default value
  • Comments: my personal comments
  • Blog posts: here you'll find quite a lot more use cases, I mention the blog posts where the referenced variable has been used

In this screenshot you see part of the first page:

Conclusion

I'm waiting for your comments. Do you see ways of using those system variables in your projects? Do you have questions, use cases that you cannot figure out if they are possible? Fire away.

Pausing Captivate's Timeline

Intro

This is the fourth post in a sequence of 5. The first post introduced features of all timelines, the second is focused on the specific aspects of the Video Demo Timeline, the third on the aspects of the normal/responsive projects (cptx) both for master slides and normal slides. To understand this article - perhaps the most important - I recommend to  read at least the first and the third article as a preparation. 

This topic is more suited for a live event: a real or a virtual training session. I expect a lot of questions, and those are easier to answer in a live event. I have presented several webinars for Adobe in the past (most about advanced and shared actions), but that practice seems to be discontinued since a while. If you want to participate in a meeting (Connect room), I'm prepared to organize it. Send me a note: either by mail (info@lilybiri.com), in the comments on this post, or use Twitter (my handle is @Lilybiri). In case of sufficient requests, I'll propose a date/hour (probably am PT, for users in USA) and will need an e-mail address for the invitations. As a bonus, will offer you some files.

Pause and Pausing points

Pausing the timeline means stopping the Playhead. However that can be done in in two ways, and they do not affect the items in the same way. Let me first explain what I mean by 'Pause' as opposed to 'Pausing Point'. You'll see that I compare them with two traffic signs: Pause with the red light, Pausing point with the Stop sign. But also in traffic, some 'items' do not respect those signs, legally or illegally. 

Pause 

This strict way of pausing can be achieved by one of these methods:

  1. With the pause button on one of the default playbars.

  2. By choosing the command 'Pause' to be triggered On Enter for a slide (doing it On Exit is not a good idea, because it will happen after the last frame, see previous post about events).  It can also be a (last) command in an advanced/shared action.

  3. By using the Success event an interactive object (like a shape button) with the command 'Pause' either as a simple command or within an advanced/shared actions. Usually it will be the last command. 

  4.  Alternative for 'Pause' command is to assign 1 to the system variable cpCmndPause (its default value is 0). This system variable controls the pause.

If you use a playbar, you'll see that the progress bar is stuck when Pause is encountered. To understand even better, I recommend to insert the system variable cpInfoCurrentFrame in a text container, displayed for the whole project (on top). 

UnPause?

You can use the Play button on the playbar, or need the command Continue, which is available as simple action and in the dropdown list in advanced actions.

Pausing point

Pausing points exist on some special slides, or you can add them by inserting an interactive object for which Pause the slide is activated in the Timing Properties panel. In many cases the pausing point will be visible on the Timeline (see previous articles), but not always. Contrary to the absolute pause, here the timeline is 'waiting' for an action by the user. For that reason the STOP sign is a better metaphor than the red light. Here is an overview of the pausing points, which will be visible on the Timeline:
  1. Quiz or question slides: the pausing point is visible on the slide timeline, but not in the Timing Properties panel. Only way to move is by dragging. Default timing is at 1,5secs, and pause cannot be unchecked. Pausing point is linked with the two-step process triggered by the Submit button. However when selecting the Submit button, you'll not see the pause in the Timing Properties panel (as is the case for the D&D Submit button). Waiting is here for the user to click the Submit button, then to press Y or click on the slide
  2. Score slide: same situation as for the quiz slides: visible in the slide timeline, not in the Timing Properties. Default timing is at 1,5secs. Pausing point is linked with the Continue button, but will not show in the Timing Properties panel of that button. Waiting here is for the user to click the Continue button.

  3. Drag&Drop slide: is pausing at 1,5secs but the point is not visible on the timeline. You will not see it in the Timing Properties for the slide, but in the Actions tab of the D&D panel. It is linked with the Submit button, when selecting that button the Timing properties panel will show the timing of the pausing point. Waiting for the user to click the Submit button, or in case of Auto Submit waiting for a correct answer.

  4. Interactive objects (click box, button, shape button, Text Entry Box) can have a pausing point, to be defined in the Timing Properties panel. That pausing point will be visible in the Timeline, and the part before the point is indicated as 'Active', part after the pausing point as 'Inactive'. Since a click box is invisible to the user, it has not inactive part, its pausing point will always be at the end of its timeline. Waiting is for the user to click either on or outside of the interactive object (click box, shape or normal button) or to confirm the Entry in a TEB. You can edit the pausing point by dragging in the Timeline or in a precise way by editing the Timing Properties panel. It is also possible to uncheck the Pause (see screenshot 3 in the Gallery).

  5. Shape button on a master slide can have a pausing point. Since objects on a master slide have no duration, no Timing Properties panel, you have to indicate that you want it to pause, in the Actions tab of the Properties panel (see screenshot 4 in the Gallery). You can uncheck the pause there as well. The pausing point will be at the end of each slide, based on that master slide. It will not be visible in the timeline
  6. Interactive widgets or learning interactions have a pausing point at 1 sec. It will not show up in the Timeline, you can find it in the Timing Properties.  Pause can be unchecked, but you'll not want to do that for this type of interactions.That is the place to edit or uncheck the Pause (see screenshot 5 in the Gallery). Static widgets/interactions do not have a pausing point. More info about difference  between interactive and static in: Widgets and Interactions

Bonus: You can download a (watermarked) pdf with this overview from PausingPoints.

UnPause?

It depends on the kind of pausing point:

  1. For Question slides: the playhead is released after the second step of the Submit process and the actions defined in Question properties will be done.

  2. For Score slide: similar, but after clicking the Continue button.

  3. For Drag&Drop: exactly the same as for the Question slides, after clicking the Submit button.

  4. For interactive objects on master or normal slides: if an advanced action is executed (Success/failure) the playhead is not released automatically. If you want this to happen you have to include a Continue or a navigation command like Jump to as last command in the action. If you use a simple action, the playhead will be released by default, but in CP9 it is possible to uncheck that default setting 'Continue playing the Project' (not done in this screenshot).
     

What is Paused?

Not everything is paused by the absolute Pause command, nor the Pausing points. Watch the interactive movie to understand better. Some items are never paused, some are paused by both Pausing points and the Pause command, some are only paused by the Pause command, not by the pausing points although there may be a workaround. 

The position of the playhead when pausing is important: objects for which the object timeline starts later than the pause will not appear until the playhead is released.

Same is the case for Effects which have a duration, a timeline: if the pause occurs while the effect is not finished, it will stall in the last position and continue only when the playhead is released.

Animations however are never paused, not even when you use the Pause command triggered by the On Enter event of a slide. They will always play.

Video clips inserted as Event video are totally independent: if they are playing when pausing, they'll continue to play. If a pause is occurring and the video is not yet started, the user will be able to use the Play button of the video control panel to watch the video. The only alternative way to pause event video is by using JavaScript (see Working with event videos). Video clips inserted as Multisynchronized video however will be paused by the Pause command and by a pausing point.

The situation is a lot more complicated for audio:

  • Background audio is totally insensitive to Pauses or Pausing points: it will continue to play.

  • Slide Audio: will automatically be paused by the Pause command, but not by a pausing point. It is possible to pause slide audio at a pausing point, to resume when the playhead is released if you check 'Stop Slide Audio' on the Options tab in the Properties panel of the interactive object.
  • For the default pausing points on quiz slides, score slide, D&D slides you cannot pause the slide audio however. This seems confusing, and can lead to a problem. Slide audio clips automatically will increase the duration of the slide. You learned that the default pausing point of this type of slides is always set to 1,5seconds. If the playhead is released with the command 'Continue', it will have to visit all the remaining frames on the slide, those frames in the 'big' inactive part of the slide. To avoid that, I recommend that you change the default pausing time and make it just a little bit smaller than the slide duration. This is not necessary if the actions when releasing the playhead from its pausing point are a navigation to another slide, because the inactive part of the slide will just be skipped.

  • Object audio: will be paused by the strict command Pause, but not by a pausing point! There is no workaround for this behavior for a Pausing point.

  • Audio started with 'Play Audio' cannot be stopped not by Pause nor by a pausing point, the only way to stop it is by launching the command 'Stop Triggered Audio'. 

Why pausing?

This blog post has become very long, for which I apologize. For that reason I will write out some use cases, to illustrate the just described theory in later posts. You're welcome to post some ideas as well. Here are some appetizers:

  • Instead of creating very long slides to fit the narrations, use the Play Audio command and have a pausing point on the slide. That can be a Next button, which offers total control to the user.

  • Question slides with narration as slide audio: you need to move the pausing point.

  • Create custom navigation: use shape buttons on the main master slide, only one of them needs a pausing point to give each user all the time needed to watch the slides.

  • Create a slide with light boxes.

  • Have multiple TEB's on one slide with a unique Submit button.

  • Create a dashboard with buttons to display multiple vodcasts, images, podcasts.

Knowledge Check Slides - tips

Intro

Knowledge Check Slides have been introduced as one of the new quizzing features with version 9. The Help documentation is 'spartan' as usual. You can read this as Features (quote from the Help):

  • Knowledge check slide imbibes similar features of question slide without any results, reporting structure and interaction ids. 
  • Knowledge check slides do not participate in reviews. 
  • Random questions are not applicable to this knowledge check slide. 
  • Master slide and controls usage is similar to question slide. 
  • Knowledge check slides can be used to impart the learning on specific topics. 

I explored those KC slides in preparation for a workshop about new Quizzing features, and want to give you some more tips. Since the KC slides are very similar to normal quiz slides, I'll start with 'Recognizing KC slides'. Then I'll show the differences in default setup, and in some other aspects not mentioned in the Help,  the relationship with the quizzing system variables and - what did you expect? - a tweaking tip.

Recognizing KC slides

This is possible in different locations:
  • in the Filmstrip, KC slides get a special indicator at the bottom right, which the Quiz slides do not have; in this screenshot slides 1&3 are KC slides and have that indicator:
  • in the Quiz Properties panel you see more differences with normal quiz slides, most are due to the fact that KC slides are not scored by default:
  • The mention (KC) next to the type of question
    The lack of the possibility to choose between Graded and Survey (because KC slides are not scored)
    No partial scoring for MCQ slides with multiple correct answers 
    No points
    No penalty

  • in the Advanced Interaction panel you don't see a specific indicator. The score of the KC slides is set to 0,  they are not set to be reported but... contrary to what the Help tells, the KC slides have an individual Interaction ID. This is probably not used. Look at this screenshot:

There is no way to convert a KC slide into a question slide, nor a question slide into a KC slide!

Default setup KC slide

The default settings for a KC slide are bit different from those for a question slide:

  1. For a KC slide only the Incomplete feedback message is activated, not the Correct message as for Quiz slides
  2. For both KC and Question slide only the Submit button is checked off. The Back, Skip and Clear buttons can be activated, but they are not by default.
  3. Attempts are set to Infinite, with the Retry Message enabled. For question slides by default Attempts is set to 1. Because the attempts are set to infinite, you don't have a Failure message enabled for KC slides. You can decrease the attempts and in that case you can provide up to 3 Failure message, same as for Question slides.

You read in the Help that KC slides will not be visited during Review, they are not in the Quiz scope, except of course if they are nested in between normal quiz slides. Contrary to Pretest slides, the KC slides will not prevent navigation by playbar or TOC.

It is not possible to use question pools (see Help), random questions but it is also not possible to use GIFT format to import KC slides. 

Some options in the Quiz Preferences do work for KC-slides: if you check the option to Hide Playbar in Quiz, this will be valid both for question slides and KC slides. Unchecking the option 'Allow Backwards Movement' will only prevent backwards movement on question slides, not on KC slides. However, KC slides do not get a Progress indicator! IIf you want a progress indicator (question X of Y) you can have a look at this older blog post..

When you leave a KC slide, it is reset immediately which is not the case for question slides which are frozen until a new attempt on Quiz level is started. In that way a KC slide behaves like a Drag&Drop slide that is not set to be reported, had no score. There is no possibility to freeze the answer on a KC slide, which may be a game stopper sometimes.

As the Help mentioned, design of the KC slides depends on the same master slides as the normal question slides, with the exception of the new Review buttons which will never appear on KC slides. For navigation on KC slides you can use the Back/Skip buttons or add custom shape buttons.


System variables 

Contrary to the Pretest slides, there are no specific system variables available for Knowledge Check slides. I have been looking for quizzing system variables that do get a value from a KC slide. Here is an overview of the variables that are not used by KC slides:

  • cpInQuizScope and cpInReviewMode, both Booleans will not be toggled from the default 'false' to 'true' when you enter a KC slide. If the KC slide is in between normal question slides, it can be 'true' but that is not due to the KC slides.
  • Variables linked with scoring are not used: cpInfoPercentage, cpQuizInfoLastSlidePointScored, cpQuizInfoNegativePointsOnCurrentQuestionSlide, cpQuizInfoPassFail, cpQuizInfoPointsPerQuestionSlide, cpQuizInfoPointsscored, cpQuizInfoPartialScoringOn, cpQuizInfoTotalProjectPoints, cpQuizInfoTotalQuizPoints 
  • cpQuizInfoAttempts: gives the attempts on Quiz level, as specified in 'Quiz Preferences, Pass or Fail'. Those attempts have no sense for KC slides, since the user can come back as many times as he wants to retake the KC question which is always reset when leaving the slide.
  • cpQuizInfoPassPercent and cpQuizInfoPassPoints: since KC slides have no score, those settings of the Quiz Preferences have no meaning for KC slides.
  • cpQuizInfoTotalQuestionsPerProject: contrary to the Pretest questions which are counted in this variable, as are the normal Question slides, the KC slides are not included in this variable. Same for the variables cpQuizInfoTotalCorrectAnswers, and cpQuizInfoTotalUnansweredQuestions

As you see not many variables are used by KC slides, but some are used! Moreover they can be very useful if you want to do more with KC slides:

  • cpQuizInfoAnswerChoice: one of my favorites as you could read in this old blog postIt can be used to tweak the work flow with KC slides as you'll read more later on. One exception: it is not populated when you use Advanced Answer option.
  • cpQuizInfoMaxAttemptsOnCurrentQuestion: can be useful as well, although having a similar system variable to cpQuizInfoAttempts for current attempt on question level would be even better. You need a user variable as a counter for attempts on question level. If you keep the default setting of Infinite attempts, this variable will have the value 32767 (no idea why?).
  • cpQuizInfoQuestionSlideTiming and cpQuizInfoQuestionSlideType are available for KC slides as well.

Tweaking tips

Here are some tips, which I tried out with success but will not explain in detail.

  1. If you do not want to keep the Attempts set at Infinite, but to a limited number it would be possible to count the number of correctly answered KC slides. Create a user variable v_counter with a default value of 0. Use the Success action of the KC slides to increment that counter. Later on you can show the obtained value for v_counter, and even use that value in a conditional action to offer feedback or navigate the user back to content slides.

  2. There is no Review possibility for KC slides as mentioned. If you offer limited attempts on question level, you could show a custom feedback message on the KC slide for the questions answered correctly, something like 'You have answered this question correctly'. When simulating a 'Review' situation, the user will be invited to answer only the KC questions that do not show that message. Be careful: all embedded question slide objects are always on top of the stack, you don't want the feedback to be hidden by those objects. That can be done by having a shape before the KC slide, timed for the rest of the project and always on top. This tweaking work flow was described in this article: Buttons on Question/Score slides?

  3. The use case described in this thread of the Captivate forums could be solved using the same system variable cpQuizInfoAnswerChoice in conditional actions, combined with a counter to track the number of attemptsl. You cannot leave a normal question slide to a content slide for remediation unless you follow the strict rules for remediation. If you want to limit the attempts to get a correct answer, remediation rules are broken. With a KC slide, the answers are reset every time, which allows a lot more freedom. However: if you need a real score for the slide, you'll have to use the workaround I described in this blog post: Report Custom Questions - part 2


    System variables in Captivate 8/9 and 2017

    I published a new version of the table with system variables for CP2019. It is still free to download and personal use. Check out: 

    Intro

    Captivate 9, 2017  users: there is no change about system variables in both versions, you can download the same table.

    The post 'System variables in Captivate 6' has been very popular, probably because it offers more details than what can be found in the documentation of Captivate itself. Later on I mentioned some new variables in Captivate 7 in the post New Features in 7.0.1.
    Time to upgrade the table for Captivate 8, you can download (for free) the pdf from here. The document is encrypted to discourage abuse. You will be able to print it at low resolution (150dpi) and it can be read by a screen reader. 

    The table was first proposed at the Adobe Learning Summit presentation about Advanced and Shared Actions. 

    New

    Captivate 8 only added two new variables:

    • cpInfoMobileOS in the category 'System Information': is read-only and detects which device is used, returns a number or a case-sensitive string

    • cpInfoGeoLocation in a new category 'Mobile': returns the geometric location when using a device on which such detection is enabled. This is the first variable that has not one but three components. Latitude, Longitude and Accuracy are numbers. There are several tutorials around, like this one.