Software simulations: Preparation phase (back to basics)

Intro

Captivate has always been famous for its interactive software simulations. Originally when it was released under the name ‘RoboDemo’ it was its primary goal. Although – in recent versions  – not much has been changed  for this feature,  it could be worthwhile to explain some tips I acquired while recording interactive tutorials for many applications (in several languages). In Flanders we often quote ‘Goed begonnen is half gewonnen’, freely translated ‘a good preparation will spare you lot of work later on’. This blog is about this preparation phase. some recommendations are also valid for Video Demo. I plan another blog will focus on the capturing workflow, and a third one on editing/polishing the sims into engaging eLearning course(s).

Preferences

Preferences can be edited before opening a project, while you are in the Welcome screen, the so-called Global Preferences. You do not have to start the Software simulation type of project to do so. Preferences are too be found under the Edit menu (Win users like me) or under the Captivate menu (Mac users).  Those global Preferences have less options because project-specific ones are missing, but the Recording category is complete.These options need to be checked, and eventually changed:

Settings:

Check the language! If you need to use another language, this is the place to be before starting the simulation. The feedback messages during capture (both shapes and captions) can be found in a file with extension rdl, like you can see in this screenshot. You can edit the messages in an editor like Notepad (don’t use Word).

I tend to keep the other settings at their default value. Lot of them can be set up later on for the project (narration, system audio..). The Camera sound and the Keystrokes audio are useful during recording, will not be included when published. The Smoothening is meant for the movie slides which have to be created for drag and other mouse actions. Later on you’ll get tips in the second part which will treat the capture itself.

Video Demo

To have a better quality for the movie slides (setting is also used for the simulation movie slides, also indicated as Full Motion Recording slides), change to 32-bit instead of 16-bit. For Video demo the temporary files are in a dedicated folder, you may want to switch to another folder on another drive if your startup drive (C) is too small. That tip is only for Video Demo, which can become rather big in file size.

Keys

Some of those shortcut keys are only for software simulations, not for Video Demo. That is the case for the Pause button, you cannot pause a Video Demo (answered that question multiple times in social media). You have to end the recording and eventually record another video at the end of the previous one..

Modes

Allows to check the setup for the three default modes (Demonstration, Training, Assessment) and eventually set up a Custom mode. Beware: you cannot choose a ‘default’ mode for future recording, which is what some users seem to believe. Choosing the mode(s) always happens at the start of a new recording. Personally I will edit some settings in this category. The feedback messages in a software sim, contrary to all other feedback messages (shapes) are by default set to be Text Captions. I prefer to switch to shapes and you can have a choice for the shape; it is easier to control the style of shapes in Captivate (see Step 2: Themes). You need to make the choice for the Demonstration mode, but it will be taken over for the Hint messages in Training/Assessment:

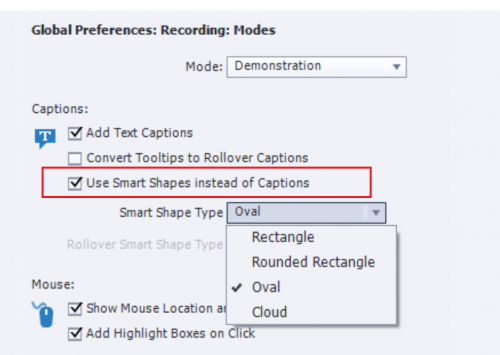
Take note of the objects to  be added during recording: besides the Success/Failure/Hint messages, highlight boxes, click boxes, Text Entry Boxes and eventually Rollover Captions (for Tooltips).

Defaults

This category is meant to edit the styles to be used. It is bit weird that this is included in the Preferences. Do not worry, Recording defaults will be added to the used Theme as well.
Beware: that will be the Theme set as Default theme. Of course if you opted for shapes instead of captions under 4., you only have to check the styles for shapes, not for captions. It is a bit confusing, because some captions have no counterpart as shapes: Capture Caption, Rollover caption. The styles for Smart Shape (used for both) is by default empty, but you can choose a styles there as well.
I will always create a different style for the Highlight box, instead of the thin lined Blue one which is the default. For the TEB, which often doesn’t have the wanted style that is a lot more difficult, because the wanted font and font size depends a lot on the application you’ll want to capture.

Theme

All software simulations (and the Video Demo) use the Blank master slide. It is important to keep that master slide blank. A background color or background image is not a problem. But you shouldn’t add other objects.

The Theme of your choice will need the wanted theme colors palette, theme fonts and object styles (maybe set in the Preferences, Defaults), Content and Quiz master slides are important if you want to add them later on to the course.  Once the wanted theme has been double-checked mark it as the Default theme. Especially if you do create many software simulations it is recommended to keep a Theme dedicated to them.

Storyboard

You have to know precisely what you want to capture. For long workflows, do not hesitate to split them up in small logical parts. It is a lot easier to record a limited number of slides, certainly if you want to do narration at the same time (which I do not recommend). For a software simulation you don’t have to worry that much about the synchronization with audio, since that can easily be done while editing (phase 3). While preparing, keep in mind to limit Full Motion Recording slides when possible. In many case drag and other mouse actions can be replaced by alternatives. Example: instead of dragging in scrollbars click somewhere on those bars. There are a couple of reasons. Several users have reported issues with the FMR (Full Motion Recording) slides when publishing to HTML5 in some browsers. Originally those slides are SWF-based, they are converted to MP4 when publishing but apparently the result is not always optimal. A better solution is to replace FMR by Video Demo slides, but that slows down the recording workflow (see second post).

Score in Software Simulation

Intro

This is a short blog post, answering a software simulation (assessment mode) question on the forum. If you are interested, here is the link.

You probably know that in such an assessment scores are attached to one interactive object on each slide: either a click box or a Text Entry Box.It offten happens that the same action can be done by clicking more than one 'target' on the slide, which will need customizing that slide to add at least one extra click box, which will also be scored. However that will lead to a results slide where the acquired percentage is not correct. Reason is that all scored objects are included in the total score. You can verify that easily in the Advanced Interaction panel, to be opened from the Project menu or with the shortcut key F9. Here is an example. Slide 59 has two target click boxes, both are scored.

The OP wants to show the correct percentage to the learner in the project, but for the reporting to the LMS Pass/Fail reporting is sufficient which can be done by basing it on the required pass points.

Variables

    • A while ago this blog post described using the system variables used in the Results slide: Quizzing System Variables. For this blog post the relevant system variables are:

cpQuizInfoTotalQuizPoints: will have the value you see at the top of the Advanced Interaction panel, and is not correct in this case because it includes the scores of the extra target click boxes.

cpQuizInfoPointsscored: will be correct because on each quiz slide only one of the targets can be clicked.

cpInfoPercentage: is calculated from both previous variables and will be lower than expected for the learner.

cpQuizInfoPointsPerQuestionSlide: this system variable is not behaving as expected for slides with multiple scored objects. It will NOT show the total score of the slide, but the score of ONE scored object. I will presume that in case of a slide with two target click boxes, both of them will have the same score. This is also valid if you prefer shape buttons instead of click boxes.

Since there  is no need to transfer the percentage to the LMS, it is possible to use user variables. Create these variables:

v_TotalScore: will replace the system variable cpQuizInfoTotalQuizPoints

v_TooMuch: will store the total score of the extra click boxes. I assume that click boxes on the same slide have the same score.

v_Percentage: will store the result of the calculation from v_TotalScore and cpQuizInfoPointsscored

Workflow

Simple

The easiest way would be to count the number of extra targets. If all the click boxes have the same score of 1 point you could calculate the correct percentage with this advanced action:

You can trigger this advanced action with the On Enter event of the custom Score slide. It will allow you to display the correct Percentage. 

Advanced

Situation becomes bit more complicated if not dual targets (click box/shape button) have the same score (of 1 point). In that case you can take advantage of the weird behavior of the quizzing system variable cpQuizInfoPointsPerQuestionSlide  (see above). I used this shared action, triggered by the Success action of the targets, and the 'Last Attempt' action which is used here (Success action on a background Shape covering the complete slide). I assumed that the Last Attempt action of the targets is set to No Action. That typical workflow was used by the OP, and explained in this blog post

You see that this shared action has no parameters, you could also create an identical advanced action, if you still fear shared actions. My main reasons for this choice:

  • Shared action can have a small description
  • Shared action appears in the Library, which make it easier to check the Usage
  • This shared action has no parameters, so it takes the same time as the advanced action to be applied to all the necessary events.
  • It is much easier to transfer this shared action to another Project.

There is a small change to the action to be triggered On Enter for the Results slide:

Conclusion

On the Results slide you can insert most of the default fields, an overview:

  • You scored:  the system variable cpQuizInfoPointsscored is correct
  • Maximum score: you need to replace the system variable by the user variable v_TotalScore
  • Correct questions: will be OK, it is the system variable cpQuizInfoTotalCorrectAnswers
  • Total Questions: will not be OK, you could add a supplementary command to the shared action similar to replace the system variable cpQuizInfoTotalQuestionsPerProject by a decremented user variable.
  • Accuracy: you need to replace the system variable cpInfoPercentage by the user variable v_Percentage
  • Attempts: will be OK, it is the system variable cpQuizInfoAttempts


Embed Software Simulations (Knockout slide)

Intro

Over 10 years ago I posted a blog 'Create/Use a Knockout Master slide'. At that moment SWF was the only way to publish a Captivate project, and in versions 5 and 5.5 Themes were not ‘grown up’ yet to their present power. Meanwhile I have pointed many users to that old article, and many claimed it was still useful. However time to clarify the slight differences and offer updated tips., Of course I will use a HTML example. 

Example Tutorial: 'Shared actions as Template'

This is a Captivate tutorial explaining how you can use a Shared action to create variables and as template for advanced actions. There are two versions. Here is a screenshot showing the difference in sim slides between version 1 (Full-size) and 2 (Embedded)

Version 1: Default software simulation

Personally I never use a software simulation in Demo mode, because it is better replaced by a Video Demo for its quality and advanced editor. I created a Training simulation, meant to learn about this Captivate topic. The UI of Captivate is rather complicated, hence my choice of a resolution 1600x900px. The ratio is important, here the common 16:9. In the limited space here, I don't want to embed the simulation because that would be almost useless. I published it as a HTML rescalable project. You can watch it using this link:

Full-size tutorial

In this first version, instructions are given using Audio. The captured Backgrounds (see Library) are filling the slides. Although this tutorial is rescalable, you will realize that using this on the limited space of a smartphone with a phone browser is not appropriate. It may be used on tablets (no incompaté:ible features), but the preferred devices are laptop/desktop. 

Version 2: Embedded in a content slide

I used the workflow explained below to create a second version, where the software sim slides are rescaled and embedded in content slides (1280x720px). On those slides there is space for a logo and more. The narration was replaced by text instrutions on the same slide as the software sim. Published project is also rescalable HTML. Even a tablet will probably be impractial in this version. Use this link:

Embedded tutorial


Setup for Embedded sim slides

For this example the simulation slides need to be embedded in a project  with a resolution of 1280×720 pixels. The captured slides were created with a resolution of 1600x900pixels, which is larger than the final resolution.  

To embed the sim slides, they need to be rescaled. If the original simulation slides have the correct resolution ready for embedding, you can skip Step 0.

Step 0 in Captivate (only if captured resolution is not correct)

Rescaling the software simulation to 2/3, which leads to a resolution of 1066x600px. You choose the resolution needed for your project, but keep 'Maintain Aspect Ratio' and 'Rescale all objects'.  Those are the default settings.

Step 1 (in Photoshop or other app) – create the Knockout image

In Photoshop I created images on two layers: the first one (FullTexture' will be used for normal content slides, the second one is the 'Knockout' image which has a transparent part.  Size of the file is same as the end resolution (1280×720). I used one of the provided textures in Photoshop as Fill. In the second layer I deleted a rectangle of 1066x600px to create a ‘knockout’ part in which the sim slides would fit. You see the size of the margins (with texture) in the screenshot: to the left – a vertical bar with a width of 200pixels, to the right one with a width of 14px; at the top another with a height of 90 pixels and a the bottom a bar with a height of 30 pixels. 

You can import the Photoshop file, and will have both layers as PNG images. See 'Roundtripping with Photoshop'.
You can use another graphics application if you cannot use Photoshop. You could also create a freeform filled shape in Captivate, start with the hexagon, which has 6 points.

Step 2 (in Captivate) 

Some maths to start with:
  1. calculate the difference between the widths of the vertical bars:     200 – 14 = 186 pixels
  2. new width project will be 1066 + 186 = 1252 pixels
  3. calculate the difference between the heights of the horizontal bars:   90 – 30 = 60 pixels
  4. new height project will be 600+ 60 = 660 pixels
Rescale the project using these settings:
  • deselect ‘Maintain aspect ratio’ and introduce the new dimensions
  • under ‘New Size is Larger’, select ‘Keep project the same size and position project Bottom Right; I choose this because the bottom bar and the right bar have the smallest dimension; you can choose another option if your smallest margins are elsewhere.

The result will look like this:


Step 3 (in Captivate)

 Rescale now to the final size, for this example to 1280x720 pixels, with settings:
  •  deselect ‘Maintain aspect ratio’ and introduce the final dimensions
  • under ‘New Size is Larger’, select ‘Keep project the same size and position project Center

After this rescale of the project it will look like this:

Step 4 (in Captivate): Master slides

 In the original blog post it was possible to create a master slide which is partially transparent, but that is no longer possible in the present versions with the Themes (new since Captivate 6).  Here is the master slide panel, where you see some master slides of the custom Theme 'Knockout' which I created:

I used the two imported PNGs from the Photoshop file to create:

  1. The Main master slide, where the FullTexture image is set as background image. You see the setup in the Properties panel:
  2. Based on that Main master slide, I created some content master slides. You see acouple of them in the master slide panel above (Title, Light). The Blank master slide always has to remain Blank, it is not using the Main master slide.
  3. The Knockout master slide. You cannot use the KnockoutTexture image as was done in the Main master slide, it needs to be a separate image as you can see in the Timeline and in the Properties panel. I added some objects and placeholders:

Step 5: Apply Knockout to simulation slides

Up till now the simulation slides used the Blank master slide. Change the master slide to the Knockout Master slide. It is very important that you do NOT check the option 'Master slide objects on top', because you'll lose the textured parts of the image.