Bookmarking in Captivate (Classic and New) - Introduction

Intro

One of the new features in Charm (new version 12) release is the possibility to have bookmarks on any content slide. In Captivate Classic you bookmarks are only available on a slide with slide video (to create an interactive video.

What do you expect from a bookmark in its original meaning? Looking this up in multiple dictionaries, two possible meanings appear everywhere:

  1. A strip of leather, cardboard, or other material used to mark one's place in a book. It has a digital version in ebooks as well. In the digital world you'll find this has also become..
  2. A saved shortcut that directs your browser to a specific webpage.

I planned to summarize my experiences with bookmarking fo navigation purposes in one blog post.  However, after weeks of exploring, I realize this would lead to a short booklet instead of a short article, hence the decision to split the content up in multiple articles. Main purpose is to compare and explain the present differences between the new (Charm) version 12 and Classic Captivate.

This introduction will explain the terminology. A Captivate tutorial, demonstrating the terminology is inserted. This tutorial was created in version 11.5.5.553. Explanation of workflows both for New and Classic Captivate will follow in next articles.

Example

You can watch this 8-slide tutorial using this link (to be preferred) for a scalable version, or watch the embedded static version. Please turn on your audio, there is narration. Slide 7 is a long video slide, taken from one of the presentation in an online Adobe conference. Be patient, the Next button if you want to skip appears after 30secs.


Terminology

When you watch the example output below, you'll see that I see two types of bookmarks for navigation: static and dynamic. My choice of adjectives refers to what is used for text fields as well: static text doesn't include variables and when publishing the content is defined and will not be changed on runtime. Dynamic text fields, as you see on the score/results slide in a project with scored objects and/or question slides, need to be rendered on runtime, because they contain variables for which the value will be defined based on actions by the learner.

Static bookmark: is linked to a fixed frame on a fixed slide. Examples: start of an important part in an interactive video. It is a bit similar to what you can have in a Table of Content, but on frame instead of slide level. Have a look at this interactive video, where the menu uses static bookmarks to allow you to access them easily:

Custom Play/Pause button

Static bookmarks can also link to non-video slides, and are not limited to navigation within the same slide. That is valid both for version 12 (New) and Captivate Classic. However, due to the absence of bookmarks in Captivate Classic, you need to use Micro-navigation. If you want an intro to this type of navigation to frames, have a look at:

Intro to Micro-navigation

Dynamic bookmark: the frame for the bookmark can be chosen by the learner, and will allow to return to that frame if wanted. This is the closest digital equivalent to putting a real bookmark in a book after a reading session. The bookmark is created on runtime, reason why I use the adjective "dynamic", referring to the difference between static text and dynamic text. At this moment dynamic bookmarks can only be created in Captivate Classic, not in the New version 12.
Custom Navigation (basics)

Warning

At this moment two versions of Captivate are functional with the same license: Captivate Classic (version 11.8) and Captivate (version 12, also named Charm). The workflows described in this post are only functional in Captivate Classic. In version 12 they are not (yet) possible for multiple reasons which I will summarize at the end.

Why use Custom Navigation? 

Captivate has a playbar which includes Next and Back buttons, and a progress bar allowing to scrub to any location.

However in many projects these default buttons are not wanted, some examples:

  • The project is not linear (presentation-like). This can be due to a dashboard pointing to different parts and allowing the learner to control the sequence of the project slides.
  • There are (dummy) slides in the project which you don't want to have visited by the learner. 
  • Your client requires Forced viewing (bad idea especially for adult learners).

In those cases you don't want to have the default buttons which will be available all the time and always cause the action 'Go to Next  Slide' or 'Go to Previous Slide'. In all those cases a scrub bar is also a bad idea, but this article has its focus on custom Next and Back buttons. I have seen so many cases where the developer just puts an instance of the custom buttons on each slide - each with their individual action -  but I will propose altnernatives.

Workflows

Purpose of both workflows is the same: avoiding to have an instance of the buttons on each slide:

  1. Workflow 1: Put the buttons on the first slide where you need them, and time them for the rest of the project, always on top. For the Next button this will be on the first slide, for the Back button on the second slide. The buttons will have a unique ID. That means that they can be addressed with an action like Show/Hide when necessary. You can hide the Next button if it is no longer needed on the last slide using the On Enter event of the slide. This workflow is to be preferred if you need a lot of Forced viewing. In that case you can hide the Next button (On Enter) and use the Delay Next Actions command to show them after a certain delay. 
  2. Workflow 2: Put the buttons on master slides. They will not get an ID, but if you keep the Pausing (is activated by default) the pausing point will occur for each slide based on the master slide at the last frame, whatever the slide duration. These buttons cannot be controlled by actions like Show/Hide.

Since the buttons in both workflows will not always be used with 'Go to Next  Slide' or 'Go to Previous Slide', you'll need a 'dynamic' action to make them flexible. 

Dynamic actions

I prefer Shared actions because it is easier to transfer them to any project, using my Shared actions Library. That is a Captivate project where I store much used Shared actions. I open the library in any new project using File, Import, External Library.

Next button

The simple action ‘Go to Next Slide’ can also be achieved by this action:

Assign cpCmndGotoSlide with cpInfoCurrentSlide

This may seem weird, but the reason is the different start number of the index: for cpCmndGotoSlide it is 0, for cpInfoCurrentSlide it is 1. Example: if you are on slide 3, Next button should go to slide 4, but for cpCmndGotoSlide slide 4 is identified by number 3.

Howeveer you cannot use this action to the Next button, whether it is on the first slide (timed Rest of Project) or on the master slide(s). It is static, you cannot edit it to go to another slide than the Next one. To solve this issue I replaced the system variable by a user variable, which I label v_Next.

   Assign cpCmndGotoSlide with v_Next

Another event and action is needed on each slide to define the value of v_Next. The used event is the Slide On Enter, and it is better to use an Advanced action, because it can be applied to all On Enter events of the slides in one workflow. For its default action it will be:

   Assign v_Next with cpInfoCurrentSlide

For slides where the Next button needs to jump to a different slide, you’ll need to edit this action, replace ‘cpInfoCurrentSlide’ by the slide number you want to navigate to.. 

Back button

The simple action 'Go to Previous Slide' can be replaced by this Expression:

Expression cpCmndGotoSlide = cpInfoCurrentSlide - 2

Why 2? For the same reason as explained for the Next button, due to the difference in index for both system variables. To make this action dynamic, we'll need another user variable which I'll label v_Back. Similar to the workflow for the Next button, the value of this variable will be set with an action On Enter for each slide. For a normal Back button this would be:

   Expression v_Back  = cpInfoCurrentSlide - 1

The action for the dynamic Back button will be:

   Expression cpCmndGotoSlide = v_Back  - 1

On the slides where you want to navigate to a slide which is not the previous slide, edit the On Enter action, replacing cpInfoCurrentSlide by the wanted slide to navigate to.

I prefer also shared actions for both the Back button action and the On Enter action.

Summary

In my Shared actions Library I have three Shared actions for the Next/Back buttons:

NextAct   Assign cpCmndGotoSlide with v_Next

BackAct   Expression cpCmndGotoSlide = v_Back  - 1

EnterAct   Assign v_Next with cpInfoCurrentSlide

                 Expression v_Back  = cpInfoCurrentSlide - 1

  • In a new project, drag the shared actions to the Project Library of the new project. It is important to drag them simultaneously to avoid the variables v_Next and v_Back to be created twice.
  • Add Next/Back buttons with one of the two workflows. Apply the Shared action ‘NextAct’ directly to  the Next button and 'BackAct' to the Back button. No parameters are needed.
  • Convert the action ‘EnterAct’ to an Advanced action, by using it as template. There are no parameters to be defined. Apply the Advanced action to all Slide Enter events, which is possible by selecting all slides in the Filmstrip (Ctrl-A) and adding to the slide Enter event.
  • Identify those slides where the buttons needs to navigate to other slides and edit the Advanced action 'EnterAct' for those slides. 

What about Captivate (version 12)

This workflow is impossible due to lack of:

  • Master slides
  • Timing of objects for rest of project
  • Missing system variables from the Movie Control category
  • Missing slide Enter event

In that version you need to keep the workflow to insert or copy/paste a button on each slide and add the appropriate action using the Interaction tool.


Tips for using Quick Start Projects (11.5)

Intro

The most recent version, 11.5.0.476 includes the new Assets Panel which I presented in this post.

You are able to use Quick Start projects, or slides taken from those projects to avoid having to design and to work out interactions for your project from scratch. Those projects/slides are available in a responsive (Fluid Boxes) and non-responsive version. I tested it out for a tutorial which you can watch using this link (it is a responsive fluid boxes project):

Button Types

If this topic, also related with 11.5, seems interesting, I will post a more detailed description in the near future. But today you'll get some tips from what I learned creating this tutorial.

QSP tips

You can use a Quick Start Project in two ways:
  1. Open the project, and delete or hide the slides you don’t want to use in your course.
  2. Open a non-responsive or a Fluid boxes project, and insert slides from the Assets panel.

I used the second approach for the tutorial, for a logical reason: I didn’t use even half of the provided slides in the Aspire project. Project has only 17 slides, including a lot of duplicate instances of slides. I used these slides from Aspire:

  • Welcome layout
  • Timeline Interaction 02
  • Main Menu layout 02
  • Subtopic Header layout (used 6 instances)
  • Tab Interaction 01 (used 3 instances)
  • Related Content Interaction (used 3 instances)
  • 3 Column layout
  • Exit Layout

Tip 1 Duplicate slides

If you need the same slide multiple times do NOT insert it multiple times in your project, because that will corrupt the Advanced actions (most slides use them). To avoid this you need to follow this workflow:
  • Insert one instance of the needed slide
  • Go into the Filmstrip, slide will be active (surrounded by a blue rectangle)
  • Duplicate that slide, either with the right-click menu or with the universal shortcut for duplicate: CTRL-D.
  • Move the slide by dragging in the filmstrip to the wanted location.

You can repeat this workflow as many times as needed. Due to Captivate’s smart labeling, the advanced actions will not corrupt in most situations. Why not always? See next tip.

Tip 2: Check Navigation commands

In a slide like the Main Menu Layout, the topic buttons point to another slides in the total project. On insertion of that slide only, without the target slides, all commands will revert to the default navigation command ‘Go to Next Slide’. You have to replace it by ‘Jump to….’ while indicating the correct target slide (in the project the slides of the Subheader Topic layout). This will prove easier if you use the next tip:

Tip 3: Rename slides

Labeling is always a good practice, but for sure in this type of project. Multiple instances of the same layout slide will have the same name (and are very long as well). Taking the time to give them a custom name will save time when you need to find a slide. Moreover, if you want to use the Table of Content, the names will be meaningful.

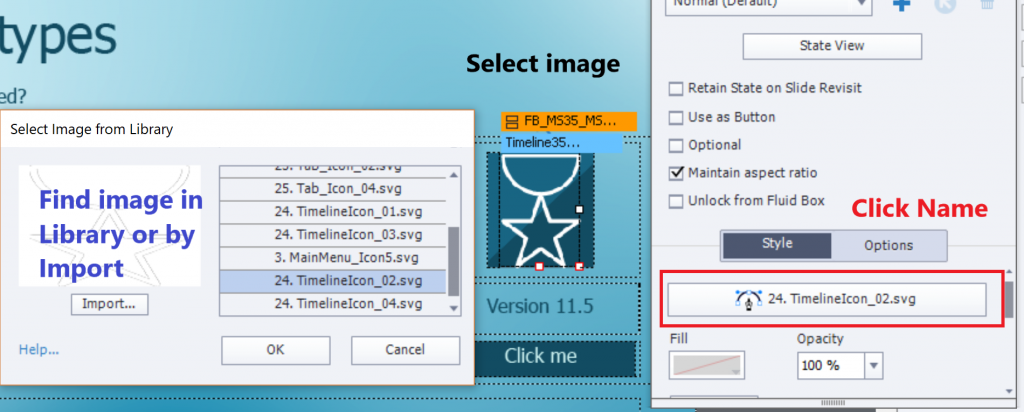
Tip 4: Replace image

Switching to another image is mostly very easy:
  1. Select the image.
  2. Click on its name in the Properties panel
  3. Choose another image from the Library dropdown list, or use the Import button to find it on your system.


However, on many slides an image is used as Fill for a Fluid Box. Look at the Subtopic Header slides (there are 6 in the example): having the image as fill allows to add an image on top of the fluid box. Normally you cannot stack two images, this is a useful solution for that limitations.

If you want to replace the fill for a Fluid box, you need to select that fluid box, you cannot just click the image. After selecting the FB you see that the fill is set to Image, click the second Fill button, use the Browse icon to find an image to replace the image. Be careful to check the Position properties if the new image doesn’t have exactly the same size as the original one.

Tip 5 Multistate objects

The layout slides use a lot of multistate objects.  That is the case for all the Click to Reveal slides (labeled ‘Tab Interaction’ and ‘Related Content Interaction) and probably for many other interactions. You really will need to learn how to use them. Click the State view button in the Properties panel, to open the Object State panel.

More questions?

You may have seen that I have edited some slides quite a lot. This post has only simple tips, not the full explanation of all changes. If you want to know more, post a comment to this blog.

Interactive Video, Navigation Bookmarks

Intro

Interactive Video is without any doubt my favourite new feature in Captivate 2019. It makes adding some interactivity to a passive video very easy compared with the old workflows which I used to simulate such an interactive video in previous versions. I had in mind to blog about some possible workflows that could add even more functionality. A user posted a question today about Bookmarking for Navigation. I had already some workflows in mind, and want to share one of them with you. I tried it out on the sample project provided with Captivate. That project has only two bookmarks, which are labeled 'ExerciseBenefits' and 'O3Jump'. the workflow can easily be extended to more bookmarkst. We'll create a shape button to pop up a menu. 

Popup menu

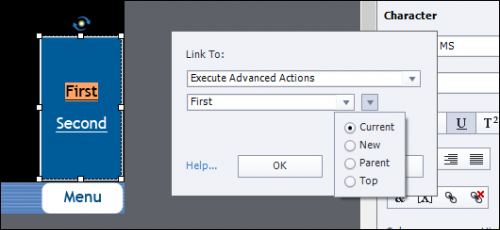
To create the menu, which is hidden when the video starts, I used a shape,  but you can use a text caption as well. I filled that shape with one word for each of the bookmarks. In this case I used the words 'First ' and 'Second'. Those words will be indicated as hyperlinks. Hyperlinks have a lot more functionality than just pointing to an URL, as I explained in some blog posts.

Close button

Dropdown menu

The menu for hyperlinks is missing some options (which I regret): you will not see the option 'Jump to Bookmark' nor 'Execute Shared Action'. My only choice was to use the command 'Execute Advanced Actions'.  That means that you have to create as many advanced actions as you have bookmarks. They are very simple oneliners, but with a simple action or a shared action it would be a better workflow.  It is also impossible to prevent release of the playhead, but that is not really an issue in this case since we are creating navigation actions, and the video may continue to play when it gets to the chosen bookmark.

The shape with the hyperlinked texts needs to be invisible in output, and timed for the rest of the slide. If you have multiple video slides, and you want one menu for all videos,  time it for the rest of the project. Because the overlays are possible, you'll not have any problem to have the shape being visible on top of the video.

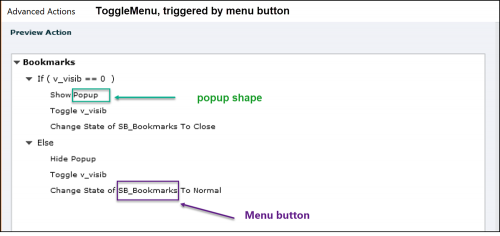
Menu Button

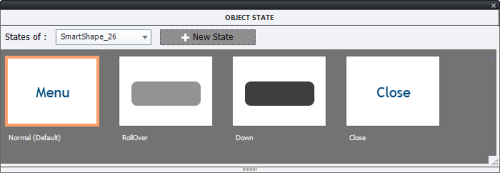
The menu button (which you could see in the screenshot with the popup shape) is a shape button. I added a custom state 'Close' to the 3 InBuilt states, where the label is changed from Menu to Close. To avoid confusion I took out the label from the Rollover and Down state which are used both for the open and closed version of the button:

The button is a toggle button, to track the visibility of the popup shape I needed a user variable (Boolean) which I labeled v_visib as usual. Default value = 0, which means the popup shape is closed and the Normal state of the button is active. When the button is clicked to open the popup, the state will change to Close, and the variable will be toggled. This leads to a conditional action which I have described/used already many times:


Conclusion

I hope you liked this workflow which is not included by default. You can add this toggle button to other buttons like an Audio/Mute and a CC button. If you missed it, you can find a workflow for that type of buttons in this blog post:.


Pausing Captivate's Timeline

Intro

This is the fourth post in a sequence of 5. The first post introduced features of all timelines, the second is focused on the specific aspects of the Video Demo Timeline, the third on the aspects of the normal/responsive projects (cptx) both for master slides and normal slides. To understand this article - perhaps the most important - I recommend to  read at least the first and the third article as a preparation. 

This topic is more suited for a live event: a real or a virtual training session. I expect a lot of questions, and those are easier to answer in a live event. I have presented several webinars for Adobe in the past (most about advanced and shared actions), but that practice seems to be discontinued since a while. If you want to participate in a meeting (Connect room), I'm prepared to organize it. Send me a note: either by mail (info@lilybiri.com), in the comments on this post, or use Twitter (my handle is @Lilybiri). In case of sufficient requests, I'll propose a date/hour (probably am PT, for users in USA) and will need an e-mail address for the invitations. As a bonus, will offer you some files.

Pause and Pausing points

Pausing the timeline means stopping the Playhead. However that can be done in in two ways, and they do not affect the items in the same way. Let me first explain what I mean by 'Pause' as opposed to 'Pausing Point'. You'll see that I compare them with two traffic signs: Pause with the red light, Pausing point with the Stop sign. But also in traffic, some 'items' do not respect those signs, legally or illegally. 

Pause 

This strict way of pausing can be achieved by one of these methods:

  1. With the pause button on one of the default playbars.

  2. By choosing the command 'Pause' to be triggered On Enter for a slide (doing it On Exit is not a good idea, because it will happen after the last frame, see previous post about events).  It can also be a (last) command in an advanced/shared action.

  3. By using the Success event an interactive object (like a shape button) with the command 'Pause' either as a simple command or within an advanced/shared actions. Usually it will be the last command. 

  4.  Alternative for 'Pause' command is to assign 1 to the system variable cpCmndPause (its default value is 0). This system variable controls the pause.

If you use a playbar, you'll see that the progress bar is stuck when Pause is encountered. To understand even better, I recommend to insert the system variable cpInfoCurrentFrame in a text container, displayed for the whole project (on top). 

UnPause?

You can use the Play button on the playbar, or need the command Continue, which is available as simple action and in the dropdown list in advanced actions.

Pausing point

Pausing points exist on some special slides, or you can add them by inserting an interactive object for which Pause the slide is activated in the Timing Properties panel. In many cases the pausing point will be visible on the Timeline (see previous articles), but not always. Contrary to the absolute pause, here the timeline is 'waiting' for an action by the user. For that reason the STOP sign is a better metaphor than the red light. Here is an overview of the pausing points, which will be visible on the Timeline:
  1. Quiz or question slides: the pausing point is visible on the slide timeline, but not in the Timing Properties panel. Only way to move is by dragging. Default timing is at 1,5secs, and pause cannot be unchecked. Pausing point is linked with the two-step process triggered by the Submit button. However when selecting the Submit button, you'll not see the pause in the Timing Properties panel (as is the case for the D&D Submit button). Waiting is here for the user to click the Submit button, then to press Y or click on the slide
  2. Score slide: same situation as for the quiz slides: visible in the slide timeline, not in the Timing Properties. Default timing is at 1,5secs. Pausing point is linked with the Continue button, but will not show in the Timing Properties panel of that button. Waiting here is for the user to click the Continue button.

  3. Drag&Drop slide: is pausing at 1,5secs but the point is not visible on the timeline. You will not see it in the Timing Properties for the slide, but in the Actions tab of the D&D panel. It is linked with the Submit button, when selecting that button the Timing properties panel will show the timing of the pausing point. Waiting for the user to click the Submit button, or in case of Auto Submit waiting for a correct answer.

  4. Interactive objects (click box, button, shape button, Text Entry Box) can have a pausing point, to be defined in the Timing Properties panel. That pausing point will be visible in the Timeline, and the part before the point is indicated as 'Active', part after the pausing point as 'Inactive'. Since a click box is invisible to the user, it has not inactive part, its pausing point will always be at the end of its timeline. Waiting is for the user to click either on or outside of the interactive object (click box, shape or normal button) or to confirm the Entry in a TEB. You can edit the pausing point by dragging in the Timeline or in a precise way by editing the Timing Properties panel. It is also possible to uncheck the Pause (see screenshot 3 in the Gallery).

  5. Shape button on a master slide can have a pausing point. Since objects on a master slide have no duration, no Timing Properties panel, you have to indicate that you want it to pause, in the Actions tab of the Properties panel (see screenshot 4 in the Gallery). You can uncheck the pause there as well. The pausing point will be at the end of each slide, based on that master slide. It will not be visible in the timeline
  6. Interactive widgets or learning interactions have a pausing point at 1 sec. It will not show up in the Timeline, you can find it in the Timing Properties.  Pause can be unchecked, but you'll not want to do that for this type of interactions.That is the place to edit or uncheck the Pause (see screenshot 5 in the Gallery). Static widgets/interactions do not have a pausing point. More info about difference  between interactive and static in: Widgets and Interactions

Bonus: You can download a (watermarked) pdf with this overview from PausingPoints.

UnPause?

It depends on the kind of pausing point:

  1. For Question slides: the playhead is released after the second step of the Submit process and the actions defined in Question properties will be done.

  2. For Score slide: similar, but after clicking the Continue button.

  3. For Drag&Drop: exactly the same as for the Question slides, after clicking the Submit button.

  4. For interactive objects on master or normal slides: if an advanced action is executed (Success/failure) the playhead is not released automatically. If you want this to happen you have to include a Continue or a navigation command like Jump to as last command in the action. If you use a simple action, the playhead will be released by default, but in CP9 it is possible to uncheck that default setting 'Continue playing the Project' (not done in this screenshot).
     

What is Paused?

Not everything is paused by the absolute Pause command, nor the Pausing points. Watch the interactive movie to understand better. Some items are never paused, some are paused by both Pausing points and the Pause command, some are only paused by the Pause command, not by the pausing points although there may be a workaround. 

The position of the playhead when pausing is important: objects for which the object timeline starts later than the pause will not appear until the playhead is released.

Same is the case for Effects which have a duration, a timeline: if the pause occurs while the effect is not finished, it will stall in the last position and continue only when the playhead is released.

Animations however are never paused, not even when you use the Pause command triggered by the On Enter event of a slide. They will always play.

Video clips inserted as Event video are totally independent: if they are playing when pausing, they'll continue to play. If a pause is occurring and the video is not yet started, the user will be able to use the Play button of the video control panel to watch the video. The only alternative way to pause event video is by using JavaScript (see Working with event videos). Video clips inserted as Multisynchronized video however will be paused by the Pause command and by a pausing point.

The situation is a lot more complicated for audio:

  • Background audio is totally insensitive to Pauses or Pausing points: it will continue to play.

  • Slide Audio: will automatically be paused by the Pause command, but not by a pausing point. It is possible to pause slide audio at a pausing point, to resume when the playhead is released if you check 'Stop Slide Audio' on the Options tab in the Properties panel of the interactive object.
  • For the default pausing points on quiz slides, score slide, D&D slides you cannot pause the slide audio however. This seems confusing, and can lead to a problem. Slide audio clips automatically will increase the duration of the slide. You learned that the default pausing point of this type of slides is always set to 1,5seconds. If the playhead is released with the command 'Continue', it will have to visit all the remaining frames on the slide, those frames in the 'big' inactive part of the slide. To avoid that, I recommend that you change the default pausing time and make it just a little bit smaller than the slide duration. This is not necessary if the actions when releasing the playhead from its pausing point are a navigation to another slide, because the inactive part of the slide will just be skipped.

  • Object audio: will be paused by the strict command Pause, but not by a pausing point! There is no workaround for this behavior for a Pausing point.

  • Audio started with 'Play Audio' cannot be stopped not by Pause nor by a pausing point, the only way to stop it is by launching the command 'Stop Triggered Audio'. 

Why pausing?

This blog post has become very long, for which I apologize. For that reason I will write out some use cases, to illustrate the just described theory in later posts. You're welcome to post some ideas as well. Here are some appetizers:

  • Instead of creating very long slides to fit the narrations, use the Play Audio command and have a pausing point on the slide. That can be a Next button, which offers total control to the user.

  • Question slides with narration as slide audio: you need to move the pausing point.

  • Create custom navigation: use shape buttons on the main master slide, only one of them needs a pausing point to give each user all the time needed to watch the slides.

  • Create a slide with light boxes.

  • Have multiple TEB's on one slide with a unique Submit button.

  • Create a dashboard with buttons to display multiple vodcasts, images, podcasts.

Navigation Help Slides

Intro

In this thread on the Captivate forums, a user asked how to configure navigation in a course with content slides and two help slides. The Help slides should be accessible from each content slide using a button. There is navigation possible between the two Help slides, and the user should be able to return to the content slide from where he started, from each of the Help slides.

Although there is a system variable cpInfoLastVisitedSlide, this cannot be used for this use case, because the user can navigate between the two Help slides. I explained shortly a possible work flow with a user variable and a couple of standard actions in the thread. Since the user told that he is a newbie concerning variables and advanced actions, I promised to write out a more detailed tutorial. This is certainly not a complicated use case! If you are an 'expert' in advanced actions, this is not a post to your taste.

Example project

This project has a Title slide, 3 Content slides and ends with two Help Slides.

Instructions are in the movie, try out the buttons.  You don't have a Back button on the content slides, but you can always refresh the browser to restart playing. Click on the Title slide to start playing:

Interactive objects/events

  • Slide 1 (Title) which uses the master slide 'Title', has a click box covering up the slide. It has the default action
     'Go to Next Slide'. 

  • Master slide 'Content' has the Help button (with the question mark): it is a shape button (no states at this moment in CP9) which triggers a standard advanced action 'ToHelp'. This master slide is used for the content slides.

  • Slide 2 (Content1): has a shape button for Next which pauses the slide at 2.5secs. This shape button is timed for the rest of the project, so that it will show up in all following content slides. A shape button on the master slide is excluded because this Next button has to be hidden on the last content slide. You cannot show/hide an object on the master slide, because it has no ID, no name. This Next button has been labeled 'SB_Next'. For this small example, it can look easier to have a Next button on each slide where it is needed, but if you have a lot of content slides, this approach will save on time and file size.

  • Slides 2,3 (content slides): to be sure that the Next button is visible, even when coming back from the Help slides, the On Enter event of these slides is used for the simple action 'Show SB_Next'. 

  • Slide 4 (last content slide): the Next button has to disappear, which is done with an On Enter action 'Hide SB_Next'.

  • Master slide 'Help': this slide has no interactive object, is used by the Help slides

  • Slide 5 (Help slide 1): has another instance of the Help button (SB_Next_Help) with the action  'Go to Next Slide'.
    This slide has a special shape button 'SB_Back1' to allow going back to the content slide. This button triggers a standard action 'BackToSlide'. This shape button has a bubble added in the Rollover state, which functions as Tooltip.
    The On Enter action for this slide is used to hide the button 'SB_Next' (from slide 2), same way as on the last content slide. Why? That button will already been hidden if the user comes from the last content slide, but not when he is getting here from one of the previous content slides.
  • Slide 6 (Help slide 2): has no need for a Next button, but needs a pausing Back button (to navigate back to the first Help slide) with the action 'Go to Previous Slide'. It has another instance of that special button ''SB_Back2'. I didn't opt to time that button for the rest of the project, because there are only two Help slides and having to hide/show them would have been more work than using two instances.


Variables and advanced actions

Variables

Two system variables are used in this example:

  1. cpInfoCurrentSlide: gives the slide number of the current slide. The index starts with 1, which means that for slide 1 this variable is 1.

  2. cpCmndGotoSlide: will be used to navigate the user back to the content slide. Beware: for this variable the index starts with 0. That means that slide 1 has to be indicated as 0, slide 2 as 1.

One user variable has to be created: v_last.  This variable will be used to store the value of cpInfoCurrentSlide when the user leaves the content slide to go to the Help slides. You do not have to define a default value for that user variable.

Standard actions

ToHelp triggered by the shape button on the master slide 'Content'

In the first statement, the slide number of the current slide is stored in the user variable v_last. Then the user is navigated to the first Help slide (slide 5), and I added Continue which is not always necessary, depends on the set up of the slides.

BackToSlide triggered by the buttons SB_Back1 and SB_Back2 on the Help slides

For the first statement an Expression was needed, because of the different index for the system variables cpInfoCurrentSlide and cpCmndGotoSlide. Example: if the user came to the Help slides from the third content slide, the variables would be:

  • cpInfoCurrentSlide = 4   because the third content slide is slide 4
  • v_last = 4   because the action ToHelp stored the value of the previous system variable in this user variable
  • cpCmndGotoSlide = 3  because this is the indicator for slide 4, since the index starts with 0; for that reason I needed to subtract 1 from the value stored in v_last

Overview

In the Advanced interaction you'll find a great overview of all the actions, events of the slides. Too bad: you'll not see the shape button on the master slide, nor its action.