Bookmarking in Captivate (Classic and New) - Introduction

Intro

One of the new features in Charm (new version 12) release is the possibility to have bookmarks on any content slide. In Captivate Classic you bookmarks are only available on a slide with slide video (to create an interactive video.

What do you expect from a bookmark in its original meaning? Looking this up in multiple dictionaries, two possible meanings appear everywhere:

  1. A strip of leather, cardboard, or other material used to mark one's place in a book. It has a digital version in ebooks as well. In the digital world you'll find this has also become..
  2. A saved shortcut that directs your browser to a specific webpage.

I planned to summarize my experiences with bookmarking fo navigation purposes in one blog post.  However, after weeks of exploring, I realize this would lead to a short booklet instead of a short article, hence the decision to split the content up in multiple articles. Main purpose is to compare and explain the present differences between the new (Charm) version 12 and Classic Captivate.

This introduction will explain the terminology. A Captivate tutorial, demonstrating the terminology is inserted. This tutorial was created in version 11.5.5.553. Explanation of workflows both for New and Classic Captivate will follow in next articles.

Example

You can watch this 8-slide tutorial using this link (to be preferred) for a scalable version, or watch the embedded static version. Please turn on your audio, there is narration. Slide 7 is a long video slide, taken from one of the presentation in an online Adobe conference. Be patient, the Next button if you want to skip appears after 30secs.


Terminology

When you watch the example output below, you'll see that I see two types of bookmarks for navigation: static and dynamic. My choice of adjectives refers to what is used for text fields as well: static text doesn't include variables and when publishing the content is defined and will not be changed on runtime. Dynamic text fields, as you see on the score/results slide in a project with scored objects and/or question slides, need to be rendered on runtime, because they contain variables for which the value will be defined based on actions by the learner.

Static bookmark: is linked to a fixed frame on a fixed slide. Examples: start of an important part in an interactive video. It is a bit similar to what you can have in a Table of Content, but on frame instead of slide level. Have a look at this interactive video, where the menu uses static bookmarks to allow you to access them easily:

Custom Play/Pause button

Static bookmarks can also link to non-video slides, and are not limited to navigation within the same slide. That is valid both for version 12 (New) and Captivate Classic. However, due to the absence of bookmarks in Captivate Classic, you need to use Micro-navigation. If you want an intro to this type of navigation to frames, have a look at:

Intro to Micro-navigation

Dynamic bookmark: the frame for the bookmark can be chosen by the learner, and will allow to return to that frame if wanted. This is the closest digital equivalent to putting a real bookmark in a book after a reading session. The bookmark is created on runtime, reason why I use the adjective "dynamic", referring to the difference between static text and dynamic text. At this moment dynamic bookmarks can only be created in Captivate Classic, not in the New version 12.

Play Audio once on First Visit

Intro

In a previous post I explained the possible workflows to force the learner to view a slide completely before the Next button appears, but only on first visit. This new use case is similar but for another goal. Most courses will have narration explaining how to use the functionality of the course: how to navigate, how to use the TOC, how to pop up extra information, how to use a dashboard/dynamic menu etc.  When the learner is free to come back to those slides, it can be annoying if she/he has to listen to the audio again. To avoid this I will explain two possible workflows:

  1. Using the On Enter event to trigger an advanced action, which will use the Play Audio command based on checking which visit it is to the slide. It is an easy workflow, with one drawback: for the Play Audio command it is not possible to use the Closed Captioning feature packed with Captivate.
     
  2. Since Closed Captioning is only possible with Slide audio, this alternative workflow will use micro-navigation to jump to a frame after the end of the audio timeline. If you didn't read my introduction to Micro-navigation, please use this link

Both workflows can be watched in this interactive movie. Be sure to check out later visits by using the Back button. As explained in the previous post, we'll need a tracking user variable. It starts with a default value of 0 and is incremented with each visit to the slide. 

Workflow 1: Play Audio

For each slide where you want to use this action, you'll need a tracking variable. For the slide in the movie where this action was used, the variable was labeled v_visit_PlayAudio. Look at the Preview of the action, which is triggered by the On Enter event of the slide:

It has two decisions:

  • TrackVar is not conditional, will increment the tracking variable (which started at 0).
  • CheckVisit checks the value of v_visit_playaudio. If the value is greater than 1, which means it is not the first visit, nothing will happen (Continue), if it is not greater than 1, which means the first visit, the audio clip will be played.

Workflow 2: Skip frames

Look at the timeline of the slide with the Touareg salt caravan (Ténéré desert):

The Next button appears at 16,5secs. If the visit is not the first, all frames in 16,5secs have to be skipped. We need a tracking variable, which will be labeled v_visit_SlideAudio. It is not possible to reuse the variable which tracked the visits to the previous slide where workflow 1 (Play Audio) was used. I suppose  free navigation is possible, hence tracking visits will need a variable for each slide where you want to use the workflow. However, the variable v_skip, which is used to store the number of frames to be skipped, can be reused for each slide where you want to use this second workflow. It doesn't matter if you want to skip part of the slide to avoid an audio clip to be played the second time, or to avoid that animatios are playing the second time. As you see in this screenshot, the advanced action looks very similar to the one in the first post 'Force first view'.

It is so similar that it was possible to create this action as a duplicate from the one in the post 'First View'. If you are not familiar with duplicating an action, have a look at  Advanced Actions Dialog Box

Afterthoughts

Such a situation with two (or maybe more) similar actions,  immediately triggers this question for me: can I make this easier, can I save time if using this action multiple times. Two possibilities:

  1. Change the advanced action so that the same action can be applied to both situations? There are two differences in the situations: the literal which is the duration in seconds to be skipped (was 10sec in the first post, 16,5sec in this timeline) Second difference is the tracking variable. For the literal a solution could be found, but that is not the case for the tracking variables because they have to be unique for each slide. This approach is not possible for the present situation.

  2. Convert the advanced action to a shared action, with as little parameters as possible. That would also make it much easier to transfer the action to future projects, and as you learned from my webinar (see summary in this interactive movie) due to the presence o the shared action in the Library, much easier to manage. How to do the conversion and use the shared action, will be the topic of my last post in this sequence.


Micro-navigation (introduction)

Intro

Recently I presented two sessions about the Timeline at the Adobe eLearning Conference in DC (25th of April 2018). Maybe you did read a previous post, where I offered some easy Timeline Tweaks, taken from the first presentation 'Demystifying Captivate's Timeline' which was aimed at clarifying basic features of the timeline, including the different ways of pausing the timeline. The second presentation 'Mastering Captivate's Timeline' plunged deeper into exploring advanced workflows, including use of variables, advanced/shared actions and.... micro-navigation. I created that term in this (old) article. The word has been adopted by many Captivate users. Time to upgrade this article to integrate the changes within newer versions (system variable names) and the switch from SWF to HTML output. If you have a look at that article, please use a Flash Player enabled browser to watch the embedded interactive movie (SWF).  The present post can be considered as an introduction to 'micro-navigation'. We will start with a comparison between navigation between Slides (macro-navigation) and navigation between Frames.

Navigation

Between Slides

You, Captivate user,  are aware of slides and master slides. Slides appear in the Filmstrip and each slide is based on a master slide Master slides have a dedicated panel, which looks very similar to the Filmstrip. In the Newbie UI when activating the Master Slide panel it will replace the Filmstrip in the left docking station. The Timeline panel can be used both for slides and master slides. Timing (horizontal scale) itself has no real meaning for master slides,  panel is used to change the stack order (or z-order) of objects. If you insert a shape button having a pausing point on a master slide,  pause will be visible at the end of the timeline. 
For sure you have used navigation commands for slides. In the dropdown list of the Actions tab for any event (slide event, interactive object event) or hyperlink navigation commands are available. They allow you to override the default navigation. 'Default navigation' means when the playhead reaches the end of a slide it will automatically move to the next slide.
The slide navigation commands are:
  • Go to the next slide

  • Go to the previous slide

  • Jump to slide ...

  • Go to last slide visited

Maybe you are not aware of the availability of dedicated Shape buttons in the Shape thumbnail dialog box, that have an advanced action to go to the Last slide or the First slide of a project?
Also less known are the system variables from the category 'Movie Control'  related to slide navigation. They be used in actions:
  • cpCmndGotoSlide  can be used to replace the simple command 'Jump to Slide'; beware: index starts with 0, whereas the index of cpInfoCurrentSlide starts with 1 (exceptional to make it possible to use in a progress indicator). If you want to restart a slide without re-entering the slide, you can use "Expression cpCmndGotoSlide = cpInfoCurrentSlide - 1"  

  • cpCmndNextSlide  is a Boolean variable with a default value of 0. With 'Assign cpCmndNextSlide with 1" has the same result as Go to the next slide     
  • cpCmndPrevious is a Boolean variable with a default value of 0. With 'Assign cpCmndPrevious with 1" has the same result as Go to the previous slide

Between Frames

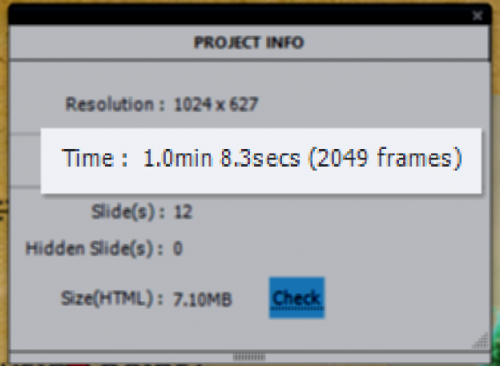
A published cptx-file (to HTML or SWF) is an interactive movie. Each movie '(and animation' plays at a certain speed, the 'professional' name for that speed is 'Frames per Second' rate, or FPS. The quality of a movie depends on the resolution but also on that FPS number. The default FPS for a published cptx-file is 30FPS. You can see this rate in the Project Info panel.
 

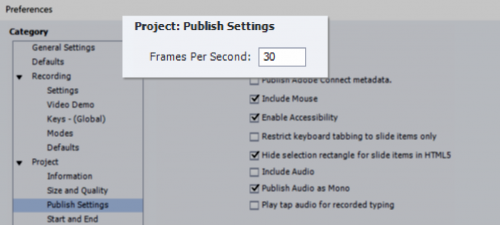
It is possible to change FPS rate in Preferences, Project Publish settings.

 
With the default rate (30), each second on the timeline has 30 frames, the smallest unit on the timeline  (0,1sec) 3 frames.  I use the word micro-navigation for navigation between frames. Contrary to the navigation to slides, there are no commands available for micro-navigation. It is only possible using advanced or shared actions which allow you to manipulate the system variables available for frames. The relevant frame system variables are:
    
From the category 'Movie Information'
  • cpInfoCurrentFrame: your best friend when exploring Captivate's timeline, debugging projects with advanced actions, micro-navigation etc. You'll find that variable inserted in a text container quite often in my tutorials. You can watch an example in this interactive movie   
              
  • cpInfoFPS: returns the FPS rate, by default set to 30 as explained above. This variable can be used in calculations (with Expression) to convert from seconds to frames.

  • cpInfoFrameCount: similar to cpInfoSlideCount (total number of slides in project) it returns the total number of frames in the project. It can be used in combination with the previous variales to calculate to the total duration of the project (as shown in the TOC).
    From the category 'Movie Control'
  • cpCmndGotoFrame can be used to jump to a frame using its frame number (similar to cpCmndGotoSlide); playhead will not be released, project remains paused.
  • cpCmndGotoFrameAndResume can be used to jump to a frame using its frame number and to release the playhead at the same time, project will continue.

Testing? 

It is just a proposal: test out what you learned by creating a one-slide project, similar to the one visible at the start of this post and as thumbnail.  Design is up to you, but this is required for the 'exercise':

  1. Replace 'No action' for the On Enter event of the slide by 'Pause'; the slide shouldn't start playing automatically.
  2. Insert the system variable cpInfoCurrentFrame in a text container (example has it bottom right); that will allow you to track the location of the playhead. When starting the slide it will pause immediately, it will show 1 (although the system variable starts with 0, there is a small delay).
  3. You need two buttons: one for navigation forward, and one for navigation backwards. I used two shape buttons from the category Buttons, but replaced the action (see below). In the example they are at bottom center.
  4. A number of objects staggered on the timeline. In the example I have 7 shapes aligned in a row. They appear 1 second later than the previous one. All objects are timed for the Rest of the Slide. Result will be that the slide itself will have a duration that is longer (8secs in my case). To move an object on the timeline one second to the right: select the timeline of that object and use shortcut key CTRL-right (see Colors and Keys for Timeline). Here is a screenshot of the Timeline in my example:

    You see a small gap (0,1 sec) before the first object. Reason is the delay I mentioned before: playhead is stopped at frame 1, I don' want that shape to appear immediately. Because this is a one slide project, I didn't need to pause the slide at all, not even at the end. Both buttons have no pausing point as you can see in the Timeline.

Three events are used on this slide for actions:

  1. I already mentioned the On Enter event of the slide, which is set to 'Pause'.
  2. The button SB_Next triggers a one-line advanced action that should look like this:
  3. The button SB_Back triggers a one-line advanced action similar to the previous one, but with the math operator for subtracting instead of adding.

Test now, either after publishing and uploading to a webserver, or with Preview HTML in Browser! 
Everything is working as exptected? Great, you are ready for more advanced workflows with micronavigation. Watch out for the next article about micro-navigation: a shared action that can be used in different situations: forcing full view of a slide on first visit, but not on later visits is one of the use cases.