Intro
In a first blog about System variables I offered a free table with description an references for all system variables. If you didn't get that table yet, please get it from that article. That older post described shortly all caregories. It had focus on the variable categories s which are read only, and how they can be used to show information in a course and/or for editing/debugging reasons (like cpInfoCurrentFrame). Not treated in that first part was the Quizzing category because I already had a detailed explanation in this blog post.
Here the focus is on that very special category 'Movie Control'. It is special because those variables cannot be inserted for viewing in a course. More important is that they can be controlled, changed by the developer on runtime which is not possible for any variable for the other categories. Learning how to control these variables can be a good step up to getting started with advanced or shared actions: more complicated actions than the simple actions which you find in the dropdown list on the Actions tab of an interactive object.
Terminology
Since this post is meant for users starting with variables, I want to explain some terms that are important expecially when working with system variables of the Movie Control category. You can skip this part is it sounds familiar to you.
Slides versus Frames
In questions on the forum I often see confusion between those two terms. A normal cptx project is slide-based. That leads many users to suppose that Captivate is functioning like Powerpoint, but that is not true. Essentially Captivate will lead to a movie, not to a sequence of slides which is typical for a presentation. That movie is more than a simple video, because interactivity is based on offering control to the user and to do so you need to pause the movie. This is not the case with a video: the learner can pause the video, but the developer has no influence of therm with the exception of the interactive videos. I use the term interactive movie for a fully interactive published Captivate file. An interactive video is not better at all, more of a hype at this moment, because is interactivity is more limited. Although a PPT can have animations with some duration and seqeuence, it is not a real movie unless you capture it as a movie.
Any video/movie is played at a certain 'speed'. The speed is defined in frames per second or FPS. The default speed of a published cptx file is set to 30FPS (but a video demo at 15FPS). If you keep the default length of a slide in CP, which is 3 seconds, that means that you have 90 frames in that slide.
I explained these terms already many times. As you can see in the table, several system variables in the Movie Control category are linked to navigation between slides or frames. Understanding the difference is required.
Boolean variable
A variable can have any value in Captivate: a text (often called string) or a number. When you look in the table you will see the typical values of the system variables. Many of them also aren: from the 'Boolean' type. That is a variable that will have only two possible values: 0 or 1, true or false. You can interchange them easily, I prefer using the numbers 0/1 because it is less typing. In the Movie control category many variables are indicated as Boolean: cpCmndCC, cpCmndMute, cpCmndNextSlide, cpCmndPause, cpCmndPlaybarMoved (pretty useless, internal), cpCmndPrevious, cpCmndResume, cpCmndShowPlaybar, cpCmndTOCVisible and cpCmndLockTOC.
Like other variables Booleans have a default (or start) value which you find also in the table. Often it is 0, which means the situation described by the variable is turned OFF. But there are exceptions. Some examples:
- cpCmndMute: default value = 0, which means that audio is playing
- cpCmndPause: default value = 0, which means the course is not paused
- cpCmndShowPlaybar: default value = 1, which means that the playbar is visible
- cpCmndTOCVisible: default value = 0, which means that the TOC in overlay is not visible
Toggle
When used as a verb, this means 'switch between two situations'. I didn't use the word 'state' to avoid confusion with states in a multistate object. You can toggle a playbar between the visible and hidden situation, audio between muted and not muted, a TOC in overlay between expanded and collapsed, any object or group between visible and invisible. There is a close relation between Boolean variables and toggling. For that reason a couple of versions ago the new command/action Toggle' appeared in the dropdown list of the Actions tab, and in the advanced actions dialog box.
Some people also use Toggle to indicate a Toggle button. That is a button which allows to switch between two situations£. Several buttons on the Captivate playbar are toggle buttons: turning CC on/off, play or mute audio, pause or continue the movie.
Use Cases
Toggle buttons
CC on/off
If you use custom buttons instead of a playbar, which is recommended for any non-linear project, you can create a toggle button to turn Closed Captioning on/of. Beware: in versions before CP2017, Closed Captioning was always turned off when the course started. That is the reason why the default value of cpCmndCC is still indicated as O. With the new more elaborated features for CC, you also have the possibility to turn CC on for a project. In that case the variable will have the value 1. To create a toggle button for this feature you can use a shape button on the main master slide (no need for pausing) if you are in a non-responsive project. For a responsive project with fluid boxes, using the main master slide is a bad idea (no fluid boxes possible), you'll have to use the other master slides. Use guides for the creation of the footer fluid box, so that it is consistent for all the master slides.
Create this simple action to be triggered by the Success event of the button:
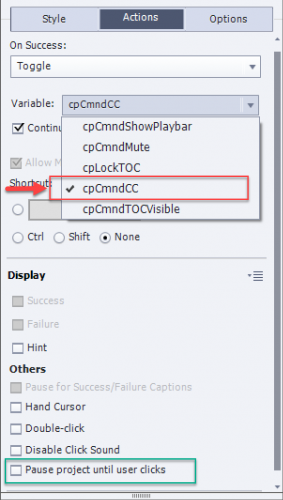
Since you don't need this button to pause the slide, you have to uncheck the option 'Pause Project until user clicks'.
Audio on/off, Playbar on/off, Overlay TOC expand/collapse, TOC lock/unlock
The workflow is exactly the same as for the CC toggle button. In the screenshot you see that the appropriate system variables show up and can be selected.
It is of course possible to replace a toggle button by two buttons. Example: a button to show the overlay TOC and another one to hide it. In that case you could use the commands 'Show TOC' (same result as Assign cpCmndTOCVisible with 1) and 'Hide TOC' (same result as Assign cpCmndTOCVisible with 0). This is an alternative for the tiny expand/collapse buttons attached top left of the slide. A toggle button saves space on the slide, easier to manage.
Two buttons are also possible for Playbar on/off (Show Playbar/Hide Playbar) and for locking/unlocking the TOC for navigation (Lock TOC/Unlokc TOC).
For Audio on/off you do NOT find such simple actions in the Actions tab. 'Play Audio' is meant only to play an audio clip, but has no effect on slide audio, object audio, nor background audio. Similar with 'Stop Triggered Audio' which can only stop clips started with the command 'Play Audio'. If you want two buttons, you will need to use the system variable cpCmndMute, with the Assign command:
- Assign cpCmndMute with 1 will mute audio
- Assign cpCmndMute with 0 will have it play again
To create a toggle button with a different look when the situation is toggled, you'll need an advanced or shared action. Have a look at:
1 action = 5 toggle buttonsShape category ‘Buttons’ – Challenge
Being a tutorial for newbie (no advanced/shared actions, I will not explain using the navigation system variables for two reasons:
- You probably never will use the slide navigation variables for navigation between slides. It is intuitive to use ‘Go to Next Slide’, muc more than ‘Assign cpCmndNextSlide with 1’
- The navigation variable cpCmndGotoFrame is very important in micro-navigation but that is a more advanced topic that needs the use of advanced/shared actions. If you are interested, have a look at: Intro to Micro-navigation
However I have a challenge for you! The shape dialog box has a special category labeled ‘Buttons’.
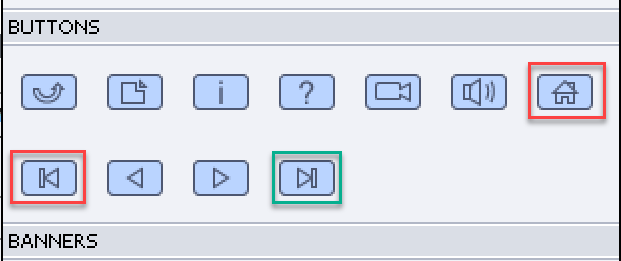
Typical for these shapes: the option ‘Use as button’ is checked off (no pausing point by default). They will trigger an action, which for most buttons is a simple action. You will see that the Mute button is assigning “1” to the system variable cpCmndMute. The three buttons marked in the screenshot trigger an advanced action: the Home button and the Start button (both marked in red) use the advanced action ‘startSlide‘, the End button (marked in green) uses ‘endSlide‘. You can open th action in the Advanced Actions dialog box, by clicking the Browse icon:
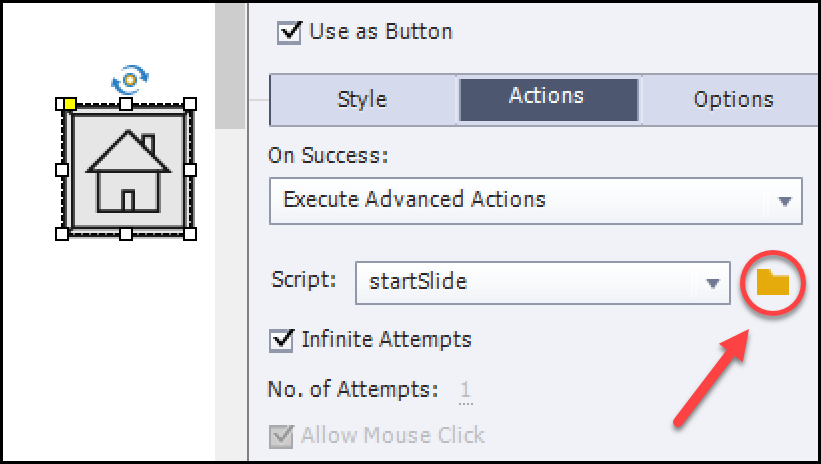
Look at the use of the system variables in startSlide :
- Assign cpCmndGotoSlide with 0 this means: go to the first slide (index starts with 0)
- Assign cpCmndResume with 1 is the same as Continue
Can you explain the script ‘endSlide’?
More?
A lot more is possible when using the movie control variables in advanced or shared actions. I already posted some links before. Here is a link to a blog post about ‘Replay Slide‘ where you’ll find different scenarios. It will help to understand the importance of frames: if you only get back to the first frame of the slide, reset will not happen if this is done by an On Enter action, or if you have Text Entry Boxes/Drag&Drop slide.
For newbies I plan a third article about user variables and simple use of them (still without advanced/shared actions). Would love to get some comments.