Replace Rollovers: Click/Reveal interactions (back to basics)

Intro

There are many ways to create a Click/Reveal interaction. Some are very old (with jump to slide), others are pretty old (show/hide) and lot depends on the exact situation. It is possible that I will make a complete analysis, although  I don’t think this will appeal to many users.

However my sense of justice is too keen, and I cannot  leave this type of comment (newbie)  without reacting:

This is basic stuff right! Why is it so complicated?  “

If you want to know more, explore the discussion link.

I created a quick example of the most basic workflow which can be used. Will explain step-by-step.

Example

A two-slide project. The Click/Reveal interaction is on the second slide. You see three characters, which act as toggle buttons. When you click a character, a speech bubble will show up, when you click the character again, the speech bubble will disappear.

There is a Back button top left (but you can also use the Back button on the playbar which I have left in this project). You'll see that when revisiting the slide, the original situation is reset: no speech bubbles. Even if you leave the slide with one or more speech bubbles opened.

You can use this link to view a rescalable version or watch the embedded one below (fixed resolution):


Step-by-step

Step 1 Characters to button

Download the Characters and insert them on the slide.  Check the option ‘Use as button’ in the Properties panel (red outline in screenshot below). Leave the option ‘Retain state on slide revisit’ unchecked (green outline)
TIP: you don’t have to do this three times. Select the three inserted Characters (using CTRL button to add to the selection, or by creating a selection rectangle which cuts the three characters. Check the option in the Properties and it will be done for all the Characters.


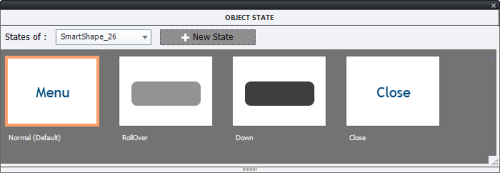
Step 2: Custom state

Select one of the Characters. Click the State view button in the Properties.  Look at the screenshot above, where you see the button with a Blue outline. The  Object state panel will appear, which will have 3 states because you have a ‘button’: Normal, Rollover and Down. I deleted the last two ‘InBuilt’ states. They were identical to the normal state. You can do that with the right-click menu as shown in this screenshot. The Down state was already deleted, here the Rollover state will be deleted. 

Now add a Custom State using the New State button. Make sure to choose Custom under the first dropdown list (click the triangle button). You can edit the default name (NewState1). You have seen in the previous screenshot that I labeled it ‘Answer’.

That state will be selected, and you can add the speech bubble (eventually even with audio attached to it) and or any other object you want. Use the stage, where all will be dimmed in the background except your new custom state:

Close the Object State panel using the Exit State button at the end of the top Big Button Bar:

Step 3: Actions

Select the Actions tab in the Properties panel for the selected Character button. For the On Success event  set up this action:

You may see how easy it is to detect the multistate object to choose from the second dropdown list, since its name appears at the top of the Properties panel.

IMPORTANT! You have to uncheck the option ‘Continue playing the Project’ (red outline). That will prevent the playhead to be released. Will not expand in this article on pausing the timeline.

Your toggle button (character) is ready.  Start testing using F11, Preview HTML in Browser.

Comparison with Show/Hide

What are the advantages of the described workflow over the older Hide/show workflow which was chosen by the user:

  • Show/Hide will need a lot more objects on the slide. In the multistate workflow the character is the only object: it is used as button, and the bubble (eventually the audio and/or other objects) is in a state of the character.
  • Since using 'Go to Next State' will loop between the Normal and the Custom state, there is no need for a close button. If you want to achieve the same with Show/Hide you can also create such a toggle button, but that means a tracking variable and a conditional advanced or shared action. If you don't want a toggle button, you need to add a close button to the group to be shown.
  • One of the biggest advantages is the automatic reset when revisiting the slide. Because the option 'Retain state when revisiting the slide' is unchecked, revisiting the slide will result in having the Normal state for each of the Character buttons. If you use a Show/Hide workflow, you have to use the On Enter event of the slide to reset everything, which means another advanced or shared action.

Hope you understand why I labeled this post as being a 'super easy' workflow. Multistate objects are available since version 9, there is no reason why you want a more complicated workflow in the 3/4 last versions.

To be honest, there is one disadvantage: you cannot apply an effect to the Speech bubble when appearing.

Custom Play/Pause button - version CP2019

Intro

Several years ago I have already created a blog about this topic.

Meanwhile Captivate has added a lot more features: multistate objects, changes in system variables, easier commands etc. Since that question often appears on social media and the old post is also still visited daily, time to offer an easier way. It is also a use case illustraing use of a system variable, following to my recent posts about system variables.  Here you'll discover how you can use an Interactive Video to as training asset for a workflow. It is up to you: video or step-by-ste textual instructions with screenshots.

Why do I prefer a Shape Button?

Buttons have InBuilt states and can have supplementary custom statesI. You can find more info in this  article: States and State Commands

Captivate has 4 types of buttons, which  have 4 InBuilt states: ‘Normal’, ‘Rollover’, ‘Down’, and ‘Visited’. They can all have extra custom states, which allows to create nice toggle buttons showing the situation at that moment. Examples: TOC open/closed, Audio playing/muted, CC visible/invisible etc (have a look at: 1 action = 5 toggle buttons).  The three first states are included in the object style of the button or the shape, the Visited state is not included. Custom states are neither included in the button style.

Text buttons, Transparent buttons (which are not necessarily transparent), Image buttons can NOT be used on master slides, can NOT be timed for the rest of the project.  A shape button can be used on master slides, can be timed for the rest of the project. For a toggle button Play/oause this is a big advantage: you need only one shape button for your project. If you prefer one of the older button types, you would need a button on each slide.

Workflow - Interactive Video

The movie is based on a Video Demo. The CPVC-file was captured at 1280x720. It is embedded as interactive video in a cptx-rpoject with a resolution of 1024x627. The ratio widht/height is not the same because the synchronized interactive video has a top control bar. I extended the functionality of Interactive video, you'll find some tips in my next post.

I will not embed the video in this post, it would be too small. I offer you two links: the first is to the unscaled published movie, where you'll have the best quality which is important to watch the sometimes very tiny features of the Captivate UI. If you want to see it oscaled to your browser resolution, you can use the second link, which is to a rescalable version. It may look more blurry on a very big screen, but you need to use this version if you want to watch on mobile devices:

Fixed resolution: Custom Play/Pause

Rescalable: Custom Play/Pause


Workflow Step-by-Step

Step 1: Creation of the Shape button

You have to know the  situation at the start of the  course. By default (after having launched the course) this will be 'Play’ situation. Consequence: the start look of the Shape button has to be ‘Pause’.  It is not possible n Captivate to create states for a shape button on a master slide . You have to create that button on a normal slide,.
  • Create a shape and check off the option ‘Use as Button’.
  • Open the State panel, using the button ‘State View’ in the Properties panel.
  • In the Normal state, fill the shape with an image and/or text you want to show when the course is playing, to pause the course.
  • Delete the InBuilt states ‘Rollover’ and ‘Down’, using the right-click menu on those states (you cannot use a simple Delete key).
  • Add a Custom State, and name that state  (I use 'Play' as label)
  • In this custom state fill the shape with an image and/or text you want to show when the course is paused, to resume Playing.

Here is a screenshot of the states I created in the video:

Step 2: Location Shape button

Once the button is ready, you have to decide where to put it, and take out the Pausing point. Reason: you want this button to be available all the time, but not a pausing point like you need for a Submit or a Next button. There are two possibilities for its location;

1. On Master slides

If you want to use the Play/pause button on all slides, and you are creating a non-responsive project or a responsive project with breakpoint views, the easiest way is to copy/paste the button to the Main master slide. The daughter master slides can inherit the button. Careful: in some themes the Title master slides is not using the main master slide objects, you’ll need the button also on that master slide in that case.

There is a problem with this possible workflow due to the fact that shape buttons on master slides do not have an ID, and that means they cannot be used with the Chang State command. You can not show a custom state for shape buttons on master slides. As a workaround (not explained here in detail), you can combine the functionality of that button, with a two-state image which is on the first slide, timed for the rest of the project. That image will have an ID and you change the state of that image. The shape button on the master slide needs to be transparent (you can keep a stroke if you want) so that the images will be visible.

For a fluid boxes responsive project, you cannot use the main master slide (cannot have fluid boxes). You will need to insert the button on each used master slides where you want that functionality.

To turn off the pausing point: open the Actions tab of the button, and uncheck the option ‘Pause project until user clicks’.

2. Timed for the rest of the project

The alternative for the master slides, is to have the Play/pause button on the first slide, and time it for the rest of the project, always on top. That has to be done in the Timing Properties of the button. At that same place you can also turn off Pausing:

For a Fluid Boxes project: object timed for the rest of the project is normally not possible. I explored and found it iw possible but with the requirement that you use the same master slide for all content slides.

Step 3: Create Advanced Action

The success event of the button has to trigger a rather simple advanced action. Check the ‘Conditional Tab’ and create this action:

Explanation: I am checking the value of the Boolean variable cpCmndPause (see article). If that value = 0, the course is playing.

In that situation I will use the command ‘Pause’ (‘Pause’ is exactly the same as ‘Assign cpCmndPause with 1) and change the state of the button SB_PausePlay to the Play state.

If the course is paused however, that variable would not have the value = 0 (but = 1) and the ELSE commands are done: the state of the button is reset to Normal, and the playhead is released by the command ‘Continue’ (which is the same as Assign cpCmndResume with 1, which is also setting cpCmndPause back to 0).

Warning: not everything is ‘paused’!

As I explained more in detail in my sequence of blogs about the timeline, even an absolute pause (‘Pause’) will not pause everything.  Here in short the most important:

  • Animations of all type (animated GIF, SWF, OAM….).
  • Event video if it is playing
  • Audio which was started with the command ‘Play Audio’

For more information:

Pausing Captivate's Timeline

Pausing Timeline and Audio

You would have the same  situation  with the Pause button on default Captivate playbars. It is not due to the fact that this is a custom button.


Interactive Video, Navigation Bookmarks

Intro

Interactive Video is without any doubt my favourite new feature in Captivate 2019. It makes adding some interactivity to a passive video very easy compared with the old workflows which I used to simulate such an interactive video in previous versions. I had in mind to blog about some possible workflows that could add even more functionality. A user posted a question today about Bookmarking for Navigation. I had already some workflows in mind, and want to share one of them with you. I tried it out on the sample project provided with Captivate. That project has only two bookmarks, which are labeled 'ExerciseBenefits' and 'O3Jump'. the workflow can easily be extended to more bookmarkst. We'll create a shape button to pop up a menu. 

Popup menu

To create the menu, which is hidden when the video starts, I used a shape,  but you can use a text caption as well. I filled that shape with one word for each of the bookmarks. In this case I used the words 'First ' and 'Second'. Those words will be indicated as hyperlinks. Hyperlinks have a lot more functionality than just pointing to an URL, as I explained in some blog posts.

Close button

Dropdown menu

The menu for hyperlinks is missing some options (which I regret): you will not see the option 'Jump to Bookmark' nor 'Execute Shared Action'. My only choice was to use the command 'Execute Advanced Actions'.  That means that you have to create as many advanced actions as you have bookmarks. They are very simple oneliners, but with a simple action or a shared action it would be a better workflow.  It is also impossible to prevent release of the playhead, but that is not really an issue in this case since we are creating navigation actions, and the video may continue to play when it gets to the chosen bookmark.

The shape with the hyperlinked texts needs to be invisible in output, and timed for the rest of the slide. If you have multiple video slides, and you want one menu for all videos,  time it for the rest of the project. Because the overlays are possible, you'll not have any problem to have the shape being visible on top of the video.

Menu Button

The menu button (which you could see in the screenshot with the popup shape) is a shape button. I added a custom state 'Close' to the 3 InBuilt states, where the label is changed from Menu to Close. To avoid confusion I took out the label from the Rollover and Down state which are used both for the open and closed version of the button:

The button is a toggle button, to track the visibility of the popup shape I needed a user variable (Boolean) which I labeled v_visib as usual. Default value = 0, which means the popup shape is closed and the Normal state of the button is active. When the button is clicked to open the popup, the state will change to Close, and the variable will be toggled. This leads to a conditional action which I have described/used already many times:


Conclusion

I hope you liked this workflow which is not included by default. You can add this toggle button to other buttons like an Audio/Mute and a CC button. If you missed it, you can find a workflow for that type of buttons in this blog post:.


Interactive Video Buttons

Intro

When I posted the article about Pausing the Timeline (part of the sequence of articles about that most important panel), I promised to add some use cases to illustrate using pause and pausing points. Let us start with a  simple use case, based on a recent forum question in this thread: Interactive Video Buttons


Use Case - description

It is clear that the user is not aware of the difference between pausing the timeline by an interactive object (pausing point) and by the command Pause. The idea is that the learner, while a video is playing, can launch a popup that has some static content (text, images...). While that popup is opened, the video should pause. On closing the popup the video should resume playing. The user proposed to have a close button for that purpose, which is the easiest solution (Scenario 1 below).   hyperlink instead of the close button as I described in this article: More is in a hyperlink - Close button

It could also be done with defining the open button as a toggle button Scenario 2).

For both scenarios it is necessary to insert the video as a multi-slide synchronized video to be able to control the video with Captivate functionality. If you insert the video as event video it will play totally independent from Captivate.

Scenario 1 

In this scenario the popup will appear with one button, and be hidden by another button or hyperlink. 

This makes it possible to have two actions, simplifies the setup: no need for a variable, no need for a conditional action. You can use two standard actions. If you want multiple buttons and popups, or expect to be using this work flow in other projects, I strongly recommend to create shared actions instead of advanced actions. This article will describe only the advanced standard actions.

Have a look at the setup of the slide. Look at the Timeline panel. It has only 3 objects (from bottom to top: video, shape button, popup). In the screenshot the shape button SB_Info is selected. It will open the popup 'Info'. Look at the Timing properties of the button. The option to pause is unchecked (which is not the default situation), the shape button is timed for the rest of the slide. The result is that the button will be active for the whole slide, there is no inactive part. 
The popup in this example is a shape used as text container, labeled 'Info'. That popup has to be invisible in output (eye icon in the Properties panel). If you expect that the slide can be revisited,  a better approach is to use the On Enter event of the slide to hide this popup 'Info'. To close the popup I preferred using a hyperlink over a close button.  The popup is ta single object. If you prefer to have a 'real' close button, you'll end up with two objects (text +  button). In that case you can group them, to reduce the number of commands for showing and hiding.

Standard Advanced Action ShowContent

This action is triggered by the Success event of the button SB_Info as you see in this screenshot:

After showing the popup (only one text container, can also be a group), I choose to disable the button SB_Info. If you want it to more user friendly, you can add a custom state 'Inactive' to that button and change to that state. This will avoid confusion for the user, some may expect that button to be a toggle, which is not the case in this first scenario. The last command will pause the timeline unconditionally, resulting in both video and audio to be paused.

Standard Advanced Action CloseContent

to be triggered by the hyperlink over the big X character:
if you prefer a Close button, this same action will be triggered by the Success event of that button; you can use exactly the same action. If you are using a responsive project, or HTML5 output only, the work flow with a button is to be preferred because the hyperlink event is not to be trusted with HTML5 output.

It is a similar advanced action (use the duplicate feature), with three commands which are the opposite of those in ShowContent: Hide (was Show), Enable (was Disable), and Continue which will release the Playhead, both video and audio will resume.

Scenario 2 

In this scenario aToggle button is used both for opening and closing the popup.

In that case you can use an approach similar to what I explained in: 1 action = 5 toggle buttons
It is a little bit more complicated because:
  • You need an extra custom state for the popup button which indicates that it changes to a close button after having opened a popup:
  • You'll need a variable to track the status: I will use v_visib, a Boolean, with value = 0 when the popup is not visible,
    and value = 1 when the popup is visible; since I used a shared action from an external library, that variable is created automatically.

  • You'll need a conditional advanced action to be triggered by the Success action of the button:, this is the advanced action version created based on the shared action:

More Possibilities

An interactive video will often be spread over multiple slides, to offer navigation buttons to different parts of the video. It is not a problem to have the scenarios available on all slides: time both the button and the popup groups for the rest of the project, always on top.

I mentioned the possibility to group a close button with text, but groups with more objects are possible as well: image, shape, animations. Group all together, hide the group On Enter for the slide, and you only have to replace the single object in the scenarios above by the group. 

Turn the actions into shared actions, and keep them in a separate project. You can open the Library of that project as an external Library in future projects. Especially the toggle action, it will save time because you don't have to create the user variable.

Future use case, example of Pausing the timeline, will be about audio. It is more complicated because there are several ways to use audio in Captivate, perhaps I will need more than one post.