Tips for using Quick Start Projects (11.5)

Intro

The most recent version, 11.5.0.476 includes the new Assets Panel which I presented in this post.

You are able to use Quick Start projects, or slides taken from those projects to avoid having to design and to work out interactions for your project from scratch. Those projects/slides are available in a responsive (Fluid Boxes) and non-responsive version. I tested it out for a tutorial which you can watch using this link (it is a responsive fluid boxes project):

Button Types

If this topic, also related with 11.5, seems interesting, I will post a more detailed description in the near future. But today you'll get some tips from what I learned creating this tutorial.

QSP tips

You can use a Quick Start Project in two ways:
  1. Open the project, and delete or hide the slides you don’t want to use in your course.
  2. Open a non-responsive or a Fluid boxes project, and insert slides from the Assets panel.

I used the second approach for the tutorial, for a logical reason: I didn’t use even half of the provided slides in the Aspire project. Project has only 17 slides, including a lot of duplicate instances of slides. I used these slides from Aspire:

  • Welcome layout
  • Timeline Interaction 02
  • Main Menu layout 02
  • Subtopic Header layout (used 6 instances)
  • Tab Interaction 01 (used 3 instances)
  • Related Content Interaction (used 3 instances)
  • 3 Column layout
  • Exit Layout

Tip 1 Duplicate slides

If you need the same slide multiple times do NOT insert it multiple times in your project, because that will corrupt the Advanced actions (most slides use them). To avoid this you need to follow this workflow:
  • Insert one instance of the needed slide
  • Go into the Filmstrip, slide will be active (surrounded by a blue rectangle)
  • Duplicate that slide, either with the right-click menu or with the universal shortcut for duplicate: CTRL-D.
  • Move the slide by dragging in the filmstrip to the wanted location.

You can repeat this workflow as many times as needed. Due to Captivate’s smart labeling, the advanced actions will not corrupt in most situations. Why not always? See next tip.

Tip 2: Check Navigation commands

In a slide like the Main Menu Layout, the topic buttons point to another slides in the total project. On insertion of that slide only, without the target slides, all commands will revert to the default navigation command ‘Go to Next Slide’. You have to replace it by ‘Jump to….’ while indicating the correct target slide (in the project the slides of the Subheader Topic layout). This will prove easier if you use the next tip:

Tip 3: Rename slides

Labeling is always a good practice, but for sure in this type of project. Multiple instances of the same layout slide will have the same name (and are very long as well). Taking the time to give them a custom name will save time when you need to find a slide. Moreover, if you want to use the Table of Content, the names will be meaningful.

Tip 4: Replace image

Switching to another image is mostly very easy:
  1. Select the image.
  2. Click on its name in the Properties panel
  3. Choose another image from the Library dropdown list, or use the Import button to find it on your system.
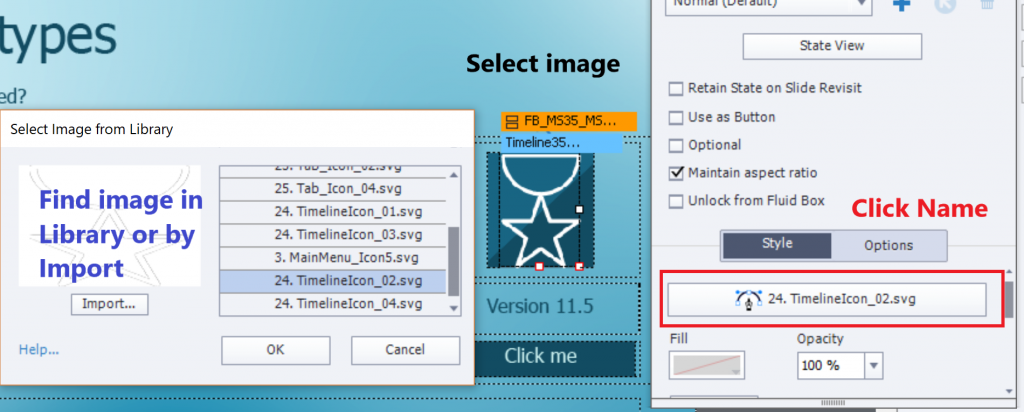

However, on many slides an image is used as Fill for a Fluid Box. Look at the Subtopic Header slides (there are 6 in the example): having the image as fill allows to add an image on top of the fluid box. Normally you cannot stack two images, this is a useful solution for that limitations.

If you want to replace the fill for a Fluid box, you need to select that fluid box, you cannot just click the image. After selecting the FB you see that the fill is set to Image, click the second Fill button, use the Browse icon to find an image to replace the image. Be careful to check the Position properties if the new image doesn’t have exactly the same size as the original one.

Tip 5 Multistate objects

The layout slides use a lot of multistate objects.  That is the case for all the Click to Reveal slides (labeled ‘Tab Interaction’ and ‘Related Content Interaction) and probably for many other interactions. You really will need to learn how to use them. Click the State view button in the Properties panel, to open the Object State panel.

More questions?

You may have seen that I have edited some slides quite a lot. This post has only simple tips, not the full explanation of all changes. If you want to know more, post a comment to this blog.

Edit SVG in Captivate 11.5

Intro

If you have read my first blog about this major update, you will know that the extended functionality of SVG’s for use as buttons is one of my favorites. I didn' t mention that you get some editing features within Captivate. Thisat means that you don’t have to do a roundtripping with Illustrator (or use another vector editing application) if you just want to change some colors. This post is meant for those who are rather new to vector images, and the way paths are used.  Next post will be about roundtripping with Illustrator for more complicated editing.

You may also ignore that the new Assets Panel (wait for an in-depth exploration in the near future) includes a set of ‘icons’ which are SVG’s. The hotspots used in 360 slides are SVG's as well, the editing functionality was added to make customizing their colors possible. All SVG’s in your project end up in a dedicated folder of the project Library.

Remember: SVG used as button is only possible for HTML5 output, not for SWF output

.

Example slide

The example uses only included  assets from the Assets panel, to be found in the Audio and Icons part. All icons have edited colors (not meant as a design example) to illustrate the workflow I will explain in this post (and later on in an interactive video). The biggest SVG in the center of the slide is configured as a button. You can click it as many times as you want, you’ll be able to listen to some of the audio assets. There is no poster image in this example, just the default Play button.


Step-by-step ‘Edit colors’

I will explain this for the Normal state of the big SVG which you clicked in the example slide.

1. Insert SVG and resize

As I explained in the intro, this SVG is one of the Icons in the new Assets panel. Insert it from that panel (name ‘Cover’). You can resize either by using the Options tab of the Properties panel for the SVG, or by dragging a corner with the mouse while keepoing SHIFT pressed to preserve the width-height Ratio. Since this is a vector image, you’ll see that it remains crisp even when enlarged considerably.  The original icon uses a uniform dark grey. I check the option to use it as a button, and uncheck the option to make the whole bounding box clickable (Enable Click in Bounding box). You can see that the bounding box extends above the image. There is an option to ‘Fit to Bounding box’ but it would have distorted the SVG.

Step 2: Edit mode

To enter edit mode for the SVG double click the SVG. You find the tooltip when hovering over the Fill in the Properties panel. Do not use the button ‘Edit SVG’, which would let you choose an editing application on your system, nor the option Edit with Illustrator.

Step 3: Select a ‘path’

A vector image is composed mostly from several paths, which can have a width (may be variable) and/or a Fill. The image I used as example has 3 paths, all closed and with a fill. You select a path by clicking it. Selected path will have a blue surrounding line as you can see in this screenshot:

Step 4: change color

Click the Fill icon in the Properties panel to open the Color dialog box. For this simple demo slide I used the color wheel to select a color. In a normal project I would have used the Theme Colors palette of course. Click OK to confirm the color change. Repeat that workflow to the remaining shapes.

SVG button states

When you convert a SVG to a button, the InBuilt states Rollover and Down are added automatically. You can use the edit workflow described above for each of those states. I added also the Visited state (with a speech bubble) and the custom state ‘Done’ which appears after you have listened to the 5 available audio clips. Here is the Object state panel of the big SVG button:

The Visited state is selected in this screenshot. Look at the Properties panel: you see that the opacity is reduced to 50%. This always applies to the full SVG, but in this case only to this state of course. You see a user variable inserted in the added speech bubble. That bubble has no reduced opacity, it is not part of the original SVG but an added shape£.

More?

Main topic is finished, you may stop reading if you want. But for the curious fans,  the audio clips are attached to a state in a second multistate object, which is a shape to which I added an icon in the Normal state (no audio) and an audio clip with its name to the other states.

The Advanced action triggered by the big SVG buttone:

No need to trigger the Visited state, it appears automatically after the first click on the SVG button.