Intro
Several users have asked me already for tips about localisation in the new version of Captivate - momentarily version 12.3.0.12. There is still a way to export texts (now called captions) to a Word document, similar to the old workflow. However I wanted to limit my endeavor for an in-depth exploring to Quizzes. The main reason is that I expected a bunch of issues, which can be solved with improvements in future releases. I have indeed logged already several bug reports and feature requests based on this exploration.
In this first part I will show you an example of a Captivate project where the quiz is presented in 2 languages, to see how this can be managed in the new Captivate. I used the CSV import feature which is new in this most recent release, and had to abandon the third language (French) for reasons linked with problems due to languages with more characters than English, and maybe also with the use of a non-US keyboard.
Example project
Try out this project, using this link. Please be patient, because output from this version is much slower to render than in all previous versions.
![]()
Used workflows
I will explain in-depth the workflows I used for this rather simple quiz: it hasn't multiple attempts on quiz nor question level. It is not possible to Retake nor Review the quiz. I left the default Results slde visible, although it is not relevant. Reasons for this simplification is the lack of the feature Branch aware which I hope will become included soon in a future release. Branch aware would make the quizzing system variables dynamic. That means the variables are adapted to the behavior of the learner, so that only the (quiz) slides visible are taken into account to create the values to be transmitted to a LMS. More info in this post on the eLearning community:
What is Branch Aware? - eLearning (adobe.com)
You can support the request to re-add this feature by voting on:
Please include quizzes that – Adobe Captivate Feedback Page (uservoice.com)
That feature is also important in projects where you want to give the opportunity to skip some parts based on a pretest or knowledge of exisiting skills for some learners.
1. Preferences
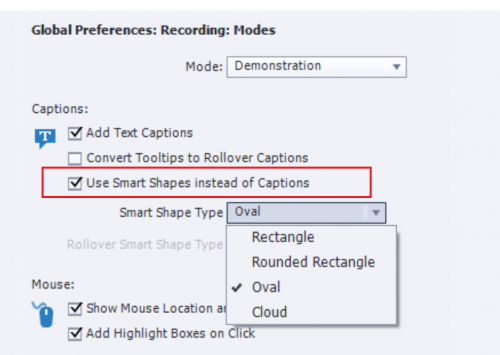
Before adding any quiz slide, start with the translation of the labels under Preferences, Quizzing, Default Labels.Changes to the Preferences will not affect existing quiz slides! In this project I started with the default labels in English, to insert the quiz slides in that language. After this first set, I translated the labels to Dutch and inserted the Dutch quiz slides. In this screenshot you see that I didn't translate all the labels, only those I would need:

In a previous version I would probably translate everything, because it was possible to export those Preferences and import them in a new project, which needed to be in Dutch without any impact on the Theme (styling) of that project. This is not yet possible in the new version of Captivate - saddening. It means that you will need to repeat this workflow in a new project from scratch, or use a model project which will have already a theme. Please support this feature request:
Export/Import Preferences – Adobe Captivate Feedback Page (uservoice.com)
More issues
- In all previous versions the Quiz Preferences included also the possibility to edit the Quiz Result messages in Settings. That has been moved to the Interaction button of the Results slide, as well as the former Pass/Fail settings. In a later example where I will show a fully translated version in one language I will include a table with all workflows needed for a full translation. The Review messages however are included in Quiz Preferences, General.
- Some button translations do not appear. That is the case for the Back button, which is necessary for the Submit All but in this version also during Review. Buttons on the results slide always need to be translated manually, but for the Review status this is cumbersome. The 'Next' button in Review is not available in Default labels. That problem was inexistent in previous versions because the Review buttons were 'international', didn't need a translation.
Translation Back/Next in Preferences – Adobe Captivate Feedback Page (uservoice.com)
- Label for "Partial correct" message (MCQ with multiple correct answers) is not available for translations, but it is even non-existent in the multistate object with all feedback messages. There are more problems with MCQMA but that is off topic.
Partial correct caption – Adobe Captivate Feedback Page (uservoice.com)
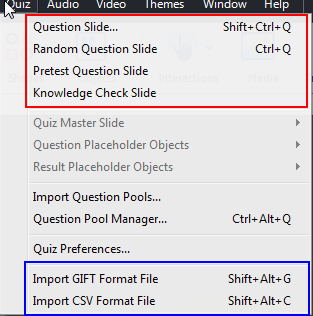
2. CSV import
Question and answers both in English and Dutch were imported using the new CSV feature in Captivate 12.3. I used the provided template in Excel and added different types of questions. CSV doesn't allow to have partial scores, which is possible when using GIFT import in previous versions. Here is a partial screenshot of the translated CSV to Dutch:

I have indicated the cells in the Option1 column which caused problems.
Issues
- You cannot translate 'True'/'False'. I did it in the example screenshot above, but when importing the CSV the default 'TRUE/FALSE' remained and you need to translate them manually. In the screenshot I highlighted them with a blue box.
I logged a bug report:
TRUE/FALSE translation in CSV not imported – Adobe Captivate Feedback Page (uservoice.com)
- The second bug is more worrying. Look at the sentence highlighted by a red box. It has a word 'creëren'. The second "ê" has a sign on top of it which will not import in Captivate. It is a character which needs two keys on my keyboard to create it. Several characters in Dutch are in that situation, and more in other languages like Spanish, German and French. It may be the reason why the French translation of the CSV file was not imported at all.
When importing the Dutch version, it worked but the sequence 'eë' was replaced by a Chinese character. When trying to edit the word manually in the question slide, I discovered that it is impossible to type the character 'ë', it is always replaced by a simple 'e'. This version of Captivate doesn't allow to use any character created by a sequence of two keystrokes; Problem is not limited to quiz slides, it is the case for all text containers in a block or in a slide template. To be complete: I am using the English version of Captivate (there is no Dutch version) and was not able to check this situation in the Spanish, French or German version. For me it is a big problem! Characters like 'à', 'è', 'ç' which are available on my keyboard with one key press are not a problem.
Combination characters in CSV replaced by Chinese characters – Adobe Captivate Feedback Page (uservoice.com)
3. Translation on slides
I was dearly missing the quizzing master slides which were available in the Themes in previous versions.
- Results slide: you can have only one results slide in a project. In the example project I kept the English version and will show the workflow in part 2 for a full translation of a quiz when only one language is used.
- True/False question: you need to translate the answers on each of the slides of this type.
-
Matching question: the 'Select an option' needs to be translated as many times as it appears. Contrary to changing style of the radiobuttons or check boxes which need to be done only on one item, for this 'Select an option' you need to repeat the translation.
- Progress indicator: is not correct for the Dutch questions. You cannot restart that indicator for the second sequence of questions. In previous versions it was easy to remediate this by replacing the default indicator by a custom indicator and using the On Enter action of the question slides. I couldn't find a workaround: the On Enter event has been taken out, and it is not that easy to get a custom indicator somewhere neither.
- No On Enter event: makes it also impossible to calculate partial totals which could be used here or in other situations. Personally I think it is important to get the On Enter event back, especially when the Question pools will be back. Please vote for this request/
Quiz Slide Enter trigger: restore please! – Adobe Captivate Feedback Page (uservoice.com)
Custom slides
To restore some of the functionality I added several custom slides, which are using multistate objects to show the necessary text in the wanted language. The chosen language is stored in a variable and conditional interactions take care of setting the correct state. The two last slides use also bookmarks and animations.