Intro
A while ago I published several blogs and interactive movies (created with Captivate) about the ins and outs of the Timeline in Captivate, which is still the feature that causes most frustrations because of lack of understanding. With CP2019 some new features are added to that timeline, for the VR projects (360 slides) and for interactive video. Looks like it is time to explain those new features. This blog has focus on the timeline in 360 slides inserted in a non-responsive project. Those slides are not able to have overlay Quiz slides as is possible in a full VR project. In a future post I will talk about the overlay Quiz slides and their timeline. I published recently a short post with some tips for a VR project.
360 slides
In a non-responsive project you can use the big button Slides to insert a slide which has a centered button to choose either a 360° static image or a 360° video. It is not possible to drag a 360 item to the slide from the Library, you need to use that button.


The 360 image is inserted as background, whereas a normal image inserted on a slide will have an individual timeline. In the Library you will see the images in the Background folder, and you have to use 'Find Background'.
Static 360 image
Editing a 360 slide is more limited than editing a normal slide. You will not have an Actions tab in the Properties panel, which means that you cannot use the On Enter/On Exit events for the slide. The Big Button Bar is mostly dimmed. There are only two assets that can have a timeline as you are used to:
- Audio (under Media button) can be added as slide audio, which will have its timeline as expected under the slide timeline. Slide audio can be paused on a 360 slide by a hotspot, just like by any interactive object: you find the feature 'Stop Slide Audio' on the Options tab of the hotspots (including Character which is also inserted as hotspot).
- Label (under Text button): can be added, formatted and timed. It can be used for titles or for instructions that need to be available even if the playhead moves. Labels can be moved and will be 'distorted' to fit in the spherical image if necessary. IT is not possible to apply an effect on the labels.
You will see 'Characters' available' under the Media button as well. However inserting a character will create a hotspot where the character is used as custom image. It is not possible to resize the image, only the location. In most cases the characters will be very big due to that lack of editing.
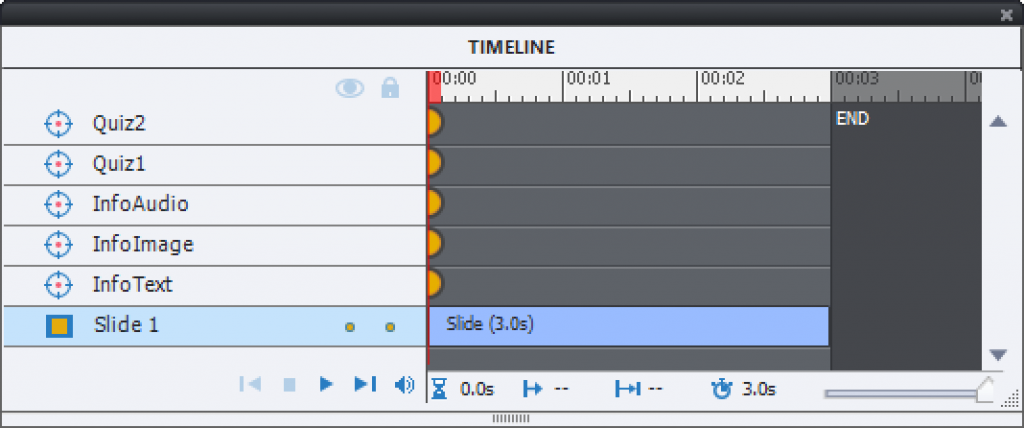
The functionality of a 360 image is mainly in the so-called 'HOTSPOTS' to be inserted from the big button with that name. Referring to existing terminology, a hotspot is a new type of interactive object similar to click boxes, (shape) buttons. However hotspots have a timeline with zero duration. In the timeline the visual representation of a hotspot is either a half circle (brownish) if the hotspot is on the first frame of the slide, or a full circle (when on a later frame). A selected hotspot has a blue circle surrounding the normal icon. In the following screenshot Hotspot2 is selected. The generic names were kept, but I have changed the stacking order by dragging hotspot 2 on top of Hotspot3. Each hotspot is marked on the stage and after publishing by one of the SVG's, a custom image or a character as mentioned above.

Default setting for each hotspot is to keep the timeline paused. For simple actions triggered by buttons in normal slides, the default setting is 'Continue playing the project'. For the hotspots, that setting is unchecked by default (if you trigger 'Play Audio' with a hotspot it will change as expected to Continue movie after audio is finished).

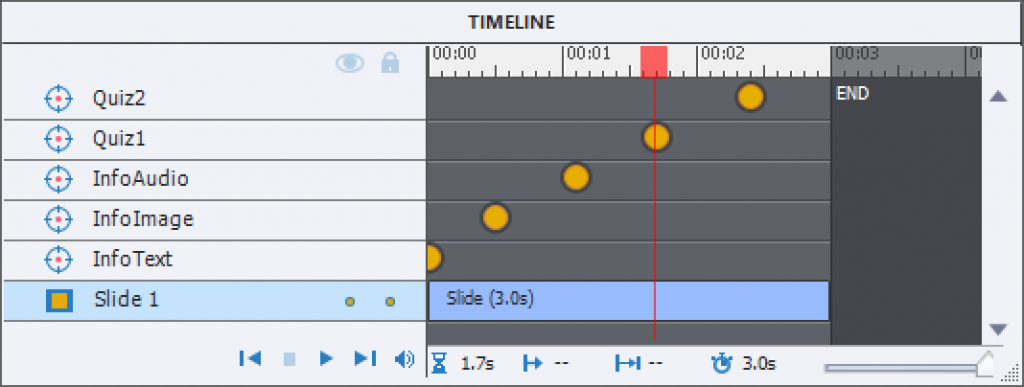
If you leave that option unchecked, the playhead will remain paused. If you use the option 'Explanatory', this means that all hotspots sharing that frame will be visible to the learner. In some cases you'll have only hotspots in the first frame (look at the sample project), but to avoid overload in a complicated image, you could choose to have groups of hotspots in a later frame. You see an example in the screenshot of the timeline inserted earlier: two hotspots are in the first frame and 3 more in frame 45(1,5secs). In that case you have to release the playhead, which can be done in two ways:
- By checking the option 'Continue playing the project', not so interesting if you have set up the image in 'Explanatory' mode where the earner can choose the sequence of clicking the hotspots. But it can be a solution in 'Guided' mode.
- By adding a hotspot with the action 'Continue', which is available in the dropdown list. That was the case for the screenshot above: it has a character hotspot (with attached audio) and a second Continue hotspot. One of the hotspot icons is clearly recognizable as a 'Play' icon.
- By showing the playbar (and maybe instruct the learner to click the Play button). Both commands 'Hide Playbar' and 'Show Playbar' are available to be triggered by a hotspot, but I was never able to use them using a hotspot in a slide. However you can show the playbar by default or use a slide event on a previous static slide.
As I explained in previous articles, the Timeline panel is also a Layers panel, defining the stack order of objects. In a 360 slides the stacking order is not always respected: even if you put a label on top of the stack, it will always be covered by any hotspot in the same location.
However for the hotspots it also has a third functionality, only for Guided mode. The stacking order will define the sequence in which the hotspots are presented to the user: starting from the bottom. In the example screenshot, at frame 45 hotspot 2 will be presented before hotspot 4. You can change the order by switching the layers.
The dropdown list with actions to be triggered by the hotspots is more limited than for another interactive object. I already mentioned the command 'Continue' and its possible use. There are several navigation commands (previous, next slide, jump to slide and to last visited slide). There is the Exit and No Action commands which are self-explanatory. The most useful commands are :
- Display Image: the image will be displayed for a duration specified in the Properties panel, Actions tab. You cannot choose an image in the Library, and once the image is imported it will not appear in the Images folder of the Library but in the Backround folder. Images folder only has the SVG icons of the used hotspots, whereas the SVG folder remains empty. Once the image has been displayed for the chosen duration, the hotspot is converted to a visited state but remains active. It is possible to click another hotspot before the duration of the first has ended. If you want all displayed assets to remain you have to choose a long duration for each of them.
- Display Text: behaves the same way as Display image, you need to specify the duration. Very little formatting is possible, hence a suggestion in a previous blog post to replace Text b: y images with text in the wanted font and with controlled colors for the background. Hotspot will also have a visited state.
- Play Audio: you can import a clip, or get it from the Library (they are stored in the Audio folder). No need to define a duration, once an audio clip is started it will continue playing unless you launch the command 'Stop Triggered Audio' from another hotspot. If you have several hotspots using the Play Audio command and the learner clicks next hotspot before the first audio is finished, that first audio will automatically be stopped. That is the normal behavior of those audio clips as I explained in 'Pausing Timeline and Audio Clips'
360 Video slide
When you insert a 360 video in a 360 slide, it will end up in the correct folder 'Video' in the Library (under Media). I couldn't find a 'Find in Library' option. The video is represented the same way as a Video Demo slide or a FMR slide in a software simulation, it is merged into the background of the slide (mention for Usage in the Library uses also 'Background of slide).
Of course, the location of the playhead is now more important than for a 360 image. You can have an image where only the first frame is used to stack all the needed hotspots. However that makes no sense for a video, where movement is crucial. It will not be easy to create an engaging experience if the video has already audio embedded, because each hotspot will pause the video, which means also the embedded audio. Adding slide audio is possible the same as for a static 360 slide. However synchroniang will not be easy neither. I need more exploration of this type of slides, but here are some first tips:
- Try to offer audio only by using hotspots. I start the video with an inserted character that is set up to play audio, and have the video continue immediately after the audio is finished.
- If you have only one hotspot in a frame, activate also the option 'Continue playing the project' whether you use Display Image/Text or Play Audio.
- If you have more than one hotspot in the same location, and you use the Guided status, keep that setting only for the last hotspot to be presented. For the Explanatory status, you probably will need the playbar or a hotspot with the Continue command.

In the screenshot you see the video slide in its first frame. That frame has a character (selected) as hotspot which will play auio. The label indicates what the learner has to do, but cannot be put on top of the character. When the audio is finished the video starts playing. It will pause again at 4.3 seconds which has two hotspots. The last hotspot has also Continue selected, status was here Guided.