Tips for using Quick Start Projects (11.5)

Intro

The most recent version, 11.5.0.476 includes the new Assets Panel which I presented in this post.

You are able to use Quick Start projects, or slides taken from those projects to avoid having to design and to work out interactions for your project from scratch. Those projects/slides are available in a responsive (Fluid Boxes) and non-responsive version. I tested it out for a tutorial which you can watch using this link (it is a responsive fluid boxes project):

Button Types

If this topic, also related with 11.5, seems interesting, I will post a more detailed description in the near future. But today you'll get some tips from what I learned creating this tutorial.

QSP tips

You can use a Quick Start Project in two ways:
  1. Open the project, and delete or hide the slides you don’t want to use in your course.
  2. Open a non-responsive or a Fluid boxes project, and insert slides from the Assets panel.

I used the second approach for the tutorial, for a logical reason: I didn’t use even half of the provided slides in the Aspire project. Project has only 17 slides, including a lot of duplicate instances of slides. I used these slides from Aspire:

  • Welcome layout
  • Timeline Interaction 02
  • Main Menu layout 02
  • Subtopic Header layout (used 6 instances)
  • Tab Interaction 01 (used 3 instances)
  • Related Content Interaction (used 3 instances)
  • 3 Column layout
  • Exit Layout

Tip 1 Duplicate slides

If you need the same slide multiple times do NOT insert it multiple times in your project, because that will corrupt the Advanced actions (most slides use them). To avoid this you need to follow this workflow:
  • Insert one instance of the needed slide
  • Go into the Filmstrip, slide will be active (surrounded by a blue rectangle)
  • Duplicate that slide, either with the right-click menu or with the universal shortcut for duplicate: CTRL-D.
  • Move the slide by dragging in the filmstrip to the wanted location.

You can repeat this workflow as many times as needed. Due to Captivate’s smart labeling, the advanced actions will not corrupt in most situations. Why not always? See next tip.

Tip 2: Check Navigation commands

In a slide like the Main Menu Layout, the topic buttons point to another slides in the total project. On insertion of that slide only, without the target slides, all commands will revert to the default navigation command ‘Go to Next Slide’. You have to replace it by ‘Jump to….’ while indicating the correct target slide (in the project the slides of the Subheader Topic layout). This will prove easier if you use the next tip:

Tip 3: Rename slides

Labeling is always a good practice, but for sure in this type of project. Multiple instances of the same layout slide will have the same name (and are very long as well). Taking the time to give them a custom name will save time when you need to find a slide. Moreover, if you want to use the Table of Content, the names will be meaningful.

Tip 4: Replace image

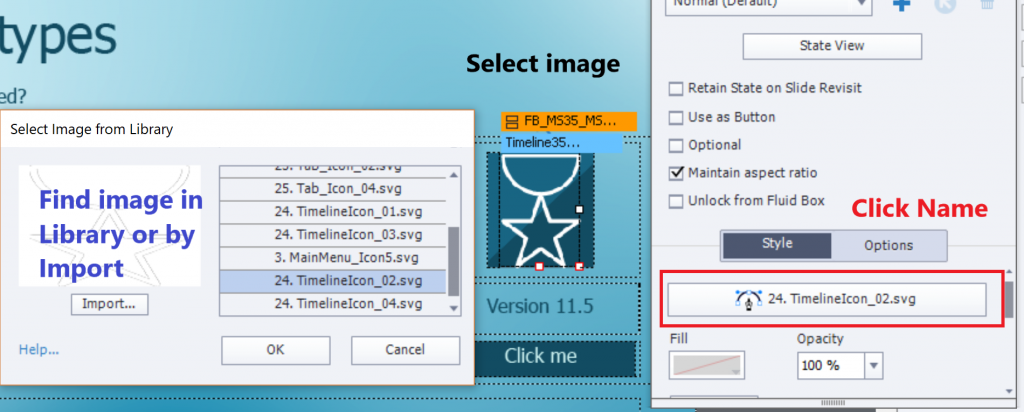
Switching to another image is mostly very easy:
  1. Select the image.
  2. Click on its name in the Properties panel
  3. Choose another image from the Library dropdown list, or use the Import button to find it on your system.


However, on many slides an image is used as Fill for a Fluid Box. Look at the Subtopic Header slides (there are 6 in the example): having the image as fill allows to add an image on top of the fluid box. Normally you cannot stack two images, this is a useful solution for that limitations.

If you want to replace the fill for a Fluid box, you need to select that fluid box, you cannot just click the image. After selecting the FB you see that the fill is set to Image, click the second Fill button, use the Browse icon to find an image to replace the image. Be careful to check the Position properties if the new image doesn’t have exactly the same size as the original one.

Tip 5 Multistate objects

The layout slides use a lot of multistate objects.  That is the case for all the Click to Reveal slides (labeled ‘Tab Interaction’ and ‘Related Content Interaction) and probably for many other interactions. You really will need to learn how to use them. Click the State view button in the Properties panel, to open the Object State panel.

More questions?

You may have seen that I have edited some slides quite a lot. This post has only simple tips, not the full explanation of all changes. If you want to know more, post a comment to this blog.

Themes are Time savers. What is NEW in 11.5?

Intro

The most recent update to CP2019, version 11.5.0.476 is packed with several enhancements to Themes. The components of a theme, as I described in this post are still the same: theme colors palette, object styles, master slides, skin, Recording defaults. The possibility to use multiple themes in one project is probably the most eye catching enhancement. Even minor changes are very useful, will try to explain them in this post.

Themes thumbnails dialog box

In older versions this dialog box had thumbnails of the available themes in the Layouts folder (and you could browse for themes in other locations). The active theme – which always had to be unique – was highlighted with name and resolution visible. The default theme was marked by a check mark.

In 11.5 this dialog box has two parts, separated by a horizontal line. The next screenshot, and indicated explanation  is valid for projects with one theme, not with multiple themes:

The top part shows the active theme, as usual with name and resolution. For a responsive project it is the resolution for the primary view (desktop).

The bottom part shows more available themes, and you can use the Browse hyperlink to search (custom) themes which may be stored on your system. Themes show name and resolution when hovering over the thumbnail. The default theme is still recognizable at its check mark. You see above that I have set the Blank theme as default theme).

To apply another theme to the project, select the new theme from the bottom part (or browse to it) and accept the warning. All slides will be converted to the new theme, which will replace the old theme in the top part. This workflow has not changed, but you’ll see below that this changes for projects with multiple themes.

Totally NEW is the button ‘Theme Properties’, replacing the former ‘Theme Colors’. You’ll read about this new panel in next point.

Themes Properties panel

Clicking the Theme Properties panel, will open this new panel, which shows you (for a one-theme project) the Fonts used in this theme (new) and the Color palette used:
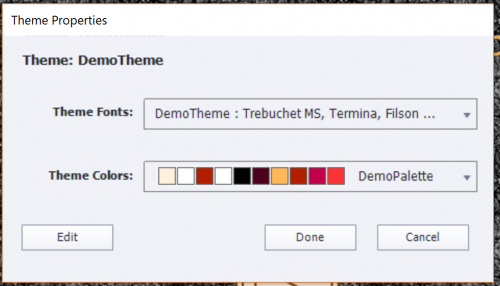
Fonts may not be totally visible the panel cannot be resized (which is the pity). But clicking the Edit button at the bottom will show you all used fonts and colors, ready for editing.
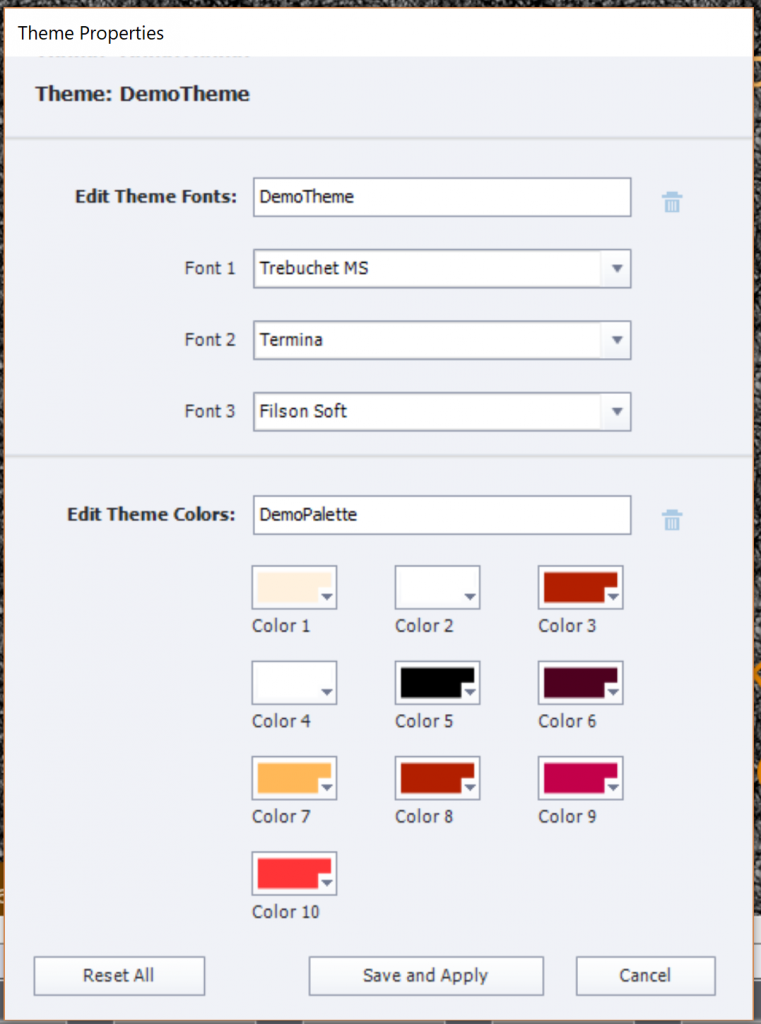
A new functionality, which can save you many working hours: it is now very easy to replace one of the used fonts by another font. I always recommend to avoid using system fonts, use only websafe fonts or Adobe (formerly Typekit) fonts. That way you’ll be sure that all learners will see the font you had in mind, even when using dynamic text (includes variables) or creating a Fluid Boxes project. In older versions, replacing a font was very cumbersome, because you had to screen all object styles in the Object style manager which included characters, and change them one by one ( see Manage the Object Style Manager ). In this editing panel you cannot see however the Usage of the fonts (feature request) but it is already a big enhancement!

As I mentioned in my first review of version 11.5, the colors in the palette have now simple numbered names. The older names (Title, Subtitle, …) were confusing because they were rarely used for those objects. Editing colors in the color palette is the same as in previous versions.

Theme in Slide Properties

Less important for a course with only one theme, but the Slide Properties have an indicator of the used theme for that slide:
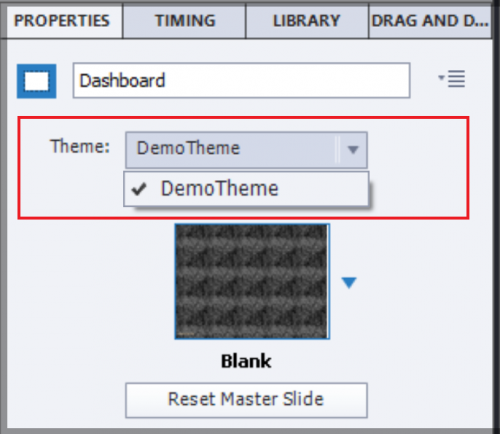
Theme fonts in dropdown list PI

When you are in edit mode for text containers (captions or shapes), the dropdown list for fonts will show at the top a group 'Theme fonts', which is new. The following group are the Adobe fonts (formerly Typekit fonts) if you have licensed some. The third group is the usual 'Websafe' group. You should limit font use to those groups, System fonts have to be avoided, especially if you are creating fluid boxes project. If you use system fonts, there is no guarantee that your learners will see that font, that it will be replaced by a generic font like Times New Roman or Tahoma.

 Multi-theme projects

You can insert slides using another theme than the project theme. Once inserted you’ll see in the Filmstrip an icon, showing two options Use destination Theme or
Keep Source Theme (which is the default choice). Beware: this icon only appears when a slide is inserted. When you insert another slide, the icon will disappear, in favor of the last inserted slide.
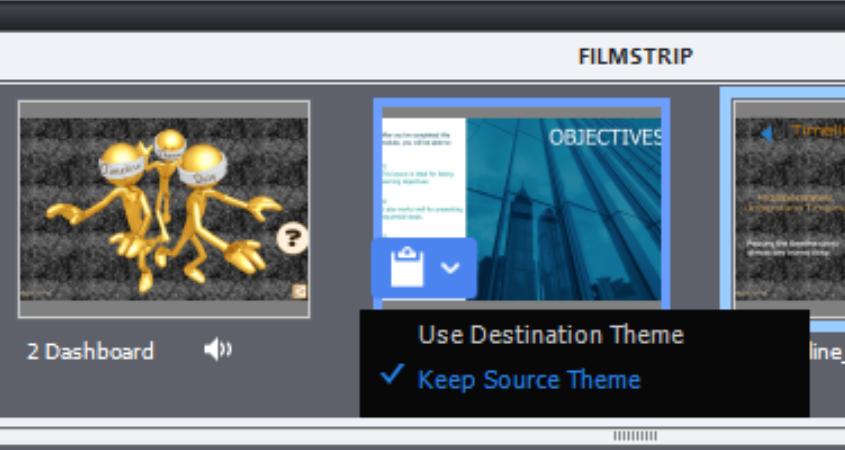
Look at this screenshot, taken after insertion of a slide with the “Earth” Theme (one of the Quick Start Project themes). You see that the first slide no longer has the icon, it was in the theme ‘Aspire’ has no longer the icon. This project has now 3 used themes: DemoTheme (my custom theme), Aspire and Earth. What is now the destination theme for the last slide? It is not the original project theme, but the theme ‘Aspire’ of the previous slide. I find this bit confusing.
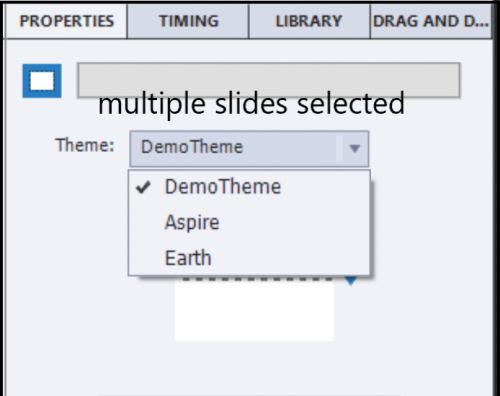
You can use one of these two workflows to change the theme of a slide (where you no longer have the icon to change to the destination theme):

  • Select the slide, use the Themes button and click the theme you want as destination theme for the slide. If there is no appropriate master slide, it will be added to the destination theme.
  • Select the slide, use the dropdown list in the Properties panel (see screenshot) and choose the destination theme. If there is no appropriate master slide, you will be invited to choose one of the existing master slides.

In the thumbnails under the big button Themes, all the used project themes appear in the top part. The ‘active’ theme shown is the one of the slide selected at that moment. If you select multiples slides, not all using the same theme, it is the theme of the first slide selected who will show its theme as active?

Clicking the Theme Properties panel will bring you to the properties of the active theme. If you want to see the Properties for another theme used in the project, do NOT click that theme in the top part of the thumbnails, because you would change the used theme for the active slide!. You need to leave the thumbnails dialog box, select a slide in the filmstrip with that other theme to make it active in the thumbnails, in order to be able to access its theme properties.

Master slides

In a multi-theme project, the master slide panel will show only the master slides belonging to the theme of the selected slide, not all the master slide used in the project. Just a warning: if you have both the Filmstrip and the Master slide panel open, which is only possible in the Expert UI, not in the default UI, the master slide panel will not refresh automatically if you choose a slide with another theme than the one showing at this moment. You have to leave the master slide panel and come back to force it to refresh.

If you change the theme of an inserted slide to the destination theme, and it uses a master slide which is not available in the destination theme, an extra master slide will be created. It will use the destination theme colors palette and its object styles.
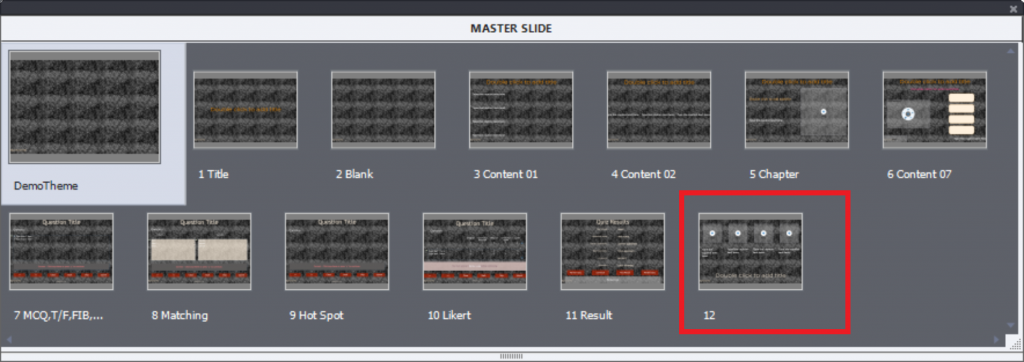
If that happens, you may have to use the button ‘Reset master slide’ to enforce the use of the new object styles. It is not always happening automatically, if an extra master slide was needed.

Object Styles

Opening the Object Style Manager will show the object styles of the theme used by the selected slide. The logic is similar to the one I explained for the master slides. If an object style used in a slide (or master slide), which is not available in the theme to which you convert the slide, it will be added to that theme.

Theme fonts in PI

Same logic: the dropdown list in the Properties panel, will show the Theme fonts for the theme used by the selected slide.

Skin editor?

When i explored the skin, I found that only one skin exists. In the example I used for the screenshots, the skin designed for the custom theme ‘DemoTheme’ was always applied. Even when I have changed all the slides to another theme, or applied another theme to the whole project (where the message appears that skin is updated). Not sure what is going on, will update this post when I have more information.

I did not check out Recording defaults, last component of any theme.

Sliding Menu

Intro 

This post is meant as an answer to a thread posted in the eLearning community. "I want to create a menu that slides on and off the screen, like a door that moves to the left and right, when the user clicks a button." I invite you to read the comment by Greg Stager who is posting some links to blogs he wrote where JS is used to create slider solutions. As you know, I often try to use only Captivate features to solve similar use cases instead of JS. This is a new example. You'll find a step-by-step workflow to recreate the example I show. The shape (which I use as 'box') is not having a menu, I invite you to (re-)read my post about Hyperlinks for the creation of a Dropdown menu. They are a great way to avoid creating multiple interactive objects in the 'box'. 

If you don't like creating advanced actions, I have an offer at the end of the post to make your life easier...

Example

Watch this short file, only three slides after the 3 seconds long Title slide. They have two buttons (from the Assets panel in 11.5): a Next button on top, and the Slide toggle button below it. You can use the toggle button as many times as you wish on a slide. To restart, refresh the browser.


Step-by-step workflow

Step 0: Next button on master slide

I used only one master slide in this project, which made it easy to put the Next button on that master slide. I kept the default option 'Pause project until user clicks' (Actions tab). That will result in having each slide paused at its last frame.

Step 1: Sliding assets

Two assets have to be created and put on the first slide where you want to use the sliding box:

  • Sliding Box: I used a rectangular shape, labeled SS_slider. You can add content to it, but make sure that you check the Options tab, because you will need both the size and the exact x/y coordinates. Here a screenshot of my setup, since it was in a non-responsive project you see both size and location in px. If it was a responsive project, it would have been in %. Put the box in the wanted position after sliding in.

  • Toggle button (SB_Slider): will be used both for slide in and out. You need to create an extra custom state for this button, I labeled it Out. Remember that Rollover nor Down state can change when you switch from the Normal to the Out state, hence make those states neutral (I did not add text to them).

Time the Sliding Box and the Toggle button for the rest of the project, with the option 'Always on top'. The Timeline of that slide will look like this:


Step 2: Custom Out Effect

Create a time-based effect to get the sliding box out of the stage. Do not use an Exit effect, but a simple motion path. I added an AlphaFromTo effect as well (100% to 0%), and reduced the duration of both effects to 1 second. 

Workflow to save this effect as a custom effect is described in detail in this post. Do use that method after you have done step 3:

Step 3: Create Guides

Show the Rulers (View menu) and create two vertical guides, through the start and end point of the motion path. See this screenshot:

They will be needed to create the In Effect, to be exactly the opposite of the Out effect. Now you can save the custom effect, and take it out from the slider box.

If you didn't use a horizontal motion path, you'll need also horizontal guides. If you need more information about using Guides and Rulers, look at 'Guides Rule'.

Step 4: Move slider box in Out position

Use the guide in the scratch area to move the slider box to the correct position. I mostly use shortcut key (SHIFT or CTRL combined with left arrow) to keep that movement horizontal. For a non-horizontal movement, you use vertical and horizontal guide. You'll see a screenshot of the new position in step 5

Step 5: Custom In Effect

Create this effect using the two guides (or four if you needed also horizontal guides). In the screenshot you see this effect, where I combined a motion path effect with an AlphaFromTo effect (0 to 100%). Save the effect, same as for the Out custom effect. 

Step 6: Hide Slider box

Use the On Enter action of the slide to hide the Slider box. 


Pause

Now comes the hard work: you could skip steps 7-9 and scroll immediately to the bottom for an offer. 

Step 7: Variable v_slider

Create a user variable, which I named v_slider. It will be used to track the status of the Slider box: in or out? Similar logic you'll be able to see for all the Toggle buttons in this older post.

Step 8: Advanced Action ResetSlide

Create this advanced action (conditional):

The items marked by in this action will be parameters if you convert it to a shared action. Beware: the name of the custom effect cannot be a parameter! I used TestIn and TestOut as names, you can replace them by your names if they are different.

Step 9: Advanced Action ToggleSlider

Create this conditional action. Like with the previous actin, I indicated the 4 parameters if converted to a shared action.


Step 10: Attach the actions to events

The action ResetSlide has to be triggered by the Success event of the Next button, whereas ToggleSlider has to be linked to the Success event of the toggle button.

Offer

You can obtain the described actions as shared actions for free, including a short explanation of how to use them. You could skip steps 7 to 9, but still have to do the other steps.

How? Visit my website (lilybiri.com), fill in the contact form with your request, and a small comment on my blogs or website. You'll get everything by mail. I probably will post more offers in the near future, if you don't want to hear about them, you can indicate that as well (I am European, respect the GDPR).

4 Tips - Assets Panel

Intro

Do not expect a complete overview of the Assets Panel in this article, may be later. The user interface is rather simple, intuitive. Opening  the panel is possible  with the big button Assets in the right part of the Big Button Bar. For he expert UI this will be the only button in the right part, fo the newbie UI the Assets button will be with the Properties and Library button. Opening is also possible using the Slides button,  option ‘Asset Library…’ on the left side of the bar.

At this moment the stored  assets are restricted to those available with Captivate (under Assets tab  or to downloaded assets (under Downloads tab). You cannot add custom assets fto the panel. For those custom assets remember that you can use external libraries.

The center tab – Discover – has two choices,  ‘Templates’ (confusing term, not the cptl template files) with a submenu or ‘Characters’. Both link to the site of the eLearning Brothers. Once downloaded, they will appear in the Downloads tab.

Tip 1: Projects/Slides

This is the first option under the Assets tab, opening by default with Slides selected. It allows you to choose individual slides for insertion in an existing project after the active slide. Under Projects you will see 6 Quick Start Projects (QSP), first of them is the Branching file. That file is meant for developers disliking variables and actions. It is based on the last QSP, labeled ‘Aspire’. 

All projects and slides are available in two formats:
  1. Non-responsive project (Blank project in Welcome screen)
  2. Responsive project with Fluid Boxes (none available for Breakpoints)

If you insert a slide in an existing project created in one of those types, the inserted slide will automatically be of the same type. A master slide may be added, and object styles but I’ll leave more details for another blog post about using QSP's

However, some users asked me "how do you open a full QSP in the wanted type"? There is no choice available after selecting a project.

Workaround which works for me: open first a project in the wanted type, either a blank project or a responsive project. Anyway you need an open project to launch the Assets panel. Selecting a QSP to open as new project, will open it in the same type as the already opened project. You can then delete the first project..

Tip 2: Characters

Contrary to previous versions, the characters packaged with Captivate are only installed on your system as thumbnails. You can find them in the Content folder under the eLearning assets. Each character has a folder bearing a number as name, and a subfolder Children, where you find all the thumbnails. When you insert a character in a project, the image is downloaded and stored in another subfolder with the name of the character (in this screenshot David), either in the High or the Low subsubfolder, depending on the chosen quality (Normal or High resolution):

Screenshot is taken on a Windows system. If you download a extra character from the eLB site, it will be stored under Characters_11_5, not in the Content folder.

It is still not possible to download more than one or all characters from a set at once (please log a feature request). However, if you like the Illustrated category, here is a tip. Characters in that category are based on one drawing file, which you can download as well. You have some choices for the format, I prefer AI (Illustrator). If you are comfortable with that vector image application, you can extract all characters from that file and export them not only as PNG, but also in other formats inclucing SVG (smaller file size and vector based, crisp look whatever the resolution - interesting for responsive projects). Those drawing files are always labeled ‘Name: Illustrated work files’. You can also use that file as reference file. After download it will be stored in the subfolder ‘Others’ under eLearning assets, (not in Content, nor Characters).

Tip 3: Icons

The files in this assets category are SVG’s. Once inserted you can convert them to a button. Editing the colors is very easy as I explained in a previous post.

Those icons are stored in a subfolder under the Contents folder in eLearning assets. When screening that folder you'll see that the 'icons' are in JPEG format. However when you insert an icon, the SVG is created in the same folder as the original JPEG image.

Tip 4: Buttons

I am finalizing another blog about the 6 button types available in Captivate 11.5, including advantages and disadvantages of each type. Which type of buttons do you insert from the Assets panel? That was bit of a mystery at first. When you insert a button from this asset category, it is a PNG image (bitmap) with the option ‘Use as button’ checked off. The three InBuilt states (Normal, Rollover, Down) which are normally included in a button object style, are identical. You have of course the possibility to edit the image for the other states once the button is inserted. However I was bit curious when watching the name of the image. Look at this screenshot of a button:

That name ‘Deep-download_up.png’ reminded me of the name convention needed for an (old) image button. For image buttons you need to create three images in the same size, with an identical name followed by _up (for normal state), _over for rollover state and _down  for the down state. Looking in the Buttons folder (under already mentioned Content folder) taught me that all the buttons had a similar name structure ending on _up.  The folder has is similar to the Characters and Icons subfolders: numbers as folder names. Each folder contains only one image file for the ‘up’ state.

Of course you can edit the states in the project, using the Object state panel and copy/paste the button if you need more instances.  But you will not be able to reuse that button with the edited states in a future project.  I tried out a workflow based on my CP-intuition:

  • I duplicated the _up file in the Content\Buttons fokler for the button 5751 ‘Bubbly_downloads_up'
  • renamed the duplicates to Bubbly_downloads_over and Bubbly_downloads_down,
  • edited the duplicates in Photoshop, watch the result in this screenshot:

Success! When inserting the 'Bubbly....' button in a project, it had three InBuilt states. Not only when inserting in the same project, but also in other projects. You cannot have an object style for Images used as buttons, as is possible for shape buttons, text buttons, image buttons and transparent buttons. However this workflow opens an alternative for re-usability  (one domain where Captivate excels over other authoring tools). One drawback: Assets are only edited on the used device, they are not in the cloud.

More about buttons in a future blog as promised.

Using Copy/Paste Appearance in 11.5.0

Intro

Copy/paste appearance is a new feature in the most recent release 11.5.0.476 of Captivate. Many call it a Format Painter like in MS Word, but I do not agree with that statement at all. I have sort of a ‘dual’ feeling about this added feature , Even the simple Format painter in Word can be a ‘two-edged sword'.  Same for Appearance transfer in Captivate: It can be used in a wise way or make your life as developer become a nightmarel.

Do I use the Format Painter in Word? Sure, when I have to write a quick short document, which I’m sure I will never have to edit later on. Even in that case I mostly use it for paragraph formatting, seldom for text formatting. When creating courses in Word  (which happened if they were mostly text-based switched to Framemaker when I could get a license in college, because it handles graphics and other assets lot better) I would NEVER use the format painter. Even Word has Styles for a professional workflow. Captivate is style-based as well, in the sense of Framemaker and InDesign.  Object styles are part of the theme you are using in a course, and I have published several posts about themes.

In this post I will try to explain which situations are suited for using appearance duplication. It is not possible for all object types, as you will discover, and has a hidden gem which you may not have discovered (yet). Let me know if my guess is wrong.

Objects supporting Copy/Paste Appearance

Not all object types can be used for duplication of its appearance to another. I checked them out and list up those who do have the options 'Copy Appearance' in their right-click menu.

Static objects

First requirement is that the object type had an object style. This means that images, audio, video, bitmap image as button, SVG used as button do not have the feature. Check the Object Style Manager. That is also the right place to detect the included features in a style. Example:  Transition (Fade in/out with its duration) is part of the object style. When using the Appearance feature it will be transferred as well. The supported objects for appearance pasting are a minority. You cannot use it for Highlight box, zoom object, rollover items although they have an object style. Only text containers:

  • Captions: in the themes packaged with the present versions, all used captions are transparent captions. But the older not-transparent captions are still available. They always come with the Callout pointer in several directions, the used pointer will not be transferred. Have a look at the screenshot below. You can transfer the style of the left caption (pastel orange) to the right caption (default style). top left pointer will not be transferred. But color, font, font size and attribute, alignment, margins, leading (space between lines) and transition will be pasted.

  • Shapes: can also be a text container, but that is not compulsory. Fill, Stroke, Transition and Text properties will be transferred. The shape itself is not part of the style and will not be changed.

After using the Copy/paste featuure

Look at the style names. For the shape the style has been taken over on the second shape, which is great!. However the style of the left caption has been applied but shows a + sign to indicate an overridden style.  I have tried this for quite a lot of captions, it seems to be always the case  and that is bad news! When later on you want to change something in the applied style (here MyCaption), that change would not be applied to the right caption shown  in the screenshots. Hence my

Warning

If you use Copy/paste appearance on text captions, and you have decided on the final look you will need to double-check the styles and avoid all overridden styles. If you forget to do so, the slightest edit you’ll have to apply in the future to that style will become a nightmare.

This problem doesn’t exist as you can see for shapes used as text containers. Double-checking at least some never harms of course. Another reason to reinforce my decision to use only shapes as text containers.

Interactive Objects

Text Entry Box, Text Button, Transparent Button, Image button have object styles but you cannot use the Copy/Paste Appearance for those objects, you need to apply object styles. A click box is invisible, so it doesn’t have an object style.

The only interactive object to accept Appearance duplication is the Shape button, my favorite Captivate object! Its object style includes the look of the Inbuilt Styles Normal, Rollover and Down (not Visited).  What is the result of a Copy/paste Appearance. Here are two shape buttons, and their Object States panels. The left button has a custom style MyShapeButton, the right button uses the Default Smart Shape Style of this theme:

Both buttons have the 4th InBuilt state - Visited - added. Its default look starts as the Normal state but I edited the style. After copy/paste appearance from the left to the right button, you expect to see this:

The good news is that the second button has now also the style MyShapeButton applied to it, same as for a non-button shape. Have a look at the new Object State panel of the right button:

As expected, the Visited state didn’t take on the look of the original MyShapeButton style, except …. for the font and its size! This observation leads me to the related:

Hidden Gem

Captivate has no individual Text Styles (no Character styles, no Paragraph styles), they are included in the object styles of the text containers (like shapes and captions, text entry boxes). Up till now I used Copy/Paste appearance to transfer styles between objects from the same type: caption to caption, shape to shape, shape button to shape button. However it is possible to copy/paste the text style between objects who are not the same type. That may not  seem unexpected between shape and shape button, but it IS ALSO possible between Caption and Shape or Shape button!

Workflow:

  • Go into Edit mode for the Caption, and select all the text if you want also to transfer the leading (F2, CTRL A)
  • Right-click, Copy Appearance
  • Go into Edit mode for the Shape, select all text (see above)
  • Right-click, Paste Appearance

If the shape is a shape button, the text style will appear in all the InBuilt states.

Of course the name of the styles will not be transferred, since a text style has non name. The style will show a +, which means it is overridden. If you decide to keep the text change in the shape, please create a new style.

Using Appearance Duplication

This new feature can be useful, but should never replace Object styles.  I would use it when being in “Draft” mode at the start of a project, when  discussing with the client about style choices. Certainly the easy way to transfer text styles is appealing to me, if followed by creation of an object style. But due to the fact that you can never be sure object styles will not be overridden (as is the case for captions) there is no way to create the custom theme before double-checking all styles. I start each project with a custom theme, because it can save so many hours of work in the future. The changes for themes in this new update are also very welcome, but that will be in another article.

Copy/paste appearance can be very useful when creating multistate objects to transfer the style of the normal state to other states. Think about a shape button, where the font style of the label is not always transferred to the other InBuilt states. 

Scrolling Text Interaction to replace Text Entry Box

Intro

Although I have already posted about one Submit button for multiple TEB’s, recently users tried to apply that blog to non-validated TEB’s, which was not the goal of that original post. Moreover giving another attempt to a TEB where the Submit has been done has become less easy with HTML5 output. SWF output had so many advantages (rewinding the playhead a couple of frames was simple), but that is the past.

Instead of writing long answers to the most recent thread, to explain why choosing Scrolling Text Interactions was a better choice for non-validated fields, I created a short example file. The workflow explanation will be in this article..

This example was created with version 11.5.0.476, the most recent version of Captivate. I uses some image and button assets from the new Assets panel. However, nothing has changed for interactions in this major update to version 11. I am confident that the solution will work for every version since 8, meant for HTML output.

Example

File has two slides. Only the first slide is relevant for the workflow, the second is meant to test the Continue button (with action "Go to Next Slide").

The first slide has three fields to fill.  If any field remains empty, a textual warning will appear and you can retry. The Continue button appears when all fields have an entry. Project has no poster image, just the default play button. It is not rescalable. Here is the link


Setup

Variables

For three fields you need 3+1=4 user variables, none of them needs a default value in its definition:
  • v_one, v_two and v_three will be used witl be associated with the Interactions
  • v_null is needed for the advanced conditional action to test if the field is blank; more info in ‘Where is Null’

Scrolling Text Interactions

Next to each Text container (used a shape) an instance of the Scrolling Text interaction. Here is a screenshot of the setup of the first of them. Important is to link one of the variables and to uncheck the option ‘Read only’:

You see in the dialog box that I edited the font (used an Adobe font), the font size and attribute.  Just a reminder: it is not sufficient to type in a variable name to define it, you need to define it in the Variables dialog box. 

Although I resized the interactions to the same height as the Text containers with the questions, the height is decreased in the output file. Be careful with copy/paste to duplicate an interaction, prefer the Duplicate functionality within Captivate (CTRL-D).

Advanced Action

This action is triggered by the Submit button. I used the On Enter event of the slide to hide the warning that will pop up if at least one field is empty. This is the Preview dialog box. The operator 'is equal to' is replaced by the JS equivalent needed '=='. The logical operator OR is replaced also by its JS equivalent |  As you perhaps know, an advanced action will be converted to JavaScript on Runtime.

The replacement of the grayscale image by the color image, disappearing items on the slide: all is achieved using  the timeline. For those interested, here is a screenshot of that timeline, I didn't group any items, but their label clearly shows what they are.

Conclusion

As usual I appreciate any comment, whether to add an alternative or to ask questions. You are welcome on my website as well.

Edit SVG in Captivate 11.5

Intro

If you have read my first blog about this major update, you will know that the extended functionality of SVG’s for use as buttons is one of my favorites. I didn' t mention that you get some editing features within Captivate. Thisat means that you don’t have to do a roundtripping with Illustrator (or use another vector editing application) if you just want to change some colors. This post is meant for those who are rather new to vector images, and the way paths are used.  Next post will be about roundtripping with Illustrator for more complicated editing.

You may also ignore that the new Assets Panel (wait for an in-depth exploration in the near future) includes a set of ‘icons’ which are SVG’s. The hotspots used in 360 slides are SVG's as well, the editing functionality was added to make customizing their colors possible. All SVG’s in your project end up in a dedicated folder of the project Library.

Remember: SVG used as button is only possible for HTML5 output, not for SWF output

.

Example slide

The example uses only included  assets from the Assets panel, to be found in the Audio and Icons part. All icons have edited colors (not meant as a design example) to illustrate the workflow I will explain in this post (and later on in an interactive video). The biggest SVG in the center of the slide is configured as a button. You can click it as many times as you want, you’ll be able to listen to some of the audio assets. There is no poster image in this example, just the default Play button.


Step-by-step ‘Edit colors’

I will explain this for the Normal state of the big SVG which you clicked in the example slide.

1. Insert SVG and resize

As I explained in the intro, this SVG is one of the Icons in the new Assets panel. Insert it from that panel (name ‘Cover’). You can resize either by using the Options tab of the Properties panel for the SVG, or by dragging a corner with the mouse while keepoing SHIFT pressed to preserve the width-height Ratio. Since this is a vector image, you’ll see that it remains crisp even when enlarged considerably.  The original icon uses a uniform dark grey. I check the option to use it as a button, and uncheck the option to make the whole bounding box clickable (Enable Click in Bounding box). You can see that the bounding box extends above the image. There is an option to ‘Fit to Bounding box’ but it would have distorted the SVG.

Step 2: Edit mode

To enter edit mode for the SVG double click the SVG. You find the tooltip when hovering over the Fill in the Properties panel. Do not use the button ‘Edit SVG’, which would let you choose an editing application on your system, nor the option Edit with Illustrator.

Step 3: Select a ‘path’

A vector image is composed mostly from several paths, which can have a width (may be variable) and/or a Fill. The image I used as example has 3 paths, all closed and with a fill. You select a path by clicking it. Selected path will have a blue surrounding line as you can see in this screenshot:

Step 4: change color

Click the Fill icon in the Properties panel to open the Color dialog box. For this simple demo slide I used the color wheel to select a color. In a normal project I would have used the Theme Colors palette of course. Click OK to confirm the color change. Repeat that workflow to the remaining shapes.

SVG button states

When you convert a SVG to a button, the InBuilt states Rollover and Down are added automatically. You can use the edit workflow described above for each of those states. I added also the Visited state (with a speech bubble) and the custom state ‘Done’ which appears after you have listened to the 5 available audio clips. Here is the Object state panel of the big SVG button:

The Visited state is selected in this screenshot. Look at the Properties panel: you see that the opacity is reduced to 50%. This always applies to the full SVG, but in this case only to this state of course. You see a user variable inserted in the added speech bubble. That bubble has no reduced opacity, it is not part of the original SVG but an added shape£.

More?

Main topic is finished, you may stop reading if you want. But for the curious fans,  the audio clips are attached to a state in a second multistate object, which is a shape to which I added an icon in the Normal state (no audio) and an audio clip with its name to the other states.

The Advanced action triggered by the big SVG buttone:

No need to trigger the Visited state, it appears automatically after the first click on the SVG button.

Version 11.5 Released!

Intro

If you are a fan of my blog, you know that usually I will not talk about a new release on the day it is released (although I have explored it in a beta test group). This time however I am so excited about this intermediate release. It has 'Voor elk wat wils' (interesting features for each developer whatever her/his level) to use a Flemish proverb. Do not expect a full review here, want to talk only about some of my preferred features which do appeal to my level of expertise. My apologies if you don't like that 'egocentric' approach. Be sure I will write more in the future, need some time to explore in-depth. As in the past, I may overlook some little gems which I couldn't dig out yet, will continue the search. You'll find three small gems at the end.

SVG as Button

It has been possible to fill a shape with an image since version 6. Converting the shape to a button was a much easier way to create nice buttons than the older workflow with Image buttons where you needed a graphics application (and had to create several images) Shape buttons also can have custom states besides the InBuilt states which they share with the old button types (Normal, Rolllover, Down, Visitedà. I never use those legacy types anymore, except for Quiz/Score slides where they cannot be used as embedded buttons.

However, those shape buttons have two lmitations:

  • You can only fill with Bitmap images, the much sleeker vector images like SVG were not possible.
  • The clickable area of the shape button is the bounding box, not the image itself.

WIth 11.5 it is possible to use SVG's directly as buttons without the need for a shape. And you can limit the clickable area to the image itself! This is a big step forward. File size of SVG's tends to be small compared with bitmap images, and moreover they are excellent for responsive project due to its vector nature.  The SVG has all the features of a shape button: can be used on master slides, can be timed for the rest of the project (not in Fluid Boxes), can be added to quiz and score slides as extra button. A setup with 3 buttons like this screenshot was not possible in previous versions, because the bounding boxes are overlapping: The screenshot may look blurry (has been converted to bitmap here) but the original SVG's in Captivate are really crisp. Size of the SVG: about 75Kb.

In the default setup, the clickable area is still the bounding box, you have to uncheck that option:

Bitmap images as Buttons

Similar to SVG's, they can now directly be used as button, no need to fill a shape button. Same for the clickable area: can be limited to the image. Depending on the type of images this extends the functionality which I explained in the first point. I dream of custom hotspot questions with partial scoring as described in this older post. Watch out for use cases in future blog posts. Not only are you now rid of the cumbersome workflow which I described here, but if you use a bitmap format which supports transparency (GIF, PNG24) you can uncheck the same feature to reduce the clickable area as for SVG'S.

Themes 

Themes have now a real Properties panel, which can access from the dialog box under the big button Themes. It is the only way, the panel is not to be found in the Windows menu, nor under the Themes menu (which still has to be used to save a customized theme). 
For sure will write more about this in the future, Themes is one of the underrated features, which I like to promote. I am really excited about the easy way to replace fonts (in ALL object stylesà. You can see in the screenshot that I replaced the original fonts in the Windswept theme by three different fonts (all Typekit). It is a smooth process: all object styles which have text related features will be updated for you. That can be a big time saver! I will have to edit this blog, where I complained about the cumbersome workflow to replace one font in a theme.
Of course, you need to avoid any overriding of object styles, and the danger that this will happen with the new copy/paste appearance feature is very real. I will talk about that new feature in another blog post, which will have some warning.
It is now possible to have slides with different themes in the same project, which will then lead to more than one Theme Colors palettes as well. I need some more exploration time to prepare a more complete overview of all the changes related to themes. Please, be patient.

Interactive video

One of the new features in the first release of CP2019 which I really like a lot. Not so much changes after this patch. It is interesting that you now are not only limited to videos on your system or from YouTube, but that you can also use Vimeo videos.

Another improvement is the possibility to insert a sequence of overlay slides (content or KC slides) on a frame of the video. 

VR project/360 slides

Several enhancements:

  • To the actions which can be triggered by hotspots the much asked for 'Play Video' was added.
  • The hotspots are now very customisable, black and white (minstrels?) are over and out: edit the colors as much as you want.
    Double click on the hotspot when inserted, select one of the paths and choose a color.
  • If you trigger Text, you will like the new formatting possibilities. Just a pity that Typekit fonts cannot be used....
  • No need to guess a duration for the popups anymore. Default setting is now a close button in the top right corner as you can see in the previous screenshot.

Small gems

Theme colors: in the screenshot of the new Themes panel inserted earlier, you see that the main theme colors are now named 'Color1.... Color10. This fits better the use of the colors, because in previous versions there was a Title color, which was not always used for titles, a Subtitle colors which was rarely used for subtitles etc...

Drag&Drop:  when selecting Infinite attempts in the Actions tab, the 'Failure action' will disappear, very logical since it will never happen in that situation. Regret however that the wording 'Failure' is still not replace by 'Last Attempt'. The action doesn't occur On Failure, but only at the last attempt, same as for quiz slides.

Preview menu: for non-responsive projects, the option 'Preview HTML5 in Browser (F11)' is now the first option which is great! The death of Flash player for all browsers will soon be a fact, every developer has to switch to HTML5 output. The other Preview methods are all still based on a temporary SWF output (except Play Slide, which is NOT a preview method). To check the future output only the mentioned Preview HTML5 in Browser should be used.

...sure will find more of those.

More...

This was not a complete overview at all. As I explained, need more time for features like the new Assets panel, use of Quick Start Projects, Branching setup, multiple themes, copy/paste appearance etc... 


Display Time (CP2019)

Intro

Almost 10 years ago I wrote a blog post to answer user question  quote: “…. if there was anyway to insert running time”.
The user wanted a display on all slides of the time information you can find  in the TOC (total duration of the project and elapsed duration).  Total duration can be found also in the panel ‘Project Info’ in Captivate, which shows global project information (number of slides/frames). In this panel you can also check the expected size of the output file.
Total duration is calculated as the sum of slide durations. Similar the elapsed duration:is calculated as the sum of the duration of the slides before the currently viewed slide. I would call that type of duration ‘developer time’. 

Developer time can be very different from the real time spent by the user viewing slides in that project.  You’ll see in this refurbished article how to show both times, developer and real ones. It is a nice use case for System variables.  BTW, if you didn’t get my free table with System variables, maybe it is the right moment .

Contrary to the old post, which was meant for SWF output, I used JS this time instead of advanced actions with the Expression command.  Reason is that for SWF output the formatting of the variable values could be controlled by the number of characters to display when inserting the variable in a text container. That is not working for HTML5 output. Formatting of numbers is a typical use case (like random data) where I tend to use JavaScript.

Example output

Watch this published movie. The described workflow (from the original post) is working only for linear projects. Sorry for the use of TTS, those slides are based on a longe project….in Dutch.


The ‘developer time’ is shown in the top left corner: total project time (secs), time of the previously viewed slides (secs) and percentage viewed.

Real time workflow

The real time is visible at the bottom, next to my name. I used the Timer widget for the real time.  You have to be careful: set the maximum time to a high number, to avoid triggering the end of time action. Getting rid of the background is easy, have a look at my setup.:


Developer's time workflow

As I announced at the start, for several reasons I preferred to use JS instead of Expressions in an Advanced action as was the case for the older blog post. I propose two scripts. The first one is close to the older blog post, because I use the same system variables, and two methods of the JS interface for Captivate. Details can be found in this document.

In the second script I skipped using the known system variables, replaced them by some more methods of the same document.

Script 1

Variables

The system variables used in the first script are:

  • cpInfoFrameCount: its value is the total number of frames in the Project Info panel (see first screenshot in this article)
  • cpInfoFPS: each movie is played at a certaing speed, which defines its qualtiy. It is indicated as Frames per Second. The higher that rate, the higher the quality
  • cpInfoCurrentFrame: indicates the present frame number. Frames are numbered, starting with 0, not per slide but for the whole project. More details can be found in this blog post about Micro-navigation

In Captivate I created these user variables to display the results in the project:

  • v_total: total duration of the project in seconds
  • v_done: sum of the duration of the previous slides in seconds
  • v_perc: percentage of duration viewed, in %

To avoid confusion, variables in JavaScript used these names:

  • frames: will start with the value of cpInfoFrameCount and end after calculation return the total project duration (secs) 
  • start: will start with a frame number (frist frame of the present slide) and after calculation return the alreadu viewed duration (secs)
  • speed: will store the value of cpInfoFPS
  • percent: will return the percentage viewed after calculation

Javascript

This script has to be triggered On Enter for each slide. That can be directly with the command 'Execute JavaScript' as simple action if you don't need any other commands to be done on entering the slide. If no slide nneeds any extra commands, you can select all slides in the Filmstrip and attach the script to all slides at once. If you need more for some slides, it could be a good idea to use the script in an advanced action, where you can add more commands. Even a shared action is possible, but in this example had no real sense.

Have a look at the script:

I am using two methods from the Common JS Interface:

  • getVariableValue to store the values of Captivate's system variables in the JS variables frames, speed, start. (lines 1-3)
  • setVariableValue to return the results to the Captivate variables v_total, v_done and v_perc (lines 6-7,9)

The calculations in lines 4-5 and 8 are straightforward. To control the formatting of the numbers I used the method 'Number.toFixed(x)'. I didn't want to display two decimals for a simple reason: the first frame will be detected on each slide, and that would have led to a duration of 0,03 seconds on the first slide (30 seconds in a frame). It would be possible to split up the results in minutes and seconds as well. I wanted this example to be a simple introduction to JS newbies. I planned to use the formatting in a third article about numbers. The first two were 'Playing with numbers - part 1' and 'Playng with numbers - part 2'. Both were meant as simple intro to JS for newbies. However, since they didn't get a lot of viewers, I gave up spending more time on it.

Script 2

No system variables here, the user variables and variables in JS are the same as in the first script: v_total, v_done, v_perc, frames, speed, start, percent.. Have a look at the script:

I didn't need the method getVariableValue in this case but used three more methods on top of setVariableValue to return the results to Captivate:

  • getPlaySpeed: returns the same value as the system variable cpInfoFPS (line 1)
  • getCurrentFrame: returns the same value as the system variable cpInfoCurrentFrame (line 2)
  • getDurationInSeconds: spares me one calculation, this value doesn't exist as system variable. This time I don't have to divide the total number of frames (exists as getDurationInFrames) by the FPS value. (line 3)

The other lines in the script are similar to those explained in the first script.


Audio in Learning Interactions

Why?

A question posted recently pushed me at creating this short post: “....a way to stop the main slide audio when a tab on the interaction is clicked”. I pointed to an older blog where you can find some tips for using learning interactions. It offers a table, tells about their limitations etc. I want to explain why there is no simple solution for this question at all. The audio referred to in the question was slide audio, the used Learning interaction was Tabs. What I explain is also valid for Accordion and Timeline. As I explained in the mentioned blog post, the term ‘Learning Interactions’ was introduced to distinguish the widgets compatible with HTML5 output from the older ‘widgets’ which were created for SWF output. Both have however the same extension ‘wdgt’ and are sometimes both indicated as widget. Terminology can be confusing

Static and Interactive

It seems logical that Learning Interactions are interactive, because they allow the learner to click and interact, and they are listed under the Interactions big button. Indeed, they all have some of interactions internally. However not all are also ‘Interactive object’ in Capativate’s timeline. A Captivate interactive object can be recognized this way:

  • It has an Actions tab
  • Under the Actions tab you find up to two events (Success, Last Attempt)
  • A pausing point is automatically inserted at 1.5secs.

You know the common interactive objects: button, shape converted to button, Text Entry Box, click box. For those objects you’ll see the pausing point immediately on the slide timeline. Moreover the object timeline, when not selected will be green. Look at this screenshot, where I kept the original generic names to clarify the type of objects.

Learning Interactions are internally interactive but as objects in Captivate they also come in the two flavors: static and interactive. You can recognize them by the presence of the Actions tab, with the possibility of scoring and reporting. However the score in the game interactions are not linked with the game results (see article)

Interactive interactions can also be identified, based on the generic name in the Timeline panel. In this screenshot I have inserted two interactions: Tabs (static) and Jigsaw Puzzle (interactive). Look at the generic names:

Look carefully at this screenshot: you see that both interactions also have a colored timeline, but exactly the opposite of what you expect. Please, support me by logging this bug. You may also wonder about the presence of a pausing point? No pausing point for the interactions? The static interaction has indeed no pausing point, you need to add an interactive object like a button, to keep the slide paused. That is needed to allow time for the learner to explore the interaction. However the Interactive Interaction doesn have a pausing point which is not showing in the Timeline panel, you’ll find it in the Timing properties.

Audio Problem

The question was about avoiding having slide audio still playing when the user clicks one of the buttons in the Tabs interaction. That interaction allows  to add audio to a button, which is object audio.  Only object audio allows simultaneously playing of multiple audio clips, either from object audio or, in this case, slide audio. Pausing the slide audio, when a button is clicked in the Interaction would need access to the source code of the widget, which is not available. I can only propose two possible solution to avoid hearing two audio clips at the same time.  I will only explain the first solution in this article. The second solution, with a custom interaction will be explained in a later article.

Interaction available after Slide Audio

This is the easiest workflow. The learner would not be able to use the Interaction while the slide audio is playing. With a normal interactive object that would be easy: disable it for a certain time with and On Enter action for the slide and enable after a certain time corresponding with the audio length. However, even an Interactive Interaction cannot be disabled! You need a workaround.

Steps:

  1. Create a static image of the interaction, either using Captivate or another screen capture app like Snagit. Quality should be good to excellent.
  2. Resize that image to the exact size of the Interaction.
  3. Insert the image on the Timeline and time it for the duration of the slide audio.
  4. Move the learning interaction to appear just after the image.
  5. For a static interaction (like Tabs, Accordion….) you need to insert a button or click box to pause the slide. That is not necessary for an interactive Interaction.

Have a look at this screenshot of the Timeline, which illustrates the described steps:

The timelines from bottom to top:
  • Slide audio, about 3,5secs long
  • Tabs Interaction, starts at 3,4 seconds, extends till end of the slide
  • Image of the Tabs interaction, same location and size, starts from the first frame and ends at 3,8secs; overlap with the Interaction is meant to avoid seeing the transition
  • Click box – duration of the slide –  to pause the slide at its end; it could be a Next button as well.

Custom Interaction

Using shared actions, multistate objects, it is perfectly possible to recreate this interaction on a slide. At that moment you have full control over all objects. To avoid multiple audio clips playing at once, the easiest way is to use only audio started with ‘Play Audio’ command.  If you start a second audio with that command, the first one will be stopped automatically. For this example:

  1. Use Play Audio with the On Enter event to replace the slide audio.  That is possible if you don’t need Closed Captioning.
  2. Use Play Audio in the actions triggered by the Tabs buttons. Clicking the button will automatically stop the previous audio, whether it is the audio started On Enter, or the Audio started with another Tabs button. Object audio would also be possible, if you use the command ‘Stop Triggered Audio’ to stop the first audio clip started On Enter.

Do you want to see the setup for such a custom interaction? Post a comment, please.