Hotspots in non-VR project - workflow 2

Intro

A week ago I published a first showcase, explaining how to replicate the hotspot workflow for VR projects on a 2D image. This second article about using hotspots for a 2D image is not duplicating as closely that same feature: instead of showing the popups for a duration defined by the developer, this workflow will offer a close button for the popups. The learner decides when to close a popup and proceed (eventually) to the next hotspot. I also used a technique, often labeled as 'lightbox': to have the popup stand out of the rest of the content, it will have a semi-transparent cover in the background dimming the rest of the slide.

Example movie

I used the same image (welcome screen) and content for the popups as i the first workflow. Only  some small color changes and changes in the location have been applied . Watch this 3-slide movie: after the title slide (doubles as poster image) you can test the new hotspot slide, and the last slide gives a short Step-by-step list if you want to use this slide in your project. 

Try it out: quick workflow

You can download the project file from this link

If you do not need to have more than 6 hotspots, and you are happy with the resolution of the project (1024x627) and its Theme (Pink Icing), you can quickly use the hotspot slide using these steps:

  1. Create a blank project, with that resolution and theme. Create your title slide, and eventually a poster image as explained in his older article
  2. Copy the hotspot slide from the sample project and paste it into your project. The object names will get an extra number, but you don't have to bother about that. The advanced and shared action is automatically adapting to the new names.
  3. Select the Image..  'WelcomeScreen.png' and replace it by your image (Properties panel).
  4. Move eventually the hotspots to the right location. If you need less than 6 hotspots you can hide some of them in output. Deleting is also possible. Start by hiding or deleting the last hotspot(s). The sequence of the hotspots is starting with HS_Responsive (first in first row), going to the right and then to the second row. Last hotspot is for the PPT.
  5. Open the multistate object SS_Info.. which is just on top of the 'Cover' (needs to be there). Click the State view button in the Properties panel to open the Object State panel.
  6. Leave the Normal state alone. Replace the content in the other states by your content (follow the sequence described under 4.)  You don't need to rename the states, nor to delete the last unused ones (just leave them as they are).
  7. Start testing with 'Preview HTML in Browser' (F11).


How to use Custom Effect in Actions?

Intro

Almost 8 years ago I posted this article on my personal blog: Editing Motion Paths and Using Custom Effects. 

Since that time Effects have been improved a lot, advanced and shared actions can make life much easier. Time to upgrade that blog post, meanwhile testing the behavior of effects in HTML output in CP2019. While Flash was always to be trusted, that is not the case for HTML output. And indeed, I bumped onto a problem with the Scale effect, and sometimes the Rotate to effect. When those problems are solved, I will post a published movie. The workflow to use Custom effects in a shared or advanced action is however still the same since many versions. It is a bit complicated, I have answered many questions about it in the forums. I will write it out now step by step.

When do you need  a custom effect?

Effects have been improved in some ways. Some parameters can be defined in the Advanced Actions dialog box. Look for the start time of an effect, its duration and more numeric fields (alpha, rotation, ease in/out, alpha….). However when using a combination of effects over and over again, you can create one custom effect which saves that combination and can applied in one step including the sequence and duration of the different effects. Another practical example are the motion effects, where you need to edit the motion path, which is certainly the case for more complicated custom motion paths.  This screenshot shows an example of a complicated combination of effects on the Timeline. It was meant to be applied to simulate a swimming fish:

Step by Step

Step 1:  Create and save effect

Create the effect or combination of effects on any object as a ‘Self)time based animation and test it out thoroughly (Preview HTML in Browser for a non-responsive project) in several browsers before saving it with a custom name.

You don’t need to save it in a specific folder. I use to save it with the project I am working on as is the case in the screenshot above. Effects are stored in XML-files.

Step 2: Apply the custom effect as time-based animation

If you would try to use the saved effect in a shared/advanced action it will no be available. If this is the first custom effect you ever created, there will not even be a Custom category to choose from You need first to delete all the individual effects applied to the object (above it was to the object SV_Fish (a SVG image). Then apply the custom effect as a (Self) time based animation again, but now with ‘one’ effect chosen with the browse button.

When looking at the timeline you’ll see exactly the same result as in the screenshot at the beginning: all the effects in the correct sequence and with the duration you had chosen.

The result of this second application is that the Category ‘Custom’ will now have been created, and it will have the new custom effect ‘Swimming’.

Step “: use in advanced or shared action

If you only wanted to apply this action using an interactive object, you could use a simple action. The field Category will now have the Custom category.

However often effects are used in Advanced or Shared actions in combination with other commands. In this example the Fishes are originally hidden, so I need to Show them and apply the effectn eventually also have an audio clip playing separately.

The two buttons on this example will trigger the same shared action. Both fishes are hidden in output at the start. When creating the advanced action, the category Custom can now be used, and the available parameters (start, duration) could be edited, but mostly you’ll not want to do that.

Because I needed to use this action twice, maybe also later in other projects unchanged or as template for other actions, I preferred a shared action which will have only one parameter: the object itself. An effect cannot be a parameter. However, the effect can not only be applied to one object, but also to a group. I can replace one fish by a group of fishes.


Rare Tips for Shared Actions

Intro

It is not a secret that I am a big fan of Shared Actions. A project without at least one shared action is a big exception to me. From what I hear and read, lot of you don't realize how much time you can save with those mysterious action. This short article will offer some ideas where Shared Actions are used for (maybe) a totally different situation than you expect.

1. Creation of Variables

If you are reading this post, it is very likely that you use system variables as well as user variables. Do you create user variables in each project, and include a proper description and eventually default values?  I have a list of variables which I use very often in projects, here are some examples:

  • v_null: an empty variable used to check if Text Entry Boxes remained empty after a learner clicked its Submit button, or to reset the variable associated with a TEB.
  • v_counter: as the name tells to track a number of clicks, attempts....
  • v_visit: for situations where the content of a slide has to be different on a later visit, you want to track if the slide has been visited
  • v_one, v_two, v_three....: number of variables that can be used for different use cases, like tracking clicks on hotspots, finishing chapters...

Knowledge fact: when you import a shared action in another project, variables not defined as parameters, will be created including the description and default value.

I have a shared action with a list of Assign commands, one for each of those often used variables. It doesn't matter what you assign at all. I drag that shared action from my external Library with shared actions to each new project. Variables are ready for use, even as parameters in other shared actions. 


2. Shared Action without Parameters

Sounds very strange, because the reusability of a shared action is based on parameters? I already gave a first example of such a parameter-less SA under 1.  It is much safer and easier to transfer a shared action to another project than an advanced action. You use the shared action directly or convert it to an advanced action if you prefer (maybe for more editing). Here is an example:

 I use this action to calculate the reference time in seconds (to be used later in calculations) of a frame, mostly the first or last frame of a slide. Defined as a shared action, it needs no parameters. Once dropped into the project Library, I can use it for any frames where I want a reference time.

3. Shared Action as Template 

You can copy an object or a slide, which has advanced actions attached to a new project. But that is not always working great. If you have navigation in the advanced action 'Jump to Slide', that command will often be reset to 'Continue' if that slide is not found. Same for objects, variables etc. 

Less known is that any shared action can be used as a template to create an advanced action. In the top left of the Advanced Actions dialog box, you are used to see 'Blank' which is the default template for an action. Open the dropdown list, and you'll find all shared actions in the project as extra templates:

Choose one of them, you'll have to fill in the parameters, add a name, edit the commands (delete, add as you want) and save as an advanced action. 

Example: a shared action triggered On Enter for a dashboard, checking a number of tracking variables and showing something special after all variables prove that everything has been visited. You can set up the shared action for 4 variables. If you need less or more variables, convert the action to an advanced action and edit it!

What about you?

Do you use shared actions? Did you like these tips? Do you want to have some training about variables/advanced/shared actions?  I love seeing comments on my posts, and promised: you will always get an answer!


Rollover in Fluid Boxes?

Intro

One of the type of objects that is indicated by the tracker as not compatible with HTML output are rollovers: rollover caption, rollover image, rollover slidelet, rollover shape. However if you ignore that warning for a non-responsive project, the rolloverrs will work fine when used with a mouse on a desktop or laptop screen (with the exception or the slidelet, which you should avoid at all times). Its functionality will not work on a mobile device, even not when using a stylus. But the 'mouse' users have that functionality.

However when you create a responsive project using Fluid Boxes, the options for inserting a rollover are greyed out. There is no way to add them. Is there a workaround to have rollovers for desktop/laptop users? That question appears once in a while in forums or social medai. In this post I will talk about my tentavies to mimick a rollover..

Example Movie

I cannot insert a responsive movie in a blog post. Use this link to have access to it. Try it out on a laptop or desktop screen: roll over the buttons in the left and in the right most Fluid box. You'll see rollovers for the big Blue buttons which do not have a real button functionality. The red buttons on the right are active, a hint message appears when rolling over the buttons. You can click those red buttons. This is a static screenshot of that slide (which appears after the poster image and the first slide):

If you try this on a tablet or a smartphone, rollovers will not appear. I tested on iPad and on an Android (HTC) phone.

First Mimick: Hint Messages

You did see the Hint messages for the red buttons when hovering over them. If you use a tablet or a phone they will not show up. Those buttons have the InBuilt States 'Rollover' and 'Down', but only the Down state will be visible on those mobile devices. This is the Object state panel for the second button:

For interactive objects it is possible to check the option 'Hint message' in the Actions tab. In all themes included with Captivate those messages are no longer in a caption but in a shape. The hint message appears wh

There are some problems with this solution:

  • Buttons and Hint messages will share the real estate in the (normal) Fluid Box.
    That is a waste of space especially for mobile screens where those hints never appear. and the buttons may shrink too much as you can see here:
  • I tried to use a static fluid box for each button+hint to be able to stack the Hint message over the button but that leads to very ugly flickering and is excluded.
  • You don't have control over the exact size of the buttons, and certainly not over the HInt messages (look at the screenshots above). This may be not so important since you'll only watch on a big screen, but nevertheless.

Second Mimick: Rollover State

With the blue shape buttons I demonstrated that you can fill the Rollover state with Text (mimicking a rollover caption), with an image (mimicking a Rollover Image) and with both. Here is a screenshot of the second shape button, having an image and text:

The effect is quite nice, provided you use rather big shape buttons as was the case here:

There is a possible problem when using images: they can be distorted if the option 'Maintain Aspect ratio' is unchecked. That was the case in the example, and can lead to distortion:

Shared Action for Red buttons

The active red buttons trigger a shared action which will change the state of a shape (showing explanations), add a star to a progress indicator and have it animated. If you have read blog posts written by me, you know that I am a big fan of Shared Actions.


Webinar Shared Actions!

Update

Thanks to all who attended the webinar, mentioned below. As usual I created a presentation with Captivate (2017) for this webinar. This allowed me to convert it to an interactive movie, which I want to offer to all readers of my blog.  I hope you'll enjoy it and learn something about Shared Actions, which are so ignored by most Captivate users. 

As for a normal training I like to use the subject of the training in the presentation. As you can see in this screenshot of the Library many shared actions were used in the presentation:

Their usage can be found in the Advanced Interaction panel, with the exception of the shared action which was used on the Drag&Drop slide:

I plan to explain some of those shared actions in future blog posts. Another plan is to write a more elaborate workbook for Shared Actions, which can be used for exploring in-depth, but also as a 'cookbook' because it will have recipes. A typical use case for Shared actions are Custom question slides, which are not treated in this short presentation. If you think a workbook would be help you  please send me a note or post a comment.


Invitation

If you are interested in a live session about using Shared Actions, you can register for the webinar on March 15, at 4pm CET (8am PT).  You'll find the link to the registration form for  webinar 'Dare to Share: Power of Advanced Actions in Captivate'. at the end of this invitation.

The majority of my blog posts are dedicated to advanced and shared actions. Advanced actions is a feature of Captivate since version 4. It allows to extend Captivate's functionaltiy in many ways, without having to learn a programming language. With the point-and-click interface of the new enhanced Advanced Actions dialog box in CP2017, you can realize scripts that will be converted to JS on runtime for HTML output (if you still use SWF output, will be converted to AS3).

Shared actions were new in Captivate version 7. They are a more flexible alternative to Advanced actions, with focus on reuslability. Due to the presence of parameters, to be filled in on assigning a new instance of the shared action to an event, you can adapt the action to each new situation. In Captivate 8 variables and literals became possible parameters as well, thus increasing that usability. Shared actions have some other important advantages over Advanced actions: they will appear in the Library like any other asset. Using the External Libraries feature this makes exchanging shared actions between projects very easy. The Usage button is available for Shared actions.

Variables that are not defined as parameters will be automatically created in a new project when you import the shared action using it. That is a real timesaver.  Some parameters can have only one type (variables, literals, states, audio clips) but most of them can have different types:  they can be a group, an image, a video, whatever you need in that project.

Less known is the ability of using a shared action as a template for the creation of an advanced action. That can be a great time saver. Learn about this feature as well in the webinar


Poster

You're welcome to particapte in this webinar, Here is the registration link:

Dare to Share

Be sure: you’ll walk away with many creative ideas!  As a plus: you’ll be working in the brand new Advanced Actions dialog box of Captivate 2017.

More is in a...hyperlink - Close button


HTML Update

A blog post about Hyperlinks in HTML output is published recently. Please check it out:

Intro

A while ago I published a list with events able to trigger an action, whether it is a simple, advanced or shared action. Most commonly used events are the slide events, Success/Failure events for interactive objects, Question slide and Quiz events, D&D events. Both the hybrid rollover slidelet events (now deprecated because it is not supported for HTML output) and the Hyperlinks are 'outsiders' but can be very useful as I want to point out with this article (Closing popup or lightbox) and the next article (creating a dropdown list with Jump to actions, equivalent of the former 'Goto Slide' widget). 

Example movie

Watch this two-slide example.

  1. The title slide has a text hyperlink 'Next' to proceed to the next slide.

  2. The second slide has six shape buttons, each opening a popup (it could have been a lightbox as well, work flow is identical). In the popup information you'll find  the text 'Close X' which is a hyperlink  to close the popup.


States and Hyperlink

It is not possible to add interactive objects to a custom state: button, click box, shape button, Text Entry Box, all are greyed out. However it is possible to have a hyperlink within a text container, that will be active for all states of that container. This can be a welcome workaround. It is however not possible to have different actions for the hyperlinks in different states. Since the goal here was to close the popup, I created a shape as text container with 7 states as you can see in this screenshot:

The 'Normal', or default state looks invisible: there is no text in the text container with the exception of the text hyperlink 'Close X'. This was achieved by giving the text hyperlink the color of the background, the text container a Fill with Alpha=0% and no stroke. The other states have a Fill (Alpha=100%), they have information text with a visible color (also for the Text Hyperlink) and an image.

Actions

1. Next Hyperlink - Title Slide

The commands for Hyperlinks look a little bit different than the dropdown list in the Actions tab. For hyperlinks commands 'Go to Next Slide', 'Go to Previous Slide' and 'Jump to Slide' are in one dialog box:

2. Shape buttons to open popup - Second slide 'ActionProcess'

Look at the timeline of the second slide: all shape buttons (name starts with SB_) pause the slide at the same time, 15,5 secs. When triggering an action, the playhead should not be released, to allow clicking as many times as wanted, in any sequence on those shape buttons. The number of attempts is left at Infinite.

The only command to be triggered is to change the state from the default 'Normal' state to one of the custom states. The choice is yours: 

  • you can use a simple action (be sure to uncheck the option 'Continue Playing the Project'
  • you can use a one-line advanced action, create duplicates for each button; playhead will not be released
  • you can use a one-line shared action with two parameters (text container and state).

3. "Close X" hyperlink - in text container second slide

Beware: there is NO option to prevent 'Continue Playing the Project' when you assign a command to a hyperlink. That means that you cannot use a simple action, but have to use a standard advanced in this case.It is again the action 'Change state...to Normal.' 

Another difference for hyperlink events: the command Excecute Shared Action is missing. That is too bad, because if it had been available, one shared action would have been able to achieve both showing popup (with the 6 shape buttons) and close the popup (with the Hyperlink).

Conclusion

Hyperlink makes it possible to have an action in a state for an object, although it has to be the same action for each state of the object. You learned about the differences between hyperlink events and other events to trigger an action:

  • There is no way to prevent the playhead from being released if you trigger a simple action; use a standard advanced action.
  • You cannot trigger a shared action with a hyperlink.
  • Some commands have a different look: example is the Slide command (see screenhot in this article).


Replay (slide) Button

Update:

A new version of these workflows (for CP2019) can be found in a new post and in an interactive Captivate tutorial.

Replay or Reset Slide

Replay/Reset (Captivate course)

Intro

This pretty short article will explain several ways to create a button that will replay a slide from its first frame and is functional on that slide only. The reason is that I have been asked about this use case multiple times. 

Questions

First thing to check is: does this slide have an On Enter action? The default On Enter action for a slide is 'No action'. On Enter actions are however the way to go if you want to reset a slide to its initial configuration, to clean up the 'mess' that can happen on that slide by the user or by the interactivity on that slide. On example: maybe the user has popped up objects  using a hyperlink on a word or iimage? In that case you'll need an On Enter event. The action needed for a Replay button will have to make sure to 're'- enter the slide, in order to have that On Enter action done. To better understand what I mean, I created a short example movie.

Example movie

Watch this movie, which I have been testing both for SWF (version here) and for HTML5 output. You'll see two slides:

  1. Slide 'Title': it has an On Enter action to play an audio clip.

  2. Slide 'Pills': a user variable v_counter is used (and displayed) to store the number of clicks on the 'pills'. The timeline of this slide looks like this

    Each of the pills (shape buttons) triggers a shared action, that will show a state (with explanation), increment v_counter, wait for 2 seconds before releasing the playhead.

On both slides you'll see two buttons: 'Replay1' will restart the slide from its first frame, without re-entering the slide. That means that the On Enter action is not executed again. The second button 'Replay2' will re-enter the slide. Listen and watch the difference (look at the counter on the second slide). Refresh the browser when you are ready to watch this example. Refreshing will also get you back to the start of the movie.

'Replay1' - On Enter action is not repeated

If you do not need a resetting action On Enter, a replay button can be coded very simple. If you are on the slide with the label 'Intro', this simple code will do the trick:

    Jump to slide Intro

However you'll not find the slide 'Intro' in the dropdown list for the 'Jump to' command in the Actions tab. You need to choose 'Execute Advanced Action', and create a one-line standard advanced action.

It is simple but I do not recommend to use this work flow. It means creating a new advanced action for each slide. A first alternative would be a shared action, defining the slide name (or number) as a parameter.

If you need this action for many, even all slides in a project, there is a much better work flow. Create this advanced action:
  
Why do you need an expression to subtract 1 from the number of the current slide, which is stored in cpInfoCurrentSlide? The index of the system variable cpInfoCurrentSlide starts by 1 That way it can be inserted on a slide indicate the slide number. Its value for slide 3 is '3'. To show the slide number you insert cpInfoCurrentSlide in a text container on the master slide or timed for the rest of the project.

The index of system variable cpCmndGotoSlide starts not by 1, but by 0 (usual in programming languares). If you want to navigate to slide 3, you have to give a value '2' to cpCmndGotoSlide.  So far the reason for that Expression in the advanced action Replay1.

This command is functional both for SWF and HTML5 output. I tested this in several browsers.

This action is triggered by both Replay1 buttons in the Example movie. The On Enter action is not executed with this Replay, which results in:
  1. For slide 'Title': the audio clip will not be heard.
  2. For slide 'Pills': the variable v_counter is not reset to 0, and will continue to increment.
Watch the variables I inserted top left of the slides: they show the current frame, and the frame number stored in the user variable v_enter.  If you wonder why the frame number never starts with 1, read the explanation under the next subject 'Replay2'.

TIP

be sure to create this action as a shared action, no need to define the system variables as parameters. Store that action with much used shared actions in a separate project. In any project you can open the Library of that project as an external Library and drag that Replay action to the library of the new project.

Replay2 - On Enter action is repeated


As explained under 'Questions', you'll have to enter the slide in this case, not just jump to the first frame as was done with the Expression in the scenario for 'Replay1'.

This is a bit more complicated. I had to use 'micro-navigation', a term introduced by me in this old  blog post: navigating between frames. Look at the advanced action created for the 'Replay 2' buttons:
This is the work flow:
  • Create a user variable v_enter that will be reused on each slide that needs a Replay button of this kind. That variable will store the number of the first frame of the slide. To achieve that I have to add a command to the already existing On Enter actions. Here are the actions for both slides:

  • When the Replay button is clicked, there is first navigation to 2 frames before the first frame of the present slide. Why 2? Theoretically 1 frame should be OK, but for HTML5 output (slower) I learned that it is better to use
  • Although I use the system variable cpCmndGotoFrameAndResume for navigation, which should release the playhead and navigate very quickly to the next slide, I detected that adding the second command 'Go to Next Slide' made the process more fluent (again for HTML5 output). 
The result is very clear in the Example movie:
  1. For slide 'Title': the audio clip is played
  1. For slide 'Pills': the variable v_counter is reset to 0.

Frame enigma - TIP

If you watched the frame number closely, you will have seen that the 'first' frame (on slide 'Title') is not 1 but 3 or 4. Here is the explanation: since I wanted the Replay2 button to be active on this first slide, I needed a slide before that first slide for the micro-navigation. That slide will not be visible to the user because it is only 0,1 sec long. At a frame rate of 30fps, that means ...3 frames.


1 action = 5 Toggle Buttons

Intro

In the past I wrote some posts about creating Toggle buttons. The oldest article explained the use of an Expression and a system variable for a button that kept the same style but could turn on/off a functionality (created for versions 5/5.5). My excitement about shape buttons, appearing in version 6, was the inspiration for several scenarios in which the style of the toggle button changed with the on/off situation. 

When shared actions appeared with Captivate 7, I posted some articles about the difference with advanced actions. Captivate 8 enhanced shared actions by allowing variables and literals as candidate parameters. Although Captivate 9 seems not to add any improvements to shared actions (had hoped secretly for an easier way to edit them), combining shared actions with the new multistate objects will save a lot of time. The use case described here is a good example. Start by watching the example movie to understand my interpretation of Toggle buttons.

Example movie

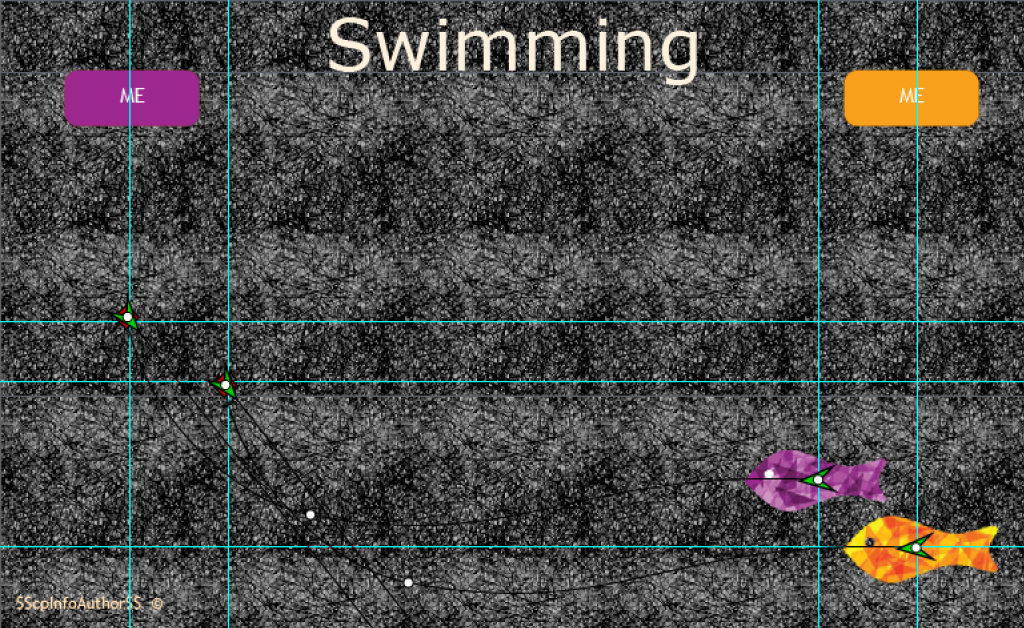
This movie has 4 slides, the third slide shows the toggle buttons. Try them out, there are two instances of the shape button that toggles the visibility of an image or a group. They use a different user variable. Beware: images do overlap on the slide. The other shape buttons are muting/playing audio, showing/hiding Closed Captioning, Table of Content and Playbar. I choose shape buttons over normal buttons because they offer more freedom for styling the InBuilt states. To navigate to the last slide you have to 'toggle' on either the playbar or the TOC for navigation.

Concept 

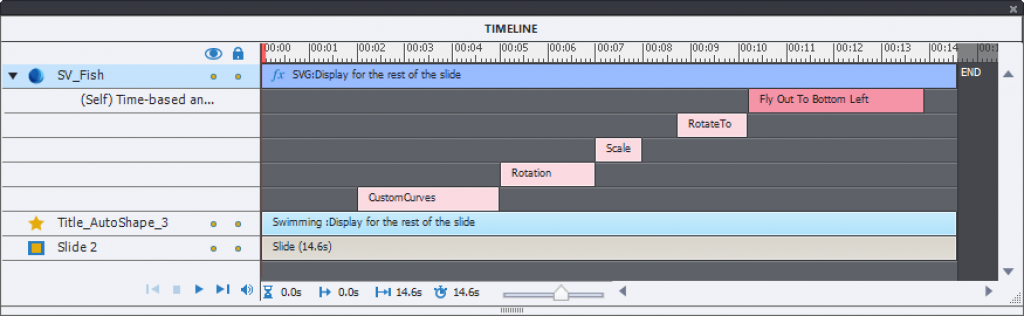
All toggle buttons have in common to be associated with a variable that can be toggled by the developer: I'm talking about Boolean variables, which can have only two logical values '0' (False/No) or '1' (True/Yes). Both system and user variables are possible. On this screenshot you see the Timeline with the 6 shape buttons, labeled to identify their functionality (SB is my indication for Shape Buttons):

Variables

The associated variables are in the same sequence as on the timeline, from top to bottom:

  • v_visgrp (user variable with Default value = 0) for SB_visib_group

  • v_visib (user variable with Default value = 0) for SB_visib

  • cpCmndShowPlaybar (system variable with Default value = 1) for SB_Playbar

  • cpCmndTOCVisible (system variable with Default value = 0) for SB_TOC

  • cpCmndCC (system variable with Default value = 0) for SB_CC

  • cpCmndMute (system variable with Default value = 0) for SB_Audio

This list shows that one of the system variables doesn't have '0' as default value, cpCmndShowPlaybar. Solution for this discrepancy can be found in switching the states for the associate button, or in switching the variable itself to '0', thus hiding the Playbar. I used the second scenario: with the On Enter action for the third slide I did Hide the Playbar, which toggles cpCmndShowPlaybar to 0

The shared action can be used for any button with such a, associated Boolean variable, system or user variable. Some examples are shown in the last slide of the example movie: cpLockTOC or a user variable to toggle an audio object.

States

The shape buttons have three InBuilt states: Normal, Rollover and Down. For each button I added one custom state. That state will change the shape button to show the 'OFF' state, and if necessary additional objects are added in this state. In this screenshot you see the 4 states for the shape button SB_Audio:

This shape button has a SVG added in each state. At this moment SVG cannot be used as a Fill image for a shape button (maybe in a next version?), they are separate objects. For some states I also changed the style of the shape itself (Fill):

  1. Normal: has a SVG indicating you can mute  audio (since cpCmndMute has a default value of 0, which means that audio is playing)
  2. Rollover: Speaker only (SVG), Fill different
  3. Down: Speaker only (SVG), Fill different
  4. AudioOn: has a SVG indication to play audio; this will be the state that is visible when audio is muted, cpCmndMute = 1.

The buttons SB_TOC, SB_CC and SB_Playbar have a similar setup: for the InBuilt states text was inserted in the shape. The custom fourth state adds two line objects (cross) over a duplicate of the Normal state. Look at the screenshot for the SB_Playbar:

Both instances of the Visibility toggle button use SVG's to change the style of the shape button (similar to SB_Audio), but they add other objects for the 4th custom state as you can see here:

Shared Action

The action has to be conditional, checking the value of the Boolean variable. Only two commands are needed, both in Then and Else part: to change the state of the shape button itself and to toggle the variable. Toggling the variable between 0 and 1 will switch the functionality between On and Off. If you write this out as an advanced action, in this case for the Audio button, it would look like this:
When creating a shared action, it is important to identify the parameters. Compulsory parameters in this action are:
  1. the button itself (SB_Audio in the screenshot above)
  2. the state 'Normal' which is used and
  3. the state 'AudioOn' which is used as well

Candidate parameters are:

  1. The variable cpCmndMute: it has to be a parameter, because we need other Boolean variables for the other buttons
  2. Literal '1': because I choose the 4 th state (custom) for each button with this action in mind, it is not necessary to define this literal as a parameter

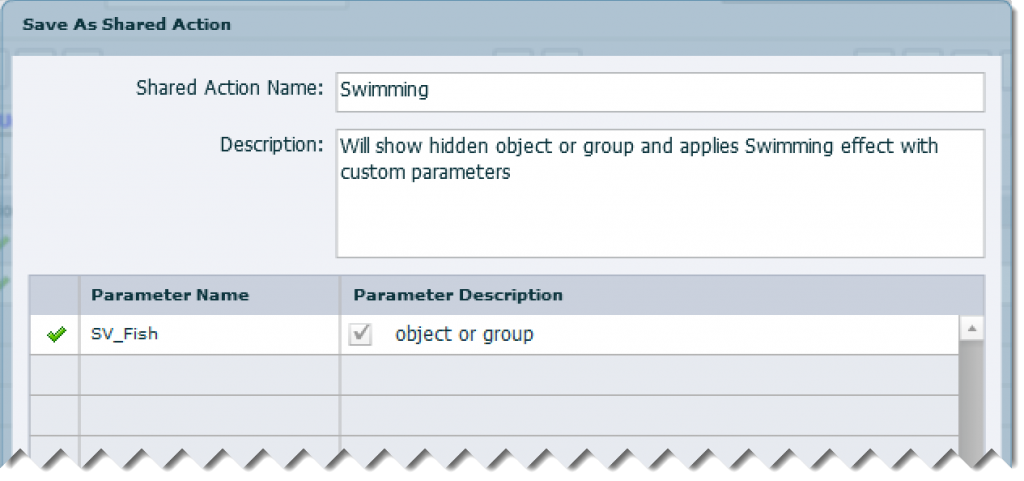
This leads to the definition of the shared action with 4 parameters, the compulsory and one candidate parameter. In this last screenshot you see the parameters with their values for another button, SB_Playbar. Watch the description of the parameters.

Conclusion

In many situations using a Captivate playbar is not a good choice, and with states, one single shared action from your script library it is now really simple to create not only Next and Back buttons, but also every other toggle button needed on the course slides. If using shape buttons (as was the case here) you can put them on the first slide of the course, time them for the rest of the project. They will have each a unique ID, which allows you to take control of those shape buttons, to hide them when they are not needed on some slides. Good luck!


Matchstick Game - shared actions

Update: new version of this game, with HTML5 output and using images as buttons to be found under this link


Intro

This post is inspired by a question on the Captivate forum, have a look at this thread: 'Advanced actions for a Matchstick Game'. After reading the question, I accepted the challenge. Some advanced actions are used, mostly to reset the game, but the two 
most important actions are shared actions. It is also a good example for a lot of tips I have offered in this blog:
  • Setup of a labeling system that makes it easier to choose parameters when applying a shared action.
  • Sequence of statements and decisions in a conditional action is very important because Captivate will always evaluate each statement and decision in sequence.
  • Choice of optional parameters for a shared action.
  • Using On Enter Slide events to reset variables and objects.
  • Using groups to simplify advanced/shared actions.

Game - rules

You can play the game:
  • goal is to create a word from the initial set of matchsticks by removing some of them;
  • clicking on a matchstick will remove it and a ghost image will appear instead of the original matchstick
  • you can reset the matchstick by clicking on the ghost image
  • maximum number to be removed is 6; you will be warned when you reach that number
  • you can try to remove a seventh matchstick, but I consider that as cheating :)
  • you have a Restart button

Objects - Labeling

The game is on one slide after the intro-slide. This is the Timeline panel:

From bottom to top you see:

  1. Gr_Match: group with the images of the matchsticks. For labeling I divided them in 3 groups. I_MS_11 is the most left matchstick of the first group, I_MS_22 is the upper matchstick of the second group, I_MS_35 is the bottom one in the third group, etc. Those numbers will also be in the names of the Outlines, the Click boxes and the associated variables. This group is initially visible.

  2. Gr_Outline: group with the grey ghost images (outlines). Same labeling discipline: I_OL_11, I_OL_22, I_OL_35,...This group is initially invisible

  3. Gr_Txt: which is expanded on the screenshot has the three messages that are used in the game. This group is initially invisible.

  4. Gr_CB: group with click boxes over the matchstick images+outlines. They follow same labeling system: CB_11, CB_22, CB_35...

  5. Bt_Restart:  the button to restart, reset everything

  6. Tx_Task: the title

  7. Tx_Rules: the explanation

Variables

To track the status of each matchstick, I created a boolean variable with initial value of 0 for each of them. Labeling is similar to those for the images, outlines and click boxes: 

  • v_11, v_12, v_13, v_14, v_15   for the first group

  • v_21, v_22, v_23, v_24, v_25   for the second group

  • v_31, v_32, v_33, v_34, v_35   for the first group

Three extra variables were needed:

  • v_moves: will track the number of removed matchsticks

  • v_correct: will track the number of correctly removed matchsticks

  • v_visit: needed to track if the intro slide is visited for the first time; a jump to that slide is used in an advanced action to reset the game

Actions

Advanced actions

I will not explain the simple and the 2 advanced actions, article would be too long. In a planned cookbook for shared actions I will explain everything in depth:
  • EnterIntro: conditional advanced action with two decisions that is triggered by the On Enter Slide event for the first slide 'Intro'. It will check the value of the variable v_visit and jump to the second 'Game' slide if it is not a first visit. 

  • ResetGame: a standard advanced action is triggered by the Restart button Success event, and by the On Enter Slide event for the second slide 'Game'. It will reset all the variables and restore the initial view of this slide (no outlines, only images).

  • Simple action 'Go to Previous Slide' is triggered by the On Exit event of the second slide 'Game'.

Shared Actions

Two shared actions are used:
  1. MatchStickNOK: to be triggered by a click box over a matchstick that should NOT be removed. This shared action is used  9 times. It is a conditional action with 3 decisions: 'Doing', 'Checking' and 'Cheating'. In the screenshot you'll see this action, with as an example parameters are set to the '11' matchstick. That is a matchstick that should in this case trigger the second shared action.
    This shared action has 6 parameters. The only optional parameter is highlighted in this screenshot, it is the tracking variable v_x associated with the matchstick. No need to define the other variables (v_moves, v_correct) nor the literals as a parameter.


  2. MatchStickOK: to be triggered by a click box over a matchstick that should be removed. This shared action is used 6 times in this particular example. The first three decisions 'Doing', 'Checking', 'Cheating' are pretty much the same as for the previous shared action, with one exception: increment or decrement for the variable v_correct. This shared action has a fourth decision 'End' that will display a Success message if all correct matchsticks are removed. Since this can only happen when the user removes a correct matchstick, this decision was superfluous for MatchStickNOK action. The sequence of decisions is very important: the condition 'IF v_moves is equal to 6' (decision 'Checking') will also be True if 6 correct matchsticks have been removed, but the commands in 'End' will override those of 'Checking' because of the sequence. There are two screenshots here:

    This shared actions has 7 parameters since the Success Message has to be added. Only optional parameter that was upgraded to a real parameter is again v_x, the tracking variable associated with the matchstick.


Enhancements

I hear you! How will it be possible to use those shared actions for a Matchstick Game with another setup? I have some ideas, what about you? Please post your suggestions in a comment.


Force first view - Captivate 8

Update: if you are on a more recent version, please check out this article:

Forcing First View with micro-navigation (shared action)

Intro

As a former college professor I don't like to push students/trainees to watch everything in an eLearning course. After all, you can watch without really seeing as well, that doesn't prove anything about the real 'learning' process. Apparently not everyone agrees with my personal opinion and again a question popped up on the Captivate forums in this thread: Force navigation upon FIRST view....

Problem

The course was totally linear, which is a requirement for the simple work flow I will propose here. To force the student the first time to have the slide played totally before being able to continue is simple: use a custom Next button, timed at the end of each slide, do not use a playbar but a TOC for navigation to previous slides. And set up the TOC settings to allow navigation only to already visited slides.
To improve the user experience, when he is coming back to an already visited slide, the Next button should appear from the start of the slide. That way he can skip part of the slide if wanted. The easiest way to solve that problem is by using an extra, replacement Next button. Because timing from start till end of a slide is the same for all slides, this can be a shape button put on the first slide that is timed for the rest of the project, always on top. It is not possible to use a shape button on the main master slide because such a button has no ID, which means it cannot be controlled, shown/hidden which is necessary for our use case.
The initial buttons can also be shape buttons and for a seamless user experience I'd recommend to use the same look for both the initial and the replacement Next button. However those initial buttons need to be individual buttons on each slides because not all slides will have the same duration, especially when they have VO attached as slide audio.

Example movie

Watch this movie to check the solution. To make the switch between the initial Next buttons and the replacement Next button clear I used a different style. Moreover I inserted a text container with two variables: the system variable cpInfoCurrentFrame and a user variable v_frames (see later) that are used to solve the problem. To navigate back to already visited slides, open the TOC with the red curved arrow top left. The TOC close button has a similar look. Refresh the browser to start the movie again. I didn't check AutoPlay, you'll have to click on the (ugly) arrow in the middle of the slide.


Events and Variables

I created one user variable: v_frames. The system variable cpInfoCurrentFrame will be used as well.
This variable will be used to store the current frame number when the user clicks on an initial Next button. Example: on the first slide the initialNext button Bt_One will appear at 5 secs and pause at 5.5 secs. When you click that button, you'll see that on the second slide the variable has the value '166' which is about the frame number of 5.5 secs at a speed of 30FPS. It is never totally exact (should be 5.5*30 which is 165, but index starts at 0, the exact number should be 164). But for the purpose it will be used, this is OK.

The used events are:
  1. Success event for the initial Next buttons: rBt_One, Bt_Two, Bt_Three, Bt_Four. I don't need a Next button on the last, fifth slide. Those button will trigger the same advanced action NextAction:
  2. On Enter event of slides 1-4 will trigger a shared action Show_Next:
  3. Success event for the replacement Next Shape button SB_Next executes a simple action: "Go to Next Slide"
  4. On Enter event of slide 5 (last slide) will trigger a simple action: "Hide SB_Next"

Advanced/Shared Actions

Advanced Action "NextAction"

This action, triggered by the initial next buttons on each slide except the last slide, has only two statements:
The frame number of the pausing point (which is where the action is executed by design) will be stored in the user variable v_frames. Then the Go to Next Slide command is done. 
Why did I prefer to use an advanced action over my favorite shared action? I don't need to change this action when applying to another button. You could create a shared action if you expect this action to be used in other projects because it is easier to transfer them using the library. In that case the shared action will not need any parameters. When you transfer it to another project, the user variable v_frames will be created automatically. That is certainly an advantage!

Shared Action "Show_Next"

This is the action that does the trick! It is a conditional action: 
When a user enters a slide for the first time, the frame number of the first slide frame will be greater than the frame number stored in the user variable v_frames. That user variable has in that case the frame number of the Next button pausing point that was on the previous slide. But if the user comes back to this slide, v_frames will store a frame number of a similar Next button pausing point on a later slide. In that case the condition in this shared action will be correct, v_frames will be greater than the cpInfoCurrentFrame. The appropriate button is shown or hidden. It is necessary, for an unknown reason (was not the case in CP6, when I blogged about toggle buttons), you also have to enable/disable as well. This is probably due to the buttons being in exactly the same location, but it was not necessary in a previous version. 
I defined only two parameters in this shared action:
It is not necessary to define the user variable v_frames as a parameter because it is always reused. It is a pity that objects have always to be a parameter, because in this particular case it would have saved some time to be able to deselect SB_Next (the replacement Next button, timed for the rest of the project) as a parameter. Maybe in a future version? Some will prefer advanced actions and duplicates to be edited for each button but remember: multiple instances of a shared action do not increase the file size, whereas multiple duplicates of an advanced action do increase file size. And I like the presence of the shared actions in the Library, and easy way to use them in other projects.

Conclusion

I love to solve this kind of problems, trying to find an easy solution that can be reused over and over again. If you ever are stuck with such a problem, please contact me. I am available as a freelance consultant, and having taught for many years in college, be sure to get some training on top.