Themes are Time savers. What is NEW in 11.5?

Intro

The most recent update to CP2019, version 11.5.0.476 is packed with several enhancements to Themes. The components of a theme, as I described in this post are still the same: theme colors palette, object styles, master slides, skin, Recording defaults. The possibility to use multiple themes in one project is probably the most eye catching enhancement. Even minor changes are very useful, will try to explain them in this post.

Themes thumbnails dialog box

In older versions this dialog box had thumbnails of the available themes in the Layouts folder (and you could browse for themes in other locations). The active theme – which always had to be unique – was highlighted with name and resolution visible. The default theme was marked by a check mark.

In 11.5 this dialog box has two parts, separated by a horizontal line. The next screenshot, and indicated explanation  is valid for projects with one theme, not with multiple themes:

The top part shows the active theme, as usual with name and resolution. For a responsive project it is the resolution for the primary view (desktop).

The bottom part shows more available themes, and you can use the Browse hyperlink to search (custom) themes which may be stored on your system. Themes show name and resolution when hovering over the thumbnail. The default theme is still recognizable at its check mark. You see above that I have set the Blank theme as default theme).

To apply another theme to the project, select the new theme from the bottom part (or browse to it) and accept the warning. All slides will be converted to the new theme, which will replace the old theme in the top part. This workflow has not changed, but you’ll see below that this changes for projects with multiple themes.

Totally NEW is the button ‘Theme Properties’, replacing the former ‘Theme Colors’. You’ll read about this new panel in next point.

Themes Properties panel

Clicking the Theme Properties panel, will open this new panel, which shows you (for a one-theme project) the Fonts used in this theme (new) and the Color palette used:

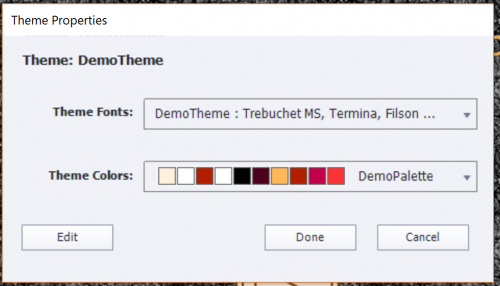
Fonts may not be totally visible the panel cannot be resized (which is the pity). But clicking the Edit button at the bottom will show you all used fonts and colors, ready for editing.

A new functionality, which can save you many working hours: it is now very easy to replace one of the used fonts by another font. I always recommend to avoid using system fonts, use only websafe fonts or Adobe (formerly Typekit) fonts. That way you’ll be sure that all learners will see the font you had in mind, even when using dynamic text (includes variables) or creating a Fluid Boxes project. In older versions, replacing a font was very cumbersome, because you had to screen all object styles in the Object style manager which included characters, and change them one by one ( see Manage the Object Style Manager ). In this editing panel you cannot see however the Usage of the fonts (feature request) but it is already a big enhancement!

As I mentioned in my first review of version 11.5, the colors in the palette have now simple numbered names. The older names (Title, Subtitle, …) were confusing because they were rarely used for those objects. Editing colors in the color palette is the same as in previous versions.

Theme in Slide Properties

Less important for a course with only one theme, but the Slide Properties have an indicator of the used theme for that slide:

Theme fonts in dropdown list PI

When you are in edit mode for text containers (captions or shapes), the dropdown list for fonts will show at the top a group 'Theme fonts', which is new. The following group are the Adobe fonts (formerly Typekit fonts) if you have licensed some. The third group is the usual 'Websafe' group. You should limit font use to those groups, System fonts have to be avoided, especially if you are creating fluid boxes project. If you use system fonts, there is no guarantee that your learners will see that font, that it will be replaced by a generic font like Times New Roman or Tahoma.

 Multi-theme projects

You can insert slides using another theme than the project theme. Once inserted you’ll see in the Filmstrip an icon, showing two options Use destination Theme or
Keep Source Theme (which is the default choice). Beware: this icon only appears when a slide is inserted. When you insert another slide, the icon will disappear, in favor of the last inserted slide.

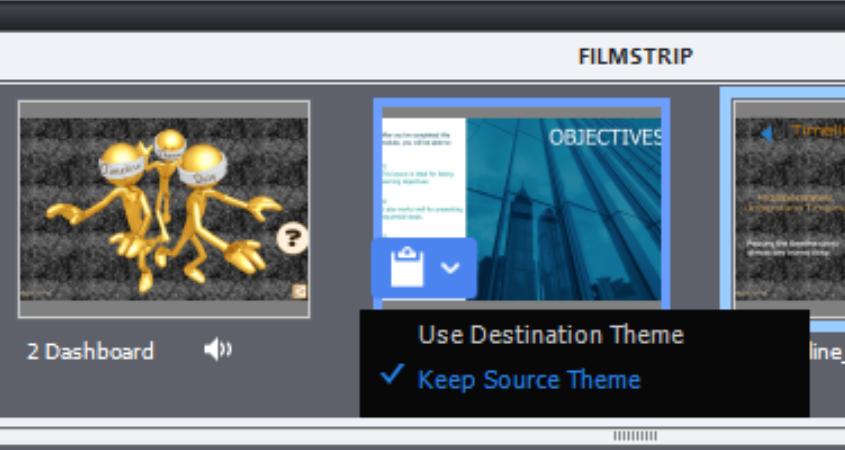
Look at this screenshot, taken after insertion of a slide with the “Earth” Theme (one of the Quick Start Project themes). You see that the first slide no longer has the icon, it was in the theme ‘Aspire’ has no longer the icon. This project has now 3 used themes: DemoTheme (my custom theme), Aspire and Earth. What is now the destination theme for the last slide? It is not the original project theme, but the theme ‘Aspire’ of the previous slide. I find this bit confusing.

You can use one of these two workflows to change the theme of a slide (where you no longer have the icon to change to the destination theme):

  • Select the slide, use the Themes button and click the theme you want as destination theme for the slide. If there is no appropriate master slide, it will be added to the destination theme.
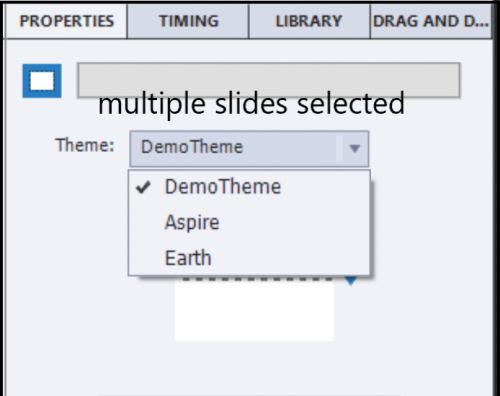
  • Select the slide, use the dropdown list in the Properties panel (see screenshot) and choose the destination theme. If there is no appropriate master slide, you will be invited to choose one of the existing master slides.

In the thumbnails under the big button Themes, all the used project themes appear in the top part. The ‘active’ theme shown is the one of the slide selected at that moment. If you select multiples slides, not all using the same theme, it is the theme of the first slide selected who will show its theme as active?

Clicking the Theme Properties panel will bring you to the properties of the active theme. If you want to see the Properties for another theme used in the project, do NOT click that theme in the top part of the thumbnails, because you would change the used theme for the active slide!. You need to leave the thumbnails dialog box, select a slide in the filmstrip with that other theme to make it active in the thumbnails, in order to be able to access its theme properties.

Master slides

In a multi-theme project, the master slide panel will show only the master slides belonging to the theme of the selected slide, not all the master slide used in the project. Just a warning: if you have both the Filmstrip and the Master slide panel open, which is only possible in the Expert UI, not in the default UI, the master slide panel will not refresh automatically if you choose a slide with another theme than the one showing at this moment. You have to leave the master slide panel and come back to force it to refresh.

If you change the theme of an inserted slide to the destination theme, and it uses a master slide which is not available in the destination theme, an extra master slide will be created. It will use the destination theme colors palette and its object styles.

If that happens, you may have to use the button ‘Reset master slide’ to enforce the use of the new object styles. It is not always happening automatically, if an extra master slide was needed.

Object Styles

Opening the Object Style Manager will show the object styles of the theme used by the selected slide. The logic is similar to the one I explained for the master slides. If an object style used in a slide (or master slide), which is not available in the theme to which you convert the slide, it will be added to that theme.

Theme fonts in PI

Same logic: the dropdown list in the Properties panel, will show the Theme fonts for the theme used by the selected slide.

Skin editor?

When i explored the skin, I found that only one skin exists. In the example I used for the screenshots, the skin designed for the custom theme ‘DemoTheme’ was always applied. Even when I have changed all the slides to another theme, or applied another theme to the whole project (where the message appears that skin is updated). Not sure what is going on, will update this post when I have more information.

I did not check out Recording defaults, last component of any theme.

Responsive Projects: Object styles

Intro

This is the last blog in a sequence of 3. In the first article I explained meaning of Object Styles when creating a custom theme, terminology and how to create a custom object style based on an example on the stage.

The second post explored in depth the Object Style Manager, for creation and management of Object Styles.

In this last article the focus is on Responsive projects: tips and tricks to keep in mind for Object Styles in a responsive theme. Since CP2017 Captivate offers two workflows for responsive projects: first is using Fluid Boxes, second older using Breakpoint Views. Tips will be specific for each of those workflows. If you want to re-read the advantages/limitations of both workflows, may I recommend reading this post. I also mention the workflow of  Rescalable HTML project as alternative for responsive projects.

Fluid Boxes project

For such a project I recommend to use real fluid boxes whenever possible. It is the only way of having a real fluid layout. If you demote (use that negative word on purpose) a Fluid box to a static fluid box to circumvent some limitations like stacking of objects, you lose the real fluidity and the layout can look very weird on smaller browser resolutions.  A static fluid box keeps the width/height ratio, and that may cripple other real fluid boxes on the slide, even when you control the exact position.

Objects not allowed in normal Fluid Boxes

What are the limitations of real fluid boxes? Many objects cannot be used. For the Object styles, that means you don’t have to bother about styling those objects. They all are in the category of the Standard objects:


  • Highlight Box cannot be used because it is meant to be stacked over the object to want to highlight. If outer fill is selected, it is covering up the rest of the slide which is breaking the stack rule..
  • Rollovers are not possible in any fluid box (not even in a static fluid box): Rollover Area, Rollover Slidelet, Slidelet.

  • Zoom object cannot be used for the same stacking rule: Zoom Source and Zoom Destination

Font size in Fluid Boxes

The font size which you define in the Object style, will be used for the highest browser resolution. In the default setup, it is indicated as Desktop (default = 1024x627px). If you have set up a higher resolution for the desktop, maybe for a 1280px wide resolution, you could prefer a slightly larger font size.

No need to bother about the other browser resolutions. After publishing fonts will decrease in size smoothly until the minimum font size is reached. At that moment the famous ‘icon’ will appear to indicating text doesn’t fit in the available text container (shape or caption). Just one tip: set the minimum font size to 10p if you expect to have learners on small browser resolutions.

Breakpoints

To have complete control over the layout in different resolutions, you need to switch to Breakpoint mode workflow, using an option in the Project menu.

Objects not allowed in Breakpoints

All objects allowed for HTML output can be used in Breakpoint mode.  When you check the HTML5 tracker under Project menu, you’ll see warnings about unsupported items like Slide transitions, Text animations. The warning also points to Rollover objects. However they will be functional on desktop/laptop screens when a trackpad or a mouse is used. On Mobile screens, the rollovers will not be functional. I would not recommend to use the Rollover slidelet because it is no longer actively supported and can be buggy.

Font size in Breakpoints

In a Breakpoint views project, the font size will not decrease smoothly when you decrease the resolution of the browser. You have to set up the font size for all the Breakpoints you want to use in your project: from 3 (minimum) to 5 (maximum). Between those breakpoints the font size will remain fixed, equal to the setup for the  higher of the two breakpoints the browser resolution is situation: you’ll keep the font size of the Desktop view until the resolution of the landscape Tablet (if you activated it) or the Portrait Tablet is reached.

It is no secret that the Adobe team is promoting the Fluid Boxes workflow over the Breakpoints (which mean more work but offer more control to the developer). For that reason, there are no real Breakpoint views themes packaged with Captivate 11 (CP2019) anymore. A responsive project will always start with a Fluid Boxes, where you can use a packaged or custom theme. When switching to Breakpoints that theme loses all fluid boxes, but the object styles for fonts are not changed: all breakpoint views keep the same font size which is the maximum font size set up for Desktop (or higher Custom size) in the Fluid Boxes.

This is a situation where I use the Object Style Manager to start with the tedious work, eventually to be edited later on while designing the master slides. The OSM will now have a dropdown list for the activated Breakpoints, whenever font size is needed. That is the case for the Captions and Shapes under Standard Objects and for most of the Quizzing Objects. Of course, you don’t have to bother about Captions if you only use shapes and vice versa. Look at this screenshot, for the Title shape, common style in most themes:

When you check the font size for the 4 Breakpoints below the Desktop, you’ll see that the size is fixed. You need to decrease the size gradually. Minimum font size is 10pt. It is a bit guessing at the start to find a good distribution between the maximum and that minimum font size (which is for Mobile Portrait). My workflow:

  • I look for the smallest used font size on Desktop, that will have to be 10pt for the Mobile Portrait.

  • Once you have chosen Mobile Portrait in the dropdown list, that resolution will remain for the other styles until you change again. Edit all mobile font sizes at once, related to that smallest size.

  • Landscape Tablet doesn’t have to be much smaller than Desktop, unless you use a really big resolution for the desktop breakpoint. So I’ll set up all the font sizes for that breakpoint.

  • etc.

Here is a check list of the objects I usually edit. Know that I never use captions, only shapes as text containers. As for the buttons, only shapes and transparent buttons (compulsory for quiz slides) are used.  They appear in the same sequence as in the OSM.

  • Buttons: I edit the style(s) for the Transparent button and for the Quiz button here (both will also appear for Buttons in the Quizzing category)
  • Text Entry Box: edit only one style which I set as default style.
  • Text Entry Box button switch to Transparent button whose default style has already been edited
  • Smart Shape: for use as text container.
  • Title: often start with 16p for the lowest breakpoint
  • Subtitle: often start with 14p for the lowest breakpoint
  • Success/Failure/Hint Shape: all need same font sizes. Beware some included themes use same style (Success), you’ll want different styles but with same font size in breakpoints.
  • Quizzing Partial Correct Shape: all other shapes use a default style which has been edited under the Standard objects.
  • Quizzing Progress indicator
  • Quizzing Review Area: is only used on the score slide to store the text about passing/failing
  • Short Answer

IMPORTANT:  Do not forget to save the theme when you have finished. Indicate clearly that it is a Breakpoint Views theme. That way you will be able to apply the theme when you have converted another project to a Breakpoint views workflow. If you change the design a lot throughout , it may be worthwhile to create a Blank project with edited font sizes for Breakpoint Views projects.

If you do use Breakpoint views because you have learners using a lot of devices and want to have a simple look for the smallest screens instead of having the same layout fluidized, please log feature requests. It should be possible to choose which workflow to prefer when creating a responsive project: Breakpoints or Fluid Boxes. Fluid Boxes should not be imposed by default  as is the case at this moment in CP2019.

Manage the Object Style Manager!


Copy/Paste Appearance, new feature in version 11.5: how does it fit with Object styles? Have a look at this post:

Copy/Paste Appearance

Intro

In a first introductory post I explained the importance of Object Styles in any Theme, the terminology and how you can create a custom style based from example object (created on a normal slide). In that article I already posted some screenshots taken from the Object Style manager, but didn’t really provide an in-depth explanation of that window.  Do you need to use it? Read this blog if you want to know the answer to that question.

Object Style Manager

You can open the OSM directly from the Welcome screen, without opening any project. The option is available under the Edit menu, or by using the shortcut key SHIFT-F7. Similar to Preferences, which can also be opened from that location (SHIFT-F8) any changes made that way to object styles are global changes, which means they will be applied to all future projects. If you open the OSM within a project, the changes will be applied only to that project. Of course, since Object Styles are part of a theme, if you save the customized theme you can applied it later to any other project as well.

There are some alternatives to open the OSM:

  • In Preferences, Defaults you can set up some General items like slide duration, color of guides … but also the default duration of a bunch of object types. You’ll get a hyperlink to the object style which is the Default style, which will open the OSM. In this screenshot you see this for the Highlight box; where the default style is the Blue Highlight box.:
  • Under Preferences, Recording you can set up the styles used during the creation of software simulations. You also find a button ‘Create new Style’ which will open the OSM.
The Object Style Manager has 2 main categories: all Quizzing objects/styles are in the second  category “Quizzing Objects”, the other objects/Styles in the first category “Standard Objects”. The triangle button is as usual meant to expand a category or a subcategory. There is one special object ‘runtime dialog box’.  Selecting an object in the top left part will show to the right to available styles for that object, and in the second half of the dialog box all the elements of the style. Down left you see a small ‘preview’ which is not always very WYSIWYG. These are the parts of the OSM dialog box. 
  1. Objects: I have selected the Quiz button ‘Submit’ in the screenshot. 

  2. Styles: a button has 4 InBuilt states, but only 3 are included in the style (Visited is missing). I selected the Normal state for the button. This is the default style, but you are free to choose one of the other styles in the list, and you could set it to be the default as well.  You can add a custom style (Clone button is highlighted in yellow) by duplicating an existing style and reformatting it. However it is not possible to have a shape button for this quiz button, because there is no original shape button style available in the style list. 

  3. Components: shows all the components of the style. In this case that is the Button type (here Transparent button, you can change to Text button or Image button), the formatting of the text (font, font size, attribute, faux attribute, color) and Fill/stroke settings for this button. If you switch to a Text or Image button, that will be a lot more limited.  The label on the button is not part of the style, you can only change it after insertion on the slide in the Properties panel.

  4. Under the Objects window you see a Preview. To be able to see it, the default Label ‘Submit’ is used here.

  5. At the bottom you find two buttons Import which allows to import styles that have been exported. The Export button has options which I expanded. The resulting file will have the extension cps.

Workflows

Creating a Custom Object Style

In the first post I explained how to create a custom style based from an example on the stage. Alternative is to create it  in the OSM, That workflow is the only way create Global styles (before opening any project).  The step-by-step workflow to create a custom Highlight Box will be used as an example. 
  • In the creation of a theme you  use only colors from the Theme Colors palette (step 1 for a custom theme). It is not possible to change the default theme, nor the color palette from the welcome screen (for global changes). That choice is missing in the Preferences. For that reason, you need to have the proper theme set as default theme, have the correct Theme Colors palette applied to it. For the example workflow here I set Windswept (packaged with CP2019) as default theme, and kept the custom Color palette linked with that theme. That color palette looks like  in this screenshot (only the main colors):
    The bright red (color 6) would be excellent as stroke color for the custom Highlight Box.

  • In the Object Style Manager, I find the object ‘Highlight Box’ in the category Standard Objects.  This object has 6 default styles. The first labeled ‘…Blue’ is set as default style, but nothing is blue :).  In some other themes this highlight box has a light blue stroke. That is not the case in the Windswept theme, because backgrounds are mostly blue: stroke is white; fill is also white but with opacity = 20%. There is no transition. 
    I expanded the style (with the triangle) and it shows two states: Normal and Rollover. For highlight boxes however the Rollover state is not functional (yet). Same styles can be used for Rollover area (and Zoom area), where a defined Rollover state will be visible. For the Highlight box we focus on the Normal state only.

  • Although I could edit this default style, I prefer to create a style with a more meaningful name. Use the Clone button to create a new style, and rename it to RedHighlight. In the screenshot see the changes. The color dialog box will always show the Theme Colors panel (highlighted first button) since we start from an existing Theme:
    Stroke width is increased to 3px, the option 'Fill Outer Area' is checked and set (visible in the Preview) to a 20% dark gray from the tints in the Theme Colors palette.

  • If you want this custom style to be used whenever a highlight box is inserted, check the option ‘Set as Default’. The Style will get marked in bold (Style box). You still have the previous 5 styles available to be used manually.

Tip: Same styles are also available for Zoom area and for Rollover Area, as well as  the new custom style, which will however not be the default style for those objects. 

Promoting style to Default style

In the screenshot Default styles are indicated by the Bold attribute. You can change that default style using the checkbox ‘Set as Default’ which was my action for the new custom style. Be sure to put the style you suppose  to use most as Default style. I often see themes where a lot of new custom styles are created, either on the stage from example, or by cloning an existing style, but the original styles are left as default styles. Themes are meant to save time, not to increase the amount of work by having to change the styles for individual objects. 

No panic needed when you forgot to save the theme under a custom name, but have edited a default packaged theme. You can always re-install the original themes from the original Gallery/Layouts folder to the duplicate folder in Public documents (Windows).

Promotion to default style can be done globally (as above) or project-based within an open project.

Cleaning up Styles

No one likes cleaning up! Sometimes the Styles list can become very long, and there is no way to rearrange its sequence (to have the most used styles on top). 

When a style is selected in the Style box, the Delete button will become active(look at the last screenshot where the RedHighlight is selected as style). Don’t hesitate to delete what you’ll never use. That may be default styles from the original theme as well (you did see how to restore the theme above).  

It is not possible to delete states (as for the Highlight box, where the Rollover state is unused), nor objects. You always have to keep at least one style for each object, and that will be the default style. If you try to delete a custom default style, you will be asked which style you’ll prefer to use as default style before the style is deleted.

When do I use OSM?

To check style components

OSM is the only place where you can see exactly what is included in an object style. That was the reason I mentioned it in my first post, and showed screenshots of different types of Objects. Remember: sometimes the Transition of an object is included, which is not to be found in the Properties panel, but in the Timing Properties panel. 

Set a global object style

One example: I don’t like the default Highlight Box style, which is too ‘bland’. The line is very thin, light blue, with an inner light fill (20% Alpha). I prefer to have a striking color, from the Theme Colors palette, wider stroke and have the outer area dimmed by another semi-transparent color of the Theme Colors palette. I always create that palette before starting with the Object Styles. You have to apply the color palette to the default theme. Before opening a project I will create this global style and set it as default style.  

Change Font for all styles

If the company has a style sheet,it will often include one or more specific fonts. There is no quick way to replace the used font in the theme (often Trebuchet in CP2019's packaged themes) by a company font. In that case I use the OSM and browse through all objects using text. Captions and Shapes do need the change, but if you only use Shapes as text containers, you can of course skip the Captions.  Some other objects use text as well: buttons, TEB’s, and quite a lot of Quizzing objects. Some styles with text will appear both under Standard Objects and Quizzing objects. 

Beware: if you use Learning Interactions, do not forget that they do not ‘obey’ to the OSM! You will have to change the fonts there as well. Some interactions offer the possibility to switch to the Theme Colors, but that is not available for other components of styles.

What is different for Responsive projects?

In a last post I will specify what is different in Responsive projects, both for object styles and the Object Style manager. Both workflows: Fluid Boxes and Breakpoint Views will be treated in that third article.

Object Styles in a Theme

Intro

A while ago I posted a blog comparing the use of a Theme for consistent design of a project, with the older Template workflow (which is buggy in the recent versions):

What's in a Theme/Template?

I always start any project by the  creation of  a custom theme, starting mostly from the Blank theme (has the minimum amount of master slides needed for a theme). More recently I offered some tips in Themes Q&A

Due to my past as civil engineer, I see a theme as the structure of a building :

  1. Theme colors palette (see Theme Colors) is the foundation. Palette is independent on type of theme: whether iit is non-responsive, responsive with fluid boxes or with breakpoint views.
  2. Object styles, the topic of this blog are the pillars (vertical structural elements). For Breakpoint views you need slightly different styles for objects containing text.
  3. Master slides are the beams (horizontal structural elements). As in a building there is a lot of interaction between beams and pillars, together they are the structure You will often going back and forth with object styles while creating the master slides. Master slides depend on type of theme.
  4. Can be considered as optional: Recording defaults and Skin, depending on the project if you need them

Now you are ready to complete the building by filling in the walls, floors…. In Captivate we call them slides.and objects.

Captivate’s Object Styles

Contrary to a word processor, Captivate has no Text styles as you know from MS Word:   a bunch of paragraph styles (includes leading, space before and after paragraph, indents, bullets….) and word/character styles. I will post a future blog about the Object Style Manager where you’ll find all object styles used in Captivate’s themes. This blog will show some screenshots taken from the OSM, because you can see what is included in each style:

  • Caption style: includes indeed the font, font size, eventually attributes (bold, italic, light), font color and leading, alignment but also the type of caption, margins within the caption, and the transition type. In the themes packaged with Captivate the caption type is mostly set to transparent, but that was not always the case in older versions and doesn’t need to be always transparent. It comes closes to what you know as text styles, but still... transition is unknown in MS Word..
  • Text Entry Box style: has the formatting of the text but also the Fill (color and transparency) and Transition setting. You cannot edit the stroke, not included.
  • Button style: is more complicated, includes formatting of 3 Inbuilt states (Visited, 4th state is not included).  In the screenshot, which shows a so-called 'Default style' (see later)  you see that when you insert a button (Interactions, Button) in these settings a Transparent button will be inserted. For each state  the text formatting of the label is defined (in case of a Text or a Transparent, button. That setting will not appear for an Image button which cannot have a label. For the transparent button , style includes also the fill (here a gradient, with full opacity), stroke (color, width and style) and the corner radius. Formatting for the two other types is much more limited.
  • Smart Shape style: the most versatile object in Captivate can be a text container, hence the text formatting similar to captions. SInce it can also be used as a button, you can define the formatting of  the same InBuilt states as for the Transparent button. The corner radius is missing  You can choose a rounded rectangle as start for a shape button, and it has a yellow handle to edit the corner radius.

Terminology

It seems useful to list up some important terms concerning Captivate's Object Styles:

Default Style: Previous screenshots showed styles set as ‘Default style’. The checkbox to mark a style as default,  is automatically dimmed in that case.  When you insert an object of that type, it will automatically be inserted with that default style. The other styles, not marked as default style, can be used but you’ll have to change them manually after inserting the object. Here is an OSM  screenshot showing the presence of 3 possible TEB styles. In a previous screenshot I had the Yellow Fill set as default style, this is one of the other styles that can be used:

Overridden Style: If you edit some formatting after inserting an object with its default or manually changed style on the stage, a + sign will precede the style name as you can see in this screenshot (I changed the transparency of the fill and the font size). This is labeled as an ‘overridden style’.

Using overridden styles is considered bad practice in any style-based application. Why? It means that if you have to make changes later on, this object will not be touched anymore. Maybe your client/boss wants to have another font for the TEB? If this is the only TEB in the course, you can find it and edit this TEB in place, thus creating an overridden style. When dealing with more TEB’s it is much easier to edit the object style itself (see later). The edited style will be applied automatically to all TEB’s in the course, exception are those with an overridden style.

Style menu in Properties panel : many sections in the Properties panel have a so-called ‘hamburger’ (or hotdog) menu button. The Styles part has such a mneu button. In this screenshot you see the style menu expanded for theTEB with the overridden style (previous screenshot). You  can choose to create a New style (if I want to keep the default style for later to be inserted TEB’s) or Save the changes to the existing style if you want all the TEB’s in this project to have this edited style. There is also a Reset Style to revert to the original style in this menu.

The option Apply this style to…. is a bit confusing for this situation. Suppose you have another TEB using the Default TEB Blue Fill Style you can use ‘Apply this Style to all objects with Style Default TEB Blue Fill, but it will be the original Yellow style that will be applied, not the overridden style. I would prefer to save first the edited Yellow style.

Creation of a Custom Style

You can create a style in the Object Style Manager, as I will explain in a later blog,  but it is easier to use the ‘from example’ workflow. Step-by-step:

  1. Have a quick look at the Object Style Manager to see what is included in the style for your object type. I showed several screenshots above. It is not always clear from the Properties panel which features are included in the style. Example: Transition is included in some styles, not visible in the Properties panel but in the Timing Properties panel.

  2. Insert an object of that type on the stage. It will be inserted with the style set as Default style.

  3. Edit the features which you detected under 1. until you have the wanted look. That is easier to verify on the stage than with the tiny Preview window in the OSM..  Do not forget the states (Normal, Rollover, Down) for interactive objects. The style field (Properties) will show the +sign to indicate the overridden default style.

  4. Open the Style menu (hamburger) and choose the option ‘Create New Style’

  5. Give the style a significant name and confirm with OK

The style will appear in the Object Style Manager. But you don’t have to use the OSM for these actions

  • Set the style as Default style: is possible from the same Style Menu. Beware: for the example of the shape button, I would not set this as the default style because all shapes would take on that style. Really hope that we can have a default shape button style which is different from the default smart shape style in a future release.

  • Apply this style for all objects with a specific style. This is a workaround I sometimes use: for shape buttons I don’t use the default smart shape style, but one of the other styles (like a hint shape style if I don’t use it in the project) as long as I am not sure about the wanted button style. When I decide to create the definite style for all shape buttons, I can use the Apply this style to replace all those ‘hint’ shape styles by the new shape button style.

This problem only exists for shape buttons. Most other object types are not used for two different goals.

If you want to include features which are not part of the style in a quick way, use the duplicate functionality (CTRL-D). It will keep not only the same style in the copy, but all features, including eventually attached advanced actions.

Third element of your theme (structure) will be the master slides. Advantage of defining object styles before the master slides is that the inserted objects on the master slides will have the new default styles. That can save time.  Just one example: if you use shape buttons on master slides, you will not be able to use 'from example' workflow to create a style for those shape buttons. Reason: the State view cannot be opened when on a master slide, and you need to set up the states. For object styles with a Transition feature, you'll not be able to define them on the master slides neither, because you miss the Timing Properties panel for them.