Color Management - Intro

Why?

Almost 5 years ago I have published some articles about the Theme Colors. From what I hear on social media, and read in most books and manuals (and in a recent webinar) there is a lot of confusion about this topic. In Captivate 11.5, which has now Quick Start Projects and the possibility for multiple themes (with their palette) in a project, this topic becomes even more important. In personalized training, my trainees will always learn that the creation of a good Theme Colors palette is the first step for a useful  custom theme. No doubt about the relevance of such a theme in a company environment, where you need to apply the style sheet of the company. However even a standalone project benefits largely from a good theme to have consistent design.

Allow me to remember some Captivate history. Before the introduction of themes as base for course design, Captivate had introduced a ‘Swatch Manager’ panel, similar to several other Adobe applications. I still see many users/trainers refer to that Manager instead of the Theme Colors palette. Personally for the past 6 years I showed that manager only to prove it is outdated, not useful in Captivate. Reason was already in the old posts : there is no link whatsoever between the Swatch manager and the Theme Colors. Even after repeated feature requests, this is still the case in version 11.5.

Creation of Color Scheme (5 colors)

To avoid confusion with Theme Colors in Captivate I prefer to use here the word ‘Color Scheme’ for the palette with 5 colors to which I refer in this part.

Classic color schemes consist of  5 colors, when you use one of the two applications provided by Adobe:

  1. Adobe Color,  a cloud-based (free) desktop application. You can open it using the CC app or with this link.  Years ago it had the name  'Adobe Kuler'. It gets regular updates, only recently that was the case. You can find inspiration in this site because lot of schemes are publicly available. Of course it is also possible to create custom schemes, either starting from one or more colors, or from an image. The schemes typically get saved to … one of your CC Libraries. For most Adobe applications that is fine but Captivate sadly has no access (yet?) to those libraries. As a workaround you could use  Captivate Draft (has access). However since the transfer from Draft to Captivate results automatically in a Fluid Boxes project, that workaround is not useful if you need to create non-responsive projects. 

    There are plenty of tutorials around for Adobe Color. Just one example: YouTube tutorial. If you have access to LinkedIn learning, you could also find courses.
    To get the scheme into a normal cptx project, you can save a color scheme as ASE file. For a reason explained later, not the ideal format for Captivate. You can make the color values visible in Color, but I miss a way to export them easily. When you open such a file in Notepad or similar, you could extract the RGB-codes but that is cumbersome. Or you can write them on a piece of paper.Hexadecimal is fine:
    For that  reason I prefer using a mobile app, around since quite a while:

  2. Adobe Capture: available for iPad and for Android (still beta, but functional). I have it installed on my iPad and my Android phone. Short tutorials included.  You have exactly the same functionality as with Adobe Color, but can also directly shoot an image as basis for your scheme. It can also be used to create shapes (SVG’s) and gradients, but I’ll leave that for another blog. Especially with the enhanced use of SVG's in 11.5, an interesting topic.

    The advantage of Capture is that you are not limited to saving the schemes to a Library, or save to ASE-file. You can export the scheme as ‘color values’ and print or send them by mail, or social media. Much more useful for Captivate. That functionality may be hidden somewhere in the desktop application, but so far couldn’t find it. You’ll get a txt file with all details of the colors, which is the ideal form for Captivate. Here a screenshot of such a file:
    Be sure: I will not explain the different ways of defining colors (although I would love to), Captivate accepts only RGB or HEX format. However,  in the Theme Colors palette I suspect that the HSB format is used to create the tints derived from the main colors.

Transfer Color Scheme into Captivate

Do NOT use Swatch Manager

If you have read my old blog post, you will know that it is possible to import an ASE-file in the Swatch Manager. Follow this workflow:

  • Clear all swatches
  • Click Append
  • Point to the ASE file.

In this screenshot you see the result of such a workflow:

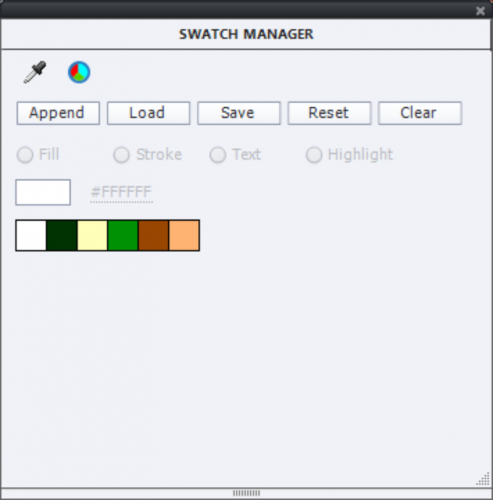
You do not need the Swatch manager, your theme will be saved with Theme Colors palette. How can you get the colors in that Theme Colors palette? Only way  is to find the color value of each of these swatches and type them in the Theme Colors editing window. Not so user friendly. This explains my present topic title: NOT to use the Swatch Manager, although I am aware that many trainers and books still mention it. Personally they could take out the Swatch manager, it is a legacy feature.

Use Color Values

Starting from the txt file you got with all the color values, open the Theme Properties panel, and go into Edit mode. To enter a color of the theme, you need 4 steps:

  1. Copy the hexadecimal value for the txt file
  2. Open a color
  3. Go to the Color wheel
  4. Paste the value

Here is a screenshot illustrating the workflow:

It is still a cumbersome workflow,. Sorry, but this is due to the fact that ASE import is impossible in the Theme Colors palettes. 

The palette has now 5 main colors, you can add 5 more. Have a good look at the existing palette: do you have enough light and dark colors to provide contrasts? Often it is a good idea to add neutral colors as black, white grey. It is not really compulsory to have/use 10 colors (+tints). In all cases if you want to switch to another palette you have to be very careful. Here I think about branding the QSP project slides.

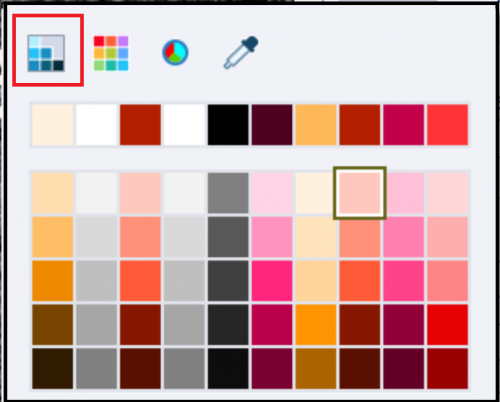
Some users/trainers recommend and use the color picker a lot. Not a good idea at all. Check it out: you will not always get the color you want when checking its value in the Color wheel. The Theme color palette is directly available (see screenshot below).

When your Theme colors palette is finished, always colors from that palette, never use the Swatch manager. It is the best guarantee to have consistent color management. Moreover, when using other Adobe applications for asset creation or editing (Photoshop, Illustrator) you can easily transfer the colors, using the ASE file or the color values. Even though you’ll use them in a Swatch panel, because that is the default workflow in that application It should be clear now that for Captivate colors are in the Theme Colors palette, not in the Swatch manager. If you open the color dialog, and the used color of the item is a Theme color, the dialog will open in its first state (highlighted in screenshot) automatically. Forget the Swatch manager (second state), the color wheel (third state) and the color picker (last state).

If you like this introduction, could write more detailed articles. Just let me know what you’d like? 

If you want make me happy, add your voice to my repeated request to make it easier to import a color scheme (from Color or Capture) to create a Theme Colors palette.

Object Styles in a Theme

Intro

A while ago I posted a blog comparing the use of a Theme for consistent design of a project, with the older Template workflow (which is buggy in the recent versions):

What's in a Theme/Template?

I always start any project by the  creation of  a custom theme, starting mostly from the Blank theme (has the minimum amount of master slides needed for a theme). More recently I offered some tips in Themes Q&A

Due to my past as civil engineer, I see a theme as the structure of a building :

  1. Theme colors palette (see Theme Colors) is the foundation. Palette is independent on type of theme: whether iit is non-responsive, responsive with fluid boxes or with breakpoint views.
  2. Object styles, the topic of this blog are the pillars (vertical structural elements). For Breakpoint views you need slightly different styles for objects containing text.
  3. Master slides are the beams (horizontal structural elements). As in a building there is a lot of interaction between beams and pillars, together they are the structure You will often going back and forth with object styles while creating the master slides. Master slides depend on type of theme.
  4. Can be considered as optional: Recording defaults and Skin, depending on the project if you need them

Now you are ready to complete the building by filling in the walls, floors…. In Captivate we call them slides.and objects.

Captivate’s Object Styles

Contrary to a word processor, Captivate has no Text styles as you know from MS Word:   a bunch of paragraph styles (includes leading, space before and after paragraph, indents, bullets….) and word/character styles. I will post a future blog about the Object Style Manager where you’ll find all object styles used in Captivate’s themes. This blog will show some screenshots taken from the OSM, because you can see what is included in each style:

  • Caption style: includes indeed the font, font size, eventually attributes (bold, italic, light), font color and leading, alignment but also the type of caption, margins within the caption, and the transition type. In the themes packaged with Captivate the caption type is mostly set to transparent, but that was not always the case in older versions and doesn’t need to be always transparent. It comes closes to what you know as text styles, but still... transition is unknown in MS Word..
  • Text Entry Box style: has the formatting of the text but also the Fill (color and transparency) and Transition setting. You cannot edit the stroke, not included.
  • Button style: is more complicated, includes formatting of 3 Inbuilt states (Visited, 4th state is not included).  In the screenshot, which shows a so-called 'Default style' (see later)  you see that when you insert a button (Interactions, Button) in these settings a Transparent button will be inserted. For each state  the text formatting of the label is defined (in case of a Text or a Transparent, button. That setting will not appear for an Image button which cannot have a label. For the transparent button , style includes also the fill (here a gradient, with full opacity), stroke (color, width and style) and the corner radius. Formatting for the two other types is much more limited.
  • Smart Shape style: the most versatile object in Captivate can be a text container, hence the text formatting similar to captions. SInce it can also be used as a button, you can define the formatting of  the same InBuilt states as for the Transparent button. The corner radius is missing  You can choose a rounded rectangle as start for a shape button, and it has a yellow handle to edit the corner radius.

Terminology

It seems useful to list up some important terms concerning Captivate's Object Styles:

Default Style: Previous screenshots showed styles set as ‘Default style’. The checkbox to mark a style as default,  is automatically dimmed in that case.  When you insert an object of that type, it will automatically be inserted with that default style. The other styles, not marked as default style, can be used but you’ll have to change them manually after inserting the object. Here is an OSM  screenshot showing the presence of 3 possible TEB styles. In a previous screenshot I had the Yellow Fill set as default style, this is one of the other styles that can be used:

Overridden Style: If you edit some formatting after inserting an object with its default or manually changed style on the stage, a + sign will precede the style name as you can see in this screenshot (I changed the transparency of the fill and the font size). This is labeled as an ‘overridden style’.

Using overridden styles is considered bad practice in any style-based application. Why? It means that if you have to make changes later on, this object will not be touched anymore. Maybe your client/boss wants to have another font for the TEB? If this is the only TEB in the course, you can find it and edit this TEB in place, thus creating an overridden style. When dealing with more TEB’s it is much easier to edit the object style itself (see later). The edited style will be applied automatically to all TEB’s in the course, exception are those with an overridden style.

Style menu in Properties panel : many sections in the Properties panel have a so-called ‘hamburger’ (or hotdog) menu button. The Styles part has such a mneu button. In this screenshot you see the style menu expanded for theTEB with the overridden style (previous screenshot). You  can choose to create a New style (if I want to keep the default style for later to be inserted TEB’s) or Save the changes to the existing style if you want all the TEB’s in this project to have this edited style. There is also a Reset Style to revert to the original style in this menu.

The option Apply this style to…. is a bit confusing for this situation. Suppose you have another TEB using the Default TEB Blue Fill Style you can use ‘Apply this Style to all objects with Style Default TEB Blue Fill, but it will be the original Yellow style that will be applied, not the overridden style. I would prefer to save first the edited Yellow style.

Creation of a Custom Style

You can create a style in the Object Style Manager, as I will explain in a later blog,  but it is easier to use the ‘from example’ workflow. Step-by-step:

  1. Have a quick look at the Object Style Manager to see what is included in the style for your object type. I showed several screenshots above. It is not always clear from the Properties panel which features are included in the style. Example: Transition is included in some styles, not visible in the Properties panel but in the Timing Properties panel.

  2. Insert an object of that type on the stage. It will be inserted with the style set as Default style.

  3. Edit the features which you detected under 1. until you have the wanted look. That is easier to verify on the stage than with the tiny Preview window in the OSM..  Do not forget the states (Normal, Rollover, Down) for interactive objects. The style field (Properties) will show the +sign to indicate the overridden default style.

  4. Open the Style menu (hamburger) and choose the option ‘Create New Style’

  5. Give the style a significant name and confirm with OK

The style will appear in the Object Style Manager. But you don’t have to use the OSM for these actions

  • Set the style as Default style: is possible from the same Style Menu. Beware: for the example of the shape button, I would not set this as the default style because all shapes would take on that style. Really hope that we can have a default shape button style which is different from the default smart shape style in a future release.

  • Apply this style for all objects with a specific style. This is a workaround I sometimes use: for shape buttons I don’t use the default smart shape style, but one of the other styles (like a hint shape style if I don’t use it in the project) as long as I am not sure about the wanted button style. When I decide to create the definite style for all shape buttons, I can use the Apply this style to replace all those ‘hint’ shape styles by the new shape button style.

This problem only exists for shape buttons. Most other object types are not used for two different goals.

If you want to include features which are not part of the style in a quick way, use the duplicate functionality (CTRL-D). It will keep not only the same style in the copy, but all features, including eventually attached advanced actions.

Third element of your theme (structure) will be the master slides. Advantage of defining object styles before the master slides is that the inserted objects on the master slides will have the new default styles. That can save time.  Just one example: if you use shape buttons on master slides, you will not be able to use 'from example' workflow to create a style for those shape buttons. Reason: the State view cannot be opened when on a master slide, and you need to set up the states. For object styles with a Transition feature, you'll not be able to define them on the master slides neither, because you miss the Timing Properties panel for them.


Tips - Learning Interactions

Intro

Captivate 8 has included several learning interactions, that are not well documented in the official Help. You'll be able to download a descriptive table at the end of this article. In the past I have been blogging quite a few times about using Widgets. And there was a similar article 'Using Captivate Widgets? Some tips'. Learning interactions is the name used by Adobe to indicate widgets that are compatible with SWF and HTML5 output, whereas the former Widgets were meant for SWF output. Some of the widgets are still available, others have been replaced by a learning interaction. Widgets can be found in the Gallery\Widgets under the installation folder of Captivate. Learning interactions can be found also in the Gallery, but you'll use them from a duplicate folder in Public Documents, which is easier to access if you don't have full administrative rights. 

In this article I'll offer some general tips. You will see an example movie, using the Radiobutton and Checkbox interactions but I will not explain in depth the advanced actions used for that example. 

Inserting Learning Interactions

There are two possible work flows:

  1. In the Big Button Bar, use the button Interactions, last option. A dialog box with thumbnails of all interactions will be opened. You'll see a badge 'New' or 'Updated' sometimes, when a new version has been pushed to your system.
  2. From the Insert menu, choose Widget and if necessary browse to the appropriate folder. I'm on Win7, you see the folder in top of the screenshot:

The second work flow is also valid for Widgets, and can be used also if you have problems with the Thumbnails dialog box not showing up. I also prefer it because scrolling through a list with names is more efficient than with the other dialog box. Which work flow you prefer, you'll see the the dialog box to edit the properties and parameters for the interaction popping up. In this screenshot you see the dialog box for a simple radiobutton interaction with 2 options (True/False). I unchecked Highlight because that puts a rectangle behind the words 'True' and 'False'. This is one of the interactions that has an associated variable, labeled v_one in this case.


Associated Variables

As you'll see in the table, several interactions have one or more associated variables. In combination with advanced/shared actions this gives you lot of possibilities for using the interactions. You can have a look at the example movie, using both the radiobutton and checkbox interaction. 
As I warned already in the article Tips about widgets, mentioned above, those variables are not created automatically because you type their name in the Properties dialog box, you have to create them in the Variables dialog box as well. The type of the variable is mentioned in the reference table that you can download from the link at the end of this article. 

Example Movie

After the title slide you'll see a slide with 3 Radiobutton interactions to create T/F questions. The Next button triggers a rather complicated conditional advanced action that covers all possible situations:
  • if the user clicks without answering any question
  • if all questions are answered with False (they are mutually exclusive)
  • if more than one answer is True

If you want to test all possibilities you'll have to refresh the browser several times.

I'm using the new possibility to control the display of the radiobuttons, they can now be cleared by controlling the variable.

On the third slide I use the Checkbox interaction, and if you choose the first option (Captivate 8.0.1) on the radiobutton slide, the first option will already be checked for you, another application of controlling the display, in this case using the same user variable for the first T/F radiobutton and the first option of the Checkbox interaction. The advanced action triggered by the Next button will navigate you to another slide, either slide 4 or 5 as you'll find out.

I added a text container with the four user variables v_one...v_four to show how they are changed in the movie.

Resizing - Refresh Widget

When using the interactions Radiobutton, Checkbox, Dropdown and Scrolling Text you'll often need to resize the interaction on the stage to make everything visible. The placeholder on the stage then can look very distorted, discover the Resize Widget button in the Properties that will appear after each resizing to have the placeholder adapt to the new size:


Customizing - Theme colors

All learning interactions can be customized, at least concerning the colors used. New in Captivate 8 is the possibility to have the Theme Colors palette applied to the interactions. I mentioned this already in the article about: Theme Colors. In the table I indicate which interactions do have that new feature. It is not the case for the Checkbox, nor the Radiobutton interaction. You can see the option in this screenshot of a Glossary interaction:


Improvements for Responsive Projects

Some interactions recently got an update to improve the user's experience when used in Responsive projects. You'll also find indication about that in the table. Whenever you see the option 'Scale Text for Responsive Projects'. On the screenshot of the Glossary interaction that option is visible.

Static versus Interactive interactions

In the former Widgets panel, which disappeared in the new UI of Captivate, you could see that widgets existed in three types: Static, Interactive and Question. Interactions have only two types: Static and Interactive. The difference is the same as for the standard objects: an interactive object (shape button, click box, button, Text Entry Box) has events that can trigger an (advanced/shared) a action and can have a score that can be added to the Quiz total. Non-interactive or static objects do not have those two features.

Most learning interactions are Static. Only the Games (with exception of the old Word Search interaction) are Interactive. Beware: although the score for some Games is stored in the associated user variable, you cannot add that score to the Quiz total. The points attributed to a Game in the Reporting section, are granted to the user in the same way as most questions in Captivate (with exception of the MCQ): black-white. If the game has been played, the user will be awarded the points, whatever the score of the game was.

Table - categories

You can download the table here. The categories are my personal choice:

  1. Interactions without variables
    1. Objects: several small interactions
    2. Display: interactions like accordion, tabs... that allow you to show a lot of info on one slide
  2. Interactions with variables: most of my favourites are here like the checkbox, dropdown, radiobutton and scrolling text
  3. Games (with or without variables)

Drag&Drop is to me also an interactive interaction, but because of its importance and different work flow it is not in this table.

Waiting for your comments :)


Captivate 8.0.1 Install? Keep your Customisation!

Intro

Today an important patch for version 8 was released, to upgrade to version 8.0.1.242. Like with the update to 7 I wonder why this is not a full 8.1 or even 8.5 because there are not only a lot of bug fixes, many features were extended and even added. Have a look at "What is new" for a summary. And Dr. Pooja Jaisingh already blogged and posted some other links: Free Update to Captivate 8. In this article  by my friend Michael Lund you'll find not only his first reflections but clear instructions about installing the patch. But none mentioned some of my favourite new features: using SHIFT to constrain an ellipse/rectangle shape to a circle/square and big improvements to color management. 

But this post is not meant as a personal summary of the new features! As an advanced user I'm used to customize Captivate of course: custom themes, custom theme color palettes, custom shapes, custom effects and... custom workspaces because I'm using Captivate 8 in Expert mode. And when following Michael's (correct!) guidelines for updating, most of those custom items will get lost. If you do not are happy with the default items, never customize, do not bother to continue reading. However, if you share my frustrations about losing precious work, maybe you could find some workarounds in this article. Some of them can also help when you have to 'clean' a tired Captivate application by killing its Preferences.

Workflow 

Before installing an update, before deleting the Preferences folder (or using the CleanPreferences files in the subfolder 'utils'):

  1. Find the custom items in these locations (I'm on Win7, will be different on Mac):

  • Workspaces in   \Users\<yourprofile>\AppData\Local\Adobe\Captivate 8.0\Workspaces   
    which means they will be refreshed because this is in the Preferences folder. Here you see the default workspaces, each defined by two files.


  • Custom Theme Color Palettes in   \Users\Public\Public Documents\Adobe\eLearning Assets\Layouts\8.0\ThemeColors
    Layouts is one of the folders you have to delete before installing a patch.


  • Custom Themes in  \Users\Public\Public Documents\Adobe\eLearning Assets\Layouts\8.0\en_US
    I will mostly not save my custom themes in this folder, but better check if you have some there. The last item in the path can of course be different if you didn't install the US English version as I did.


  • Custom Effects contrary to the themes, I like to have some custom effects in the Gallery with other effects in a subfolder Custom:
    The Gallery can have more custom items. Eventually check also the folder en_US in the installation folder. Maybe you have edited some of the files there as well.

  • Copy all the custom items to a safe place

  • Install the update, or Clean Preferences

  • Copy the custom items back to the same locations described above.

  • Of course, if you want to go back to Expert mode to be able to use the custom workspaces, you'll have to edit the Preferences again:

    Bonus

    Wondering what SFH means in this new setting:

    Success/Failure and Hint captions can now be replaced by cool shapes, also for Question slides! And it is no secret that I'm a big fan of Shapes over the older objects. Now waiting to be able to import SVG as shapes :)