Intro
You will not find in this blog post details about the basics of creating a Video Demo (cpvc-project) in Captivate, just some practical tips which could make the workflow easier.
Since I rarely use the possibility to capture from webcam along with the screen recording, you'll not find tips about that neither. Many users reported issues with webcams or cameras. Sorry you'll not find a solution for those issues neither.
Tips for Preparation
You'll need a solid 'storyboard', similar to what you need for a software simulation. My preparation always includes:
- In Preferences, Recording, Video Demo set the bitrate to 32-bit instead of 16-bit. You could also change the location of the temporary working folder if you don't have enough space in the default folder under AppData. In most cases you will want to keep the default choice for capturing the mouse tracks:

BTW this setting will also improve the quality of Full Motion Recording slides in software simulations, although it seems to be only for Video Demo. - Recording requires, similar to software sims, to see 1px/px. That can be done by editing the AdobeCaptivate.ini file, DPIAwareness setting as you are invited to:

However I prefer the alternative: lowering the screen resolution until I can set the Display Resolution to 100% and still be comfortable to manage Captivate.
Example: laptop used has a recommended screen resolution of 3840x2160px and a display resolution of 225%. To be able to work comfortable with Captivate at 100% I need to lower to HD (1920x1080)

Tips for Recording
As mentioned at the beginning, I will focus on screen recording, not webcam recording.
- Do not try to record a complete video at once, but split it up in manageable chunks. In most cases I record only a couple of minutes in one session. After recording the first part, I will use the editor to clean up, and eventually replace the audio clip (see tips about editing). Goal is to finalize the real duration of that part before adding the next recording. To add the next recording you need to move the play head to the end of the first footage and start the recording using the menu Insert, Video Recording:

Tip: If you plan to use the recording to create an interactive video later on, you can use planned bookmarks or overlay slides to choose how to split up in chunks. - It is important to record in an appropriate rhythm. For that reason I always opt to capture video and audio at the same time. In most cases the narration will define the wanted rhythm. That narration can be a 'draft' version which you'll replace later on by a proper recording (see tips about editing). Try to make the mouse movements as swift as possible, and try a narration speed convenient for a one to one talk.
Tips for Editing
The Video Demo editor has a lot of features, and editing is non-destructive. Although it is possible to do some editing in specific editing applications like Premiere Pro and Rush (see later), those applications need a published MP4-file. It is important to do use the editor before switching to those other applications.
- When previewing the video you'll often find the mouse paths too boring because they are too slow. In that case I often prefer to hide the path and use only the the marker for the mouse click itself.

- Although you can edit the audio narration clips in Audition or in Captivate, it is possible that you want to replace the 'draft' audio by a more professionally recorded version. This is possible using either the Audio menu, Import Video Narration. However, in that case you get the full audio clip. For that reason I prefer to use the Edit options in the Library on the individual audio clips of each part. That way you'll keep even the original WAV files on top of the 'edited' clips which can be new recordings. Look at this example of a video which had 7 parts. Some audio clips have been edited, others have been replaced.

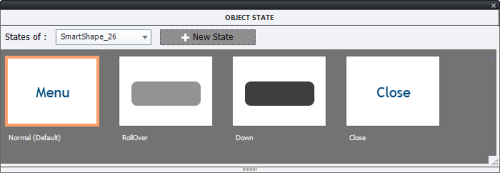
- The object styles are available in Video Demo projects. Use them to create proper styles for the static objects you want to insert: highlight boxes, shapes, captions.
- If you use text (captions or shapes) you don't have to bother about the used fonts, as in normal cptx projects. ( Fonts in Captivate). It is perfectly possible to use a cool system font.
- Careful with transitions which you'll need between the 'chunks' of your video. You can also bridge a gap between clips using a static object which can have transitions (no Effects).
Extra tips
Video Demo Slides in Software sims
Software simulations often need Full Motion Recording slides for mouse movements. Those slides are short videos, which are still based on the original SWF technology (FLV slides). Although they will be converted to MP4 when published, several developers have reported issues with the conversion. You can avoid those problems by replacing the FMR slide by Video Demo slides. The easiest way is during recording:
- When you expect a FMR slide to appear, stop the recording.
- Use the Slides button to create a Video Demo slide, the resolution will be set automatically to the chosen resolution at the start.
- After the creation of the Video Demo slide, continue with the software simulation.
Final touch with Adobe Premiere Rush
The Video Demo editor has great features for mouse management, Pan and Zoom, inserting static objects. However if you want to uplevel your video with great intro and outro, you need a real video editor. This can only be used with published MP4 footage. I used Premiere Pro in the past, but always found it rather challenging for the small improvements to the videos. Adobe launched Rush a couple of years ago, available for phones, tablets and desktop. It has exactly the amount of features needed to embellish your Video Demo projects. If you have a license to Creative Cloud, give it a try:
Interactive video
It is no secret that I am not a big fan of passive video, because due to my decades of experience with coaching/training/teaching interactivity is my first goal. A recorded Video Demo is perfect to use as Interactive Video to enhance its learning efficiency. It is not offering a big amount of interactivity but way better than passive video. Here is an example:
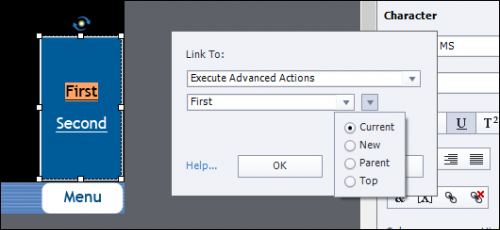
Custom Play/Pause button